Overview
Welcome to Linx!
Before you get on your way to developing powerful back-end applications there are a few concepts in Linx to familiarize yourself with.
In this tutorial, we’ll be covering some of the basic components and concepts in Linx. Following this we’ll go through a practical build of a Linx application.
Resources
Linx core concepts
A Linx application is based on the following core concepts:
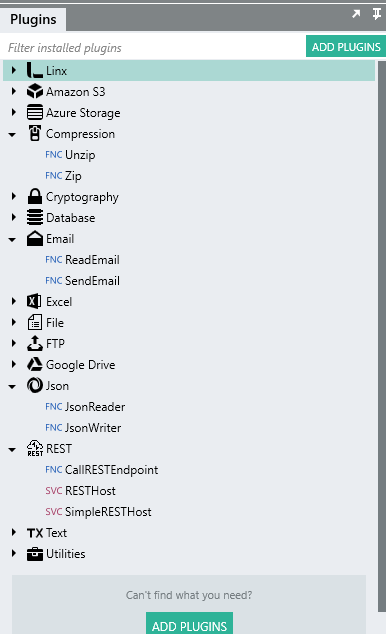
Plugins
Plugins can be thought of as code libraries containing commonly related types, functions and services which are used to build logic with. Plugins can be added to a Linx application when needed.
Types
Types can be thought of as variables in which data is stored during runtime, these are the typical data types as well as pre-built complex types. All Linx data objects must conform to a type. Outputs, return values, inputs, and decisions will all have to evaluate to a type.
Types
In Linx, you also have the ability to create your own custom types made up of these basic types and nested types. These are represented in JSON format to store and work with complex multi-level data objects.
Functions
Functions are contained in each plugin library These functions are pre-built and wrap common processing functionality to streamline use. These typically take in inputs and return output values which achieves a specific goal. These allow you to implement custom processing logic with a wide range of functionality.
User defined functions
In Linx, you are able to create your own re-usable custom user defined functions which allow you to string together logic by chaining types and pre-built plugin functions as well as custom functions together to achieve a goal.
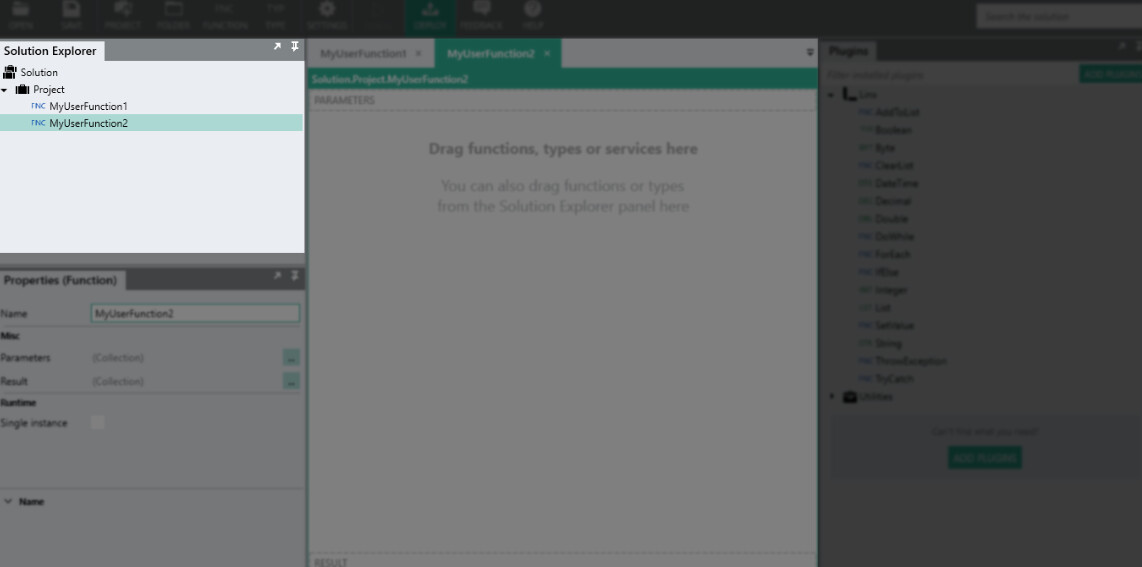
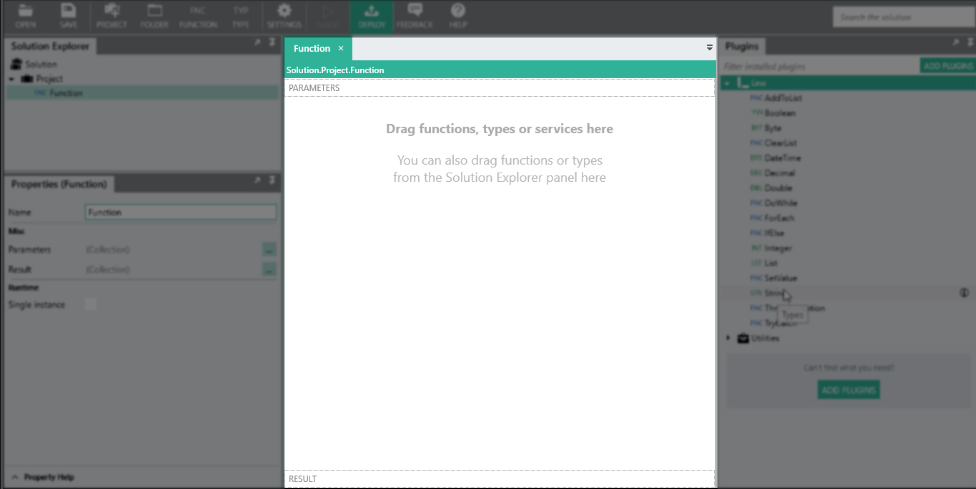
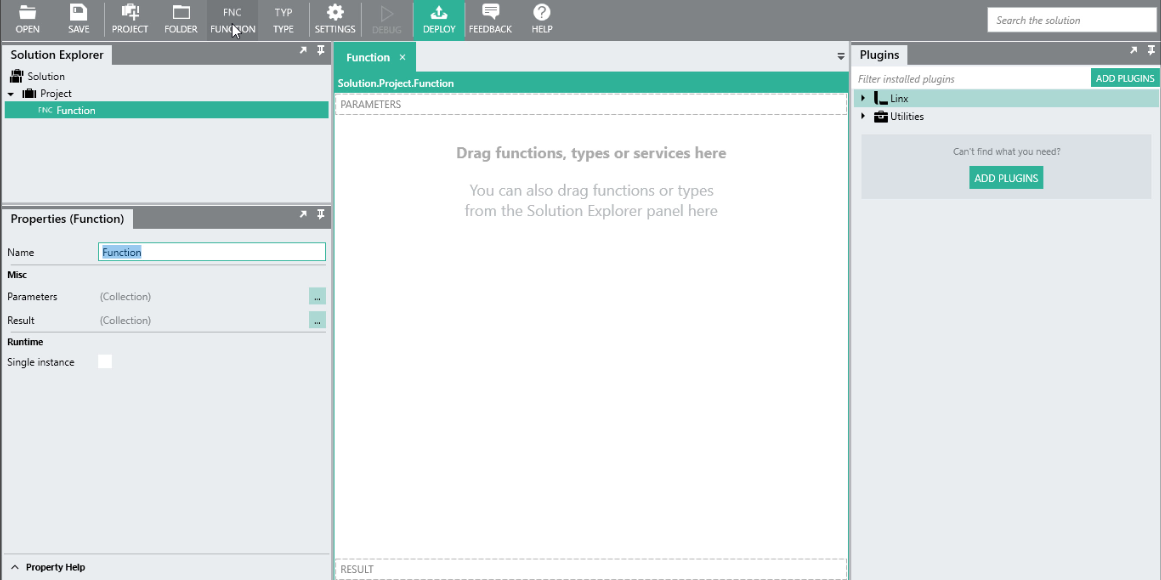
Each user defined function, service or event has a ‘canvas’ on which you add functionality to by dragging from the plugins panel onto the canvas:
The user defined functions contain all your custom logic.
Services
Services automate your application, these can be things such as a TimerSVC , DirectoryWatchSVC or SimpleRESTHostSVC .
You link user defined and pre-built function to services which will execute based on triggers.
When deployed to a Linx application cloud server, these services will run in the background and monitor for the trigger events, when an event occurs, the linked logic will be executed.
Services will be covered in a later tutorial.
Beginners tutorial 
Overview
In this tutorial we will be going over a basic introduction of the usage of the types and function in the LinxPLG.
The Linx plugin is added to a Linx application by default. The plugin contains types (TYP) and functions (FNC) that can be used programmatically to enhance and facilitate the use of other built-in functions belonging to other plugins. Functions and types in the Linx plugin are the fundamental building blocks of a Linx application. They allow you to implement customized logic, decision making and transformation of data like you would in a coding language.
The following tutorial will cover usage of the types and functions contained in the Linx plugin. As these are the building blocks of a Linx application you will need to get an understanding of these first before making use of other plugin functionality.
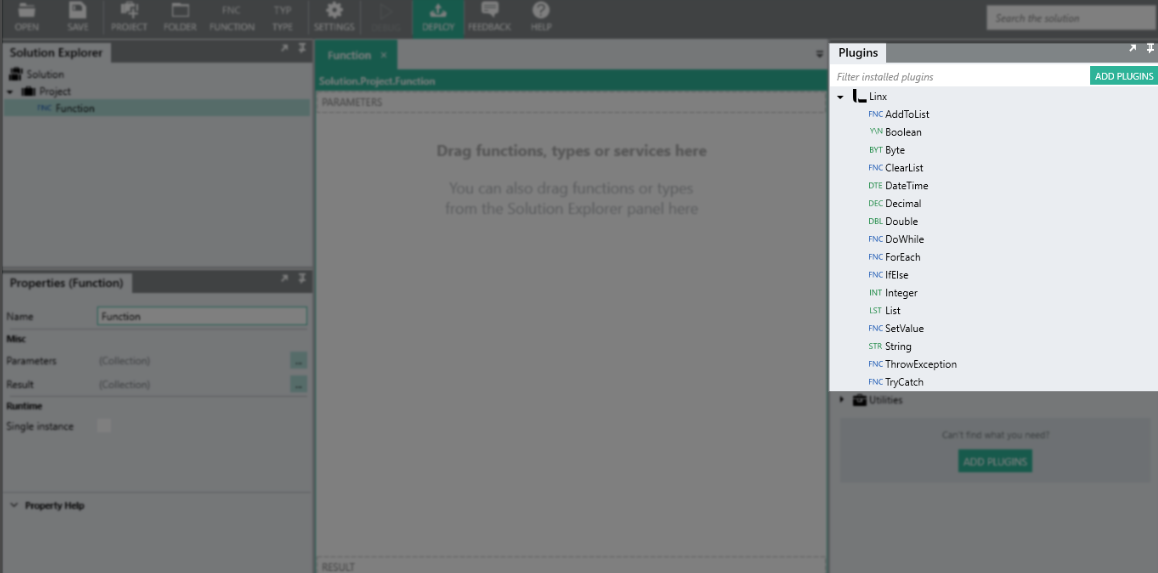
The following types are part of the Linx plugin :
The following pre-built functions are part of the Linx plugin :
Resources
Open the provided sample application in your Linx Designer to help along your learning journey:
Linx 5 Solution.lsoz (12.5 KB)
Tutorial Steps
We are going to create a basic user defined function which will contain our logic. We will then add some types to this function to store values relating to a ‘customer’. We will then perform some data manipulations using functions and expressions on these types. The function will be extended with input parameters and return results to make it re-usable. We will then explore creating a custom type to store all the separate values in one ‘customer’ object.
First we need to create a custom user defined function which can be done by clicking on the ![]() button.
button.
This will create a new instance of a function and a blank canvas for you to build logic on.
Function logic is executed in a top-down manner like in classical programming. The execution path or “control” flow of a function can split and return as well.
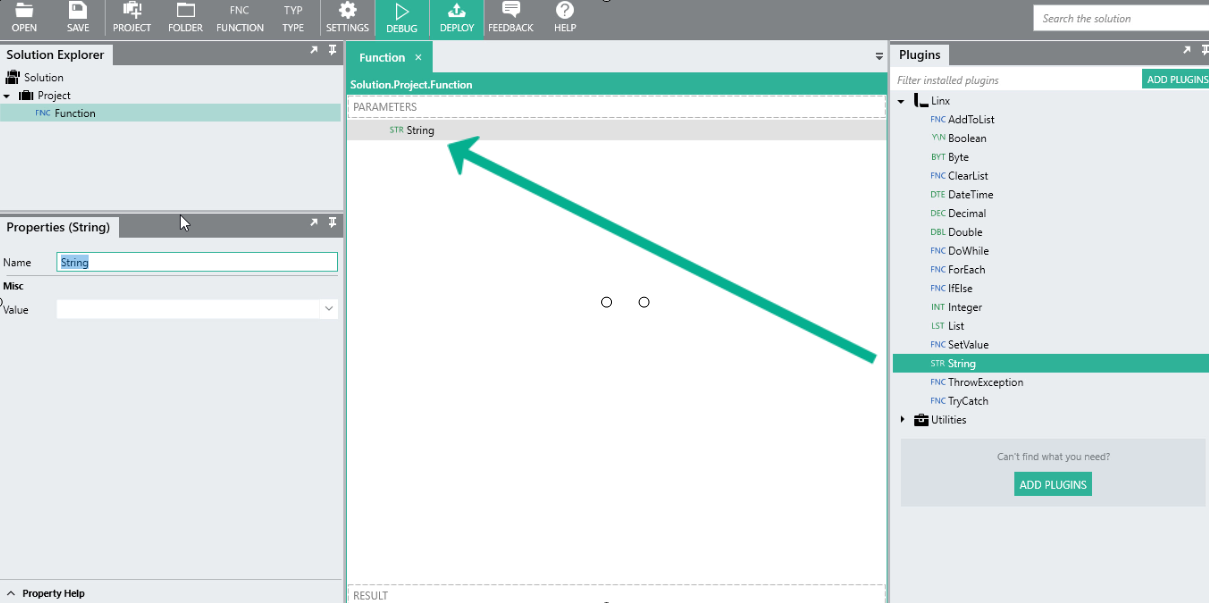
Now we can begin to add types and functions from the plugin panel to create a logical flow with.
First we are going to create two string types to store a ‘first name’ and ‘last name’ value. We will then combine them using an expression into a ‘full name’ which will be stored in another string type.
The StringTYP is used to store text or character values, these can also contain any numerics, booleans or things such as a tab, space or new line but ultimately will be stored as text.
Drag a string type onto the function canvas in the middle. This will create a new local instance of a string data type which is only available within the scope of the current function.
When a type is declared this way, it will have a default name and initial value depending on which type it is.
You can alter the name property of a type and set the initial value by setting the appropriate value in the properties panel. During runtime, you are able to alter and reference the value held in this type.
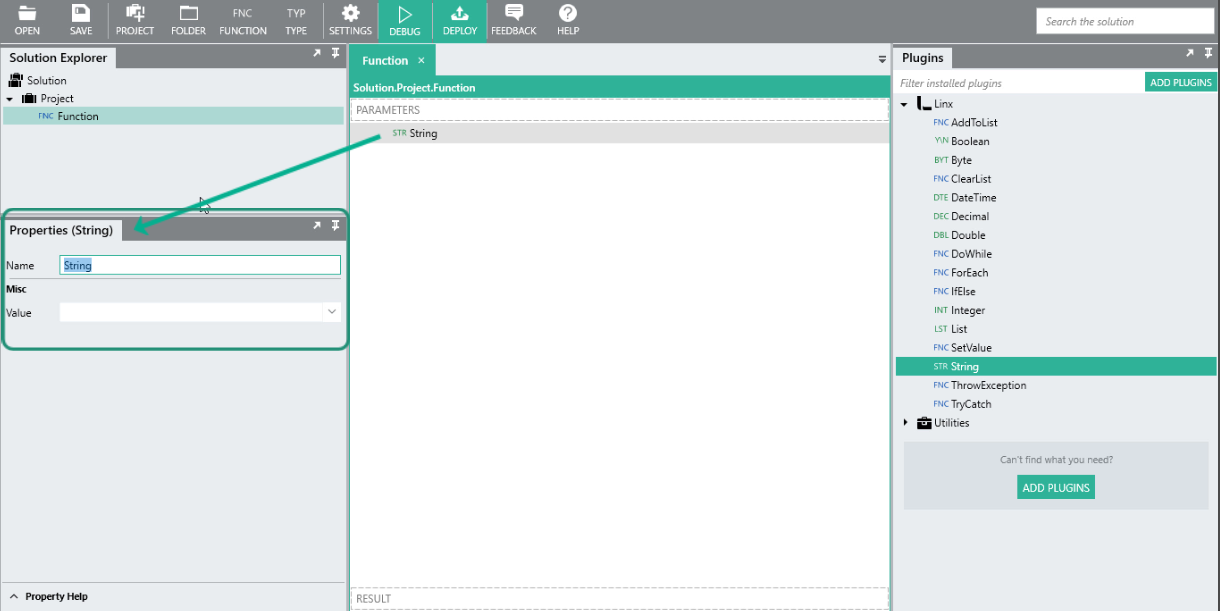
Rename the newly added string to ‘firstNameString’ and set your name as the initial value property of the firstNameString.
Next we are going to exactly the same but for a new string which will hold the value of the ‘last name’.
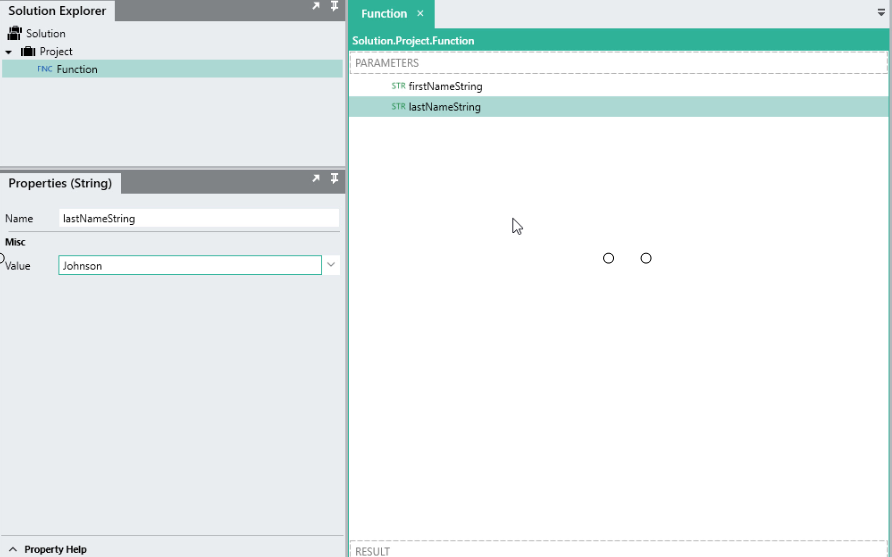
Now we are going to combine the values of firstNameString and lastNameString into a single value stored in another string type .
We can add another string type to the canvas and rename it to ‘fullNameString’. For the Value property, we are going to make use of the expression editor (EX) to build up a dynamic value with the below expression:
= firstNameString + " " + lastNameString
Expressions allow you to create dynamic algorithms that evaluate to a particular Linx data type. This allows you to modify and combine strings, perform mathematical calculations, evaluate data and make decisions, filter through items and many more. The expression editor is an extremely powerful tool that is available at every data reference.
To create an expression for a property reference, select the Expression Editor (EX) option from the drop down.

The expression editor allows you to create expressions which must always result in some kind of type depending on the object being set i.e boolean, string, decimal etc.
You are then able to use build in type methods and transform values dynamically.

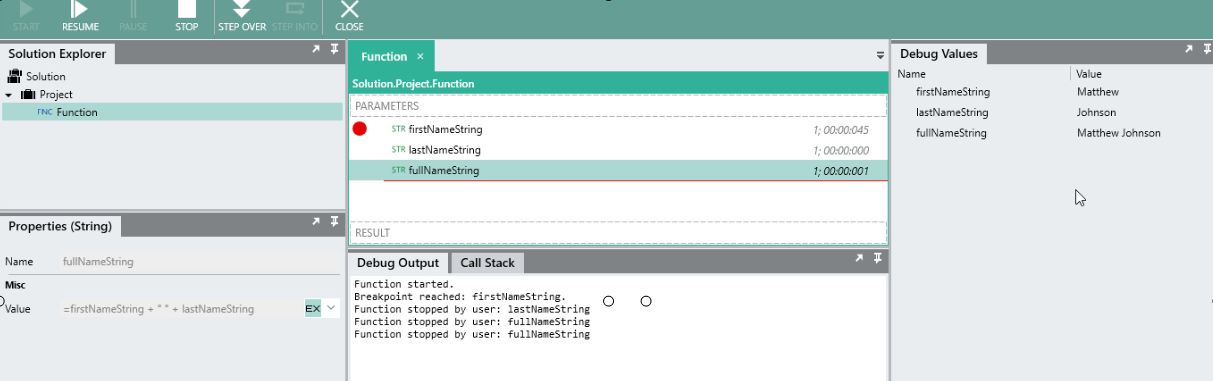
The above expression references the firstNameString and lastNameString values and combined them with a space character. At runtime the values contained in the two types will be combined into a single string and set as the value of fullNameString.
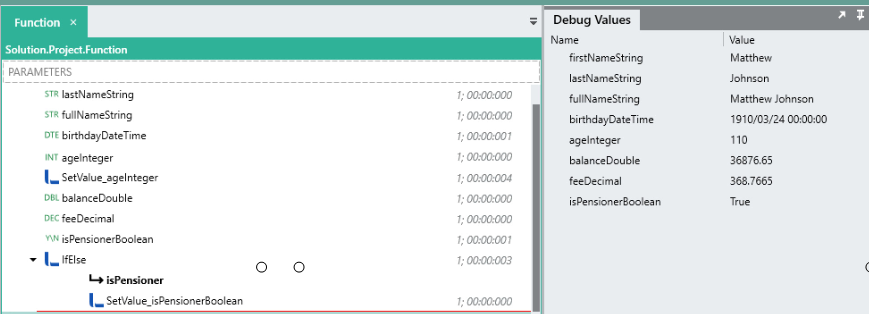
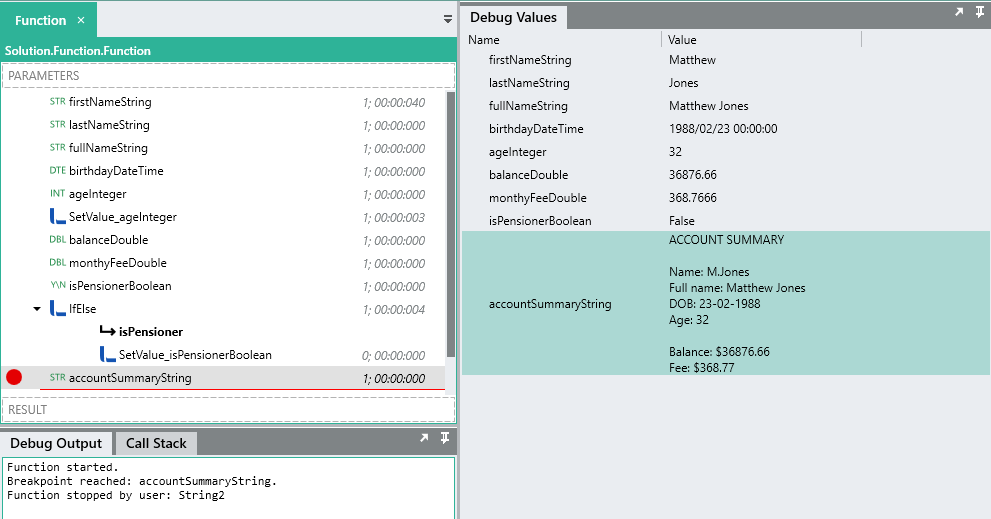
When you debug ► the function you will see the different values appear in the debug values panel as the function logic reaches them.
Now that we’ve dipped our toes into some basic type manipulations and expression use, lets use some of the other types.
The next detail that we will store about a ‘customer’ is the customer’s birthday. A DateTimeTYP stores a Date/Time value in the format of:
yyyy/MM/dd hh:mm:ss
A DateTime type can be used to store date and time related data for use with datetime manipulations. Be careful about the different accepted date formats when working with things like databases and web services.
Lets add a DateTime type to the function and rename it to 'birthdayDateTime`. Set the date to a valid date.
Next we are going to store the value of a customer’s age.
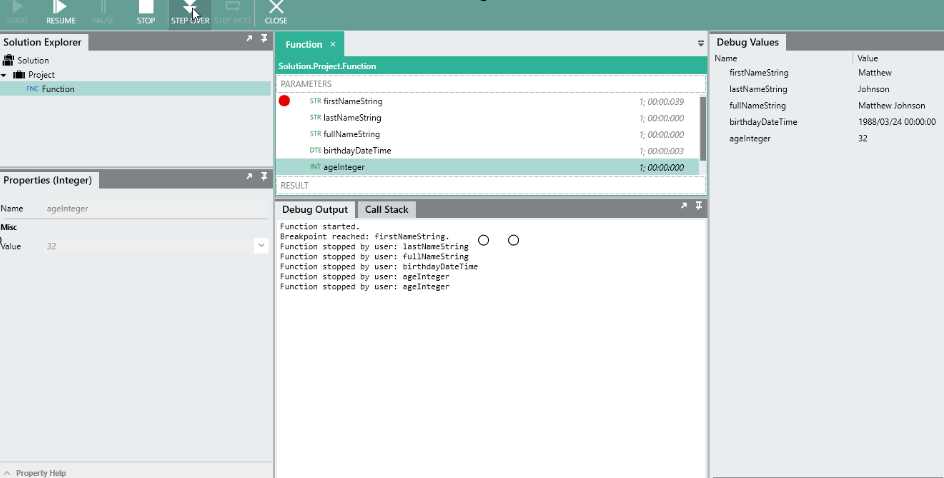
Because people’s ages are whole numbers, we can use a IntegerTYP to store the value.
An integer type is a numerical type which can store whole numbers. This is used for things such as adding to loops or counting within a functions logic.
Add an integer type to the function and give it a name of ‘ageInteger’ and then set the initial value to your current age.
32
If you debug the function, you’ll see the different run time values of all the types we’ve added to the function.
Lets add some more dynamic logic to the function. Currently, the ageInteger type is set to an initial value of some kind, however, we already have a birthday value that we can use to deduce the age by comparing it to the current date.
We are now going to alter the set the value of ageInteger after it has been initially set.
In Linx, a major function that is used all over is the SetValueFNC . This allows you, as the name says, set the value of something. The reference to set can be another type or output and can be built from expressions.
We will set it using the below expression:
=$.System.CurrentDateTime.AddYears(-birthdayDateTime.Year).AddMonths(-birthdayDateTime.Month).AddDays(-birthdayDateTime.Day).Year
The above expression takes the current time and date ($.System.CurrentDateTime) and then uses the function .AddYears(n) to substract the year value of both the datetime values. It then does the same of months and days. This leaves a date difference like below:
10/30/0032 14:18:24
We can then just grab the year value using the .Year method at the end which will be like 0032. As we are using the SetValue function to assign a value to an integer type the value will automatically be converted from 0032 to 32 which we can use as the age value.
Now we’re going to add a type to store a ‘Customer’ account balance. Due to this involving precise financial values, we can make use of a DoubleTYP .
Add a double type to the function and rename it to ‘balanceDouble’ and give it a initial value such as 36876.66 which represents an account balance.
Like all numerics, we can use a double type to calculate equations using expressions. To demonstrate we will calculate the monthly fee of the customer at 1%:
= balanceDouble * 0.01
Next we will deal with the BooleanTYP . This represents a True / False value and can only be one of the two. These can then be used in decision making logic. To demonstrate we are going to evaluate whether or not a customer is a pensioner (75 +).
Add a boolean type to the function and rename it to isPensionerBoolean.
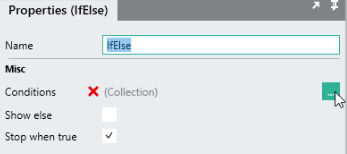
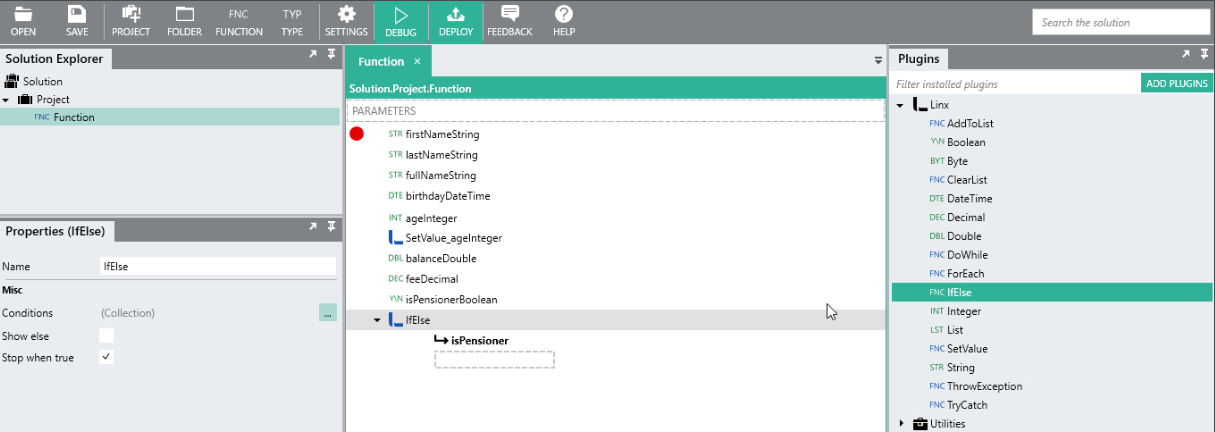
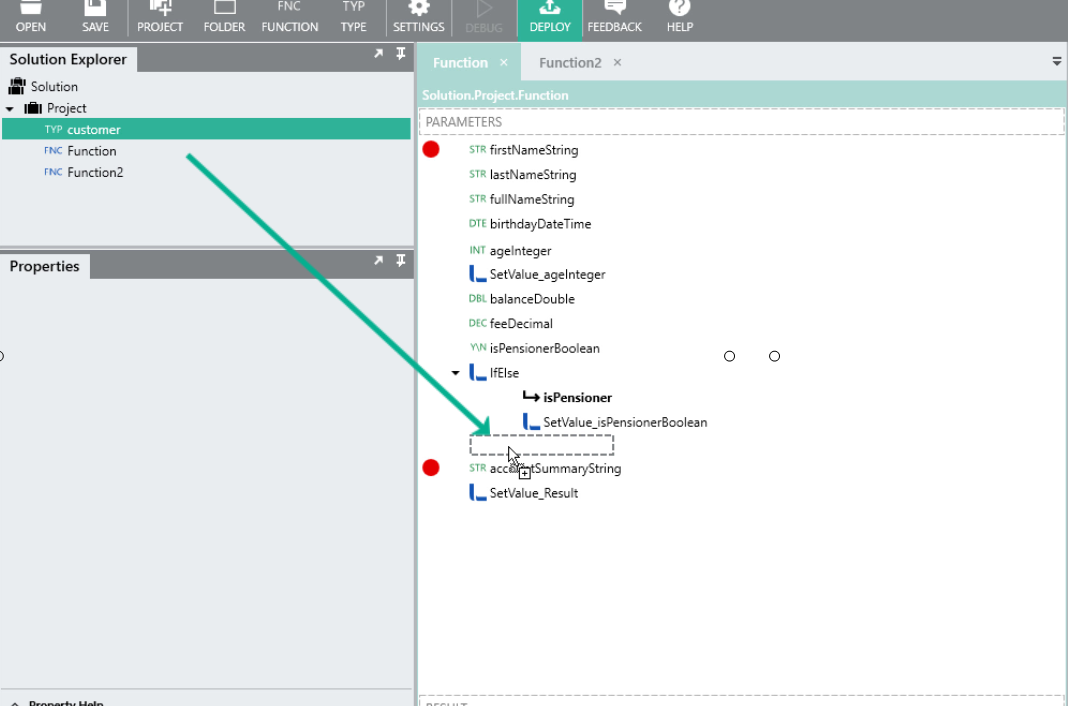
We are now going to use an IfElseFNC to perform a decision to check if our customers age is over 75.
An IfElse function allows you to diverge your control flow depending on different conditions that evaluate to a boolean value.
Add an IfElse to the function. Expand the conditions property by clicking on the […].
Create a first condition with the name of ‘isPensioner’. For the conditions value, use an expression to evaluate if the value of ageInteger is greater than 75 like below:

This will create an execution path on the canvas. Any functions or types added in this new isPensioner execution path are only available within the execution path, once the logic completes in this path, it will return to the main control flow and execute any logic below the IfElse function.
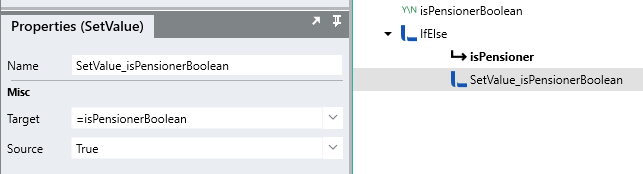
We can then use a SetValue function to alter the runtime value of isPensionerBoolean like below:
Now that we have all these types holding values of a fake customer, lets write out a fake customer account summary using all the details.
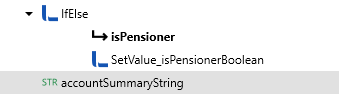
Add a new string type to the end of the function (out of the ‘isPensioner’ execution path).
We are going to build up a message like below:
ACCOUNT SUMMARY

Name: M.Jones
Full name: Matthew Jones
DOB: 23-02-1988
Age: 32

Balance: $36876.66
Fee: $368.77
With Linx, when dealing with text, you need explicitly define the formatting involved i.e. tabs and new lines.
To begin we need to create the header lines and 2 line breaks:
"ACCOUNT SUMMARY" + $.System.NewLine + $.System.NewLine
We then need to extract the first intial of the name which can be done with a .Substring()
"Name: " + firstNameString.Substring(0,1) + "." + lastNameString + $.System.NewLine
The full name is added:
"Full name: " + fullNameString + $.System.NewLine
The date of birth is added and formatted using the .ToString() method:
"DOB: " + birthdayDateTime.ToString("dd-MM-yyyy") + $.System.NewLine
The age and line breaks are added:
"Age: " + ageInteger + $.System.NewLine + $.System.NewLine
Next, the balance and fee are added and formatted into currency:
"Balance: " + balanceDouble.ToString("$0.00") + $.System.NewLine + "Fee: " + monthyFeeDouble.ToString("$0.00")
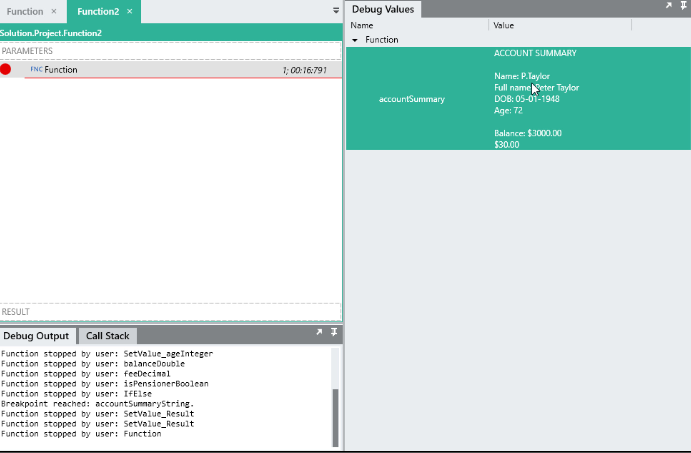
When you debug the function now, the ‘accountSummaryString’ will be built up like below:
![]() Well done! You’ve built your first user-defined function and delved into some basic types and how to work with them.
Well done! You’ve built your first user-defined function and delved into some basic types and how to work with them.
Adding input parameters to the function
In this tutorial so far, most of the values of the types in our function are hardcoded as the types’ initial values, this is just for demonstration sake. To give you a more practical understanding we’re now going to create a re-useable function that will take in a fields related to the customer as an input parameter. These input parameters will then be available to reference within the function. This function can then be called from another function or service with dynamic input values being passed in.
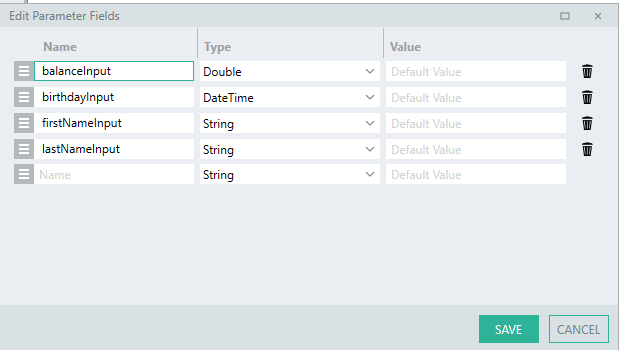
To add an input parameter to a function, select the function in the Solution Explorer and then expand its parameters property.
You are then able to define input parameters of different types.
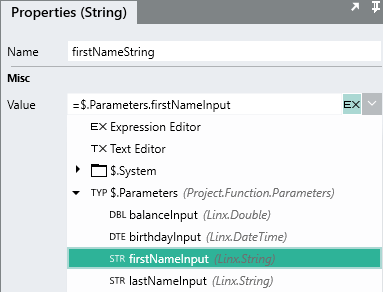
Inside the function, you are then able to reference these values which are available in the $.Parameters object.
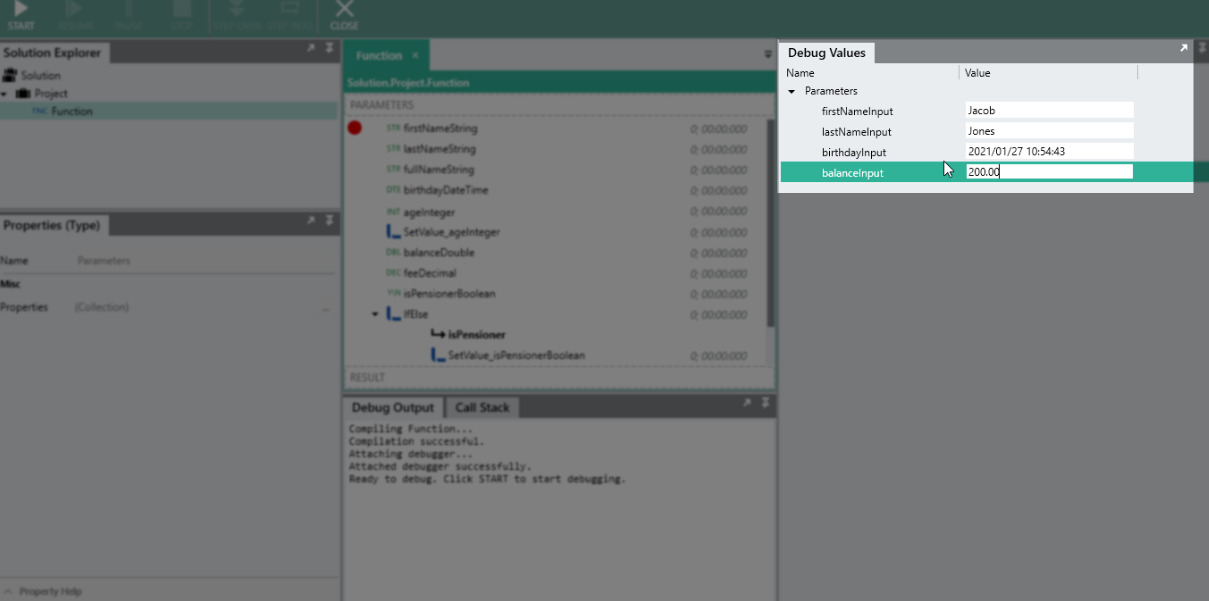
When you debug the function, you are able to add test values for these fields in the debug values panel:
When the function is called from another function, you are able to pass in values dynamically.
To add a call to another user function, simply drag the desired function from the solution explorer onto the canvas.
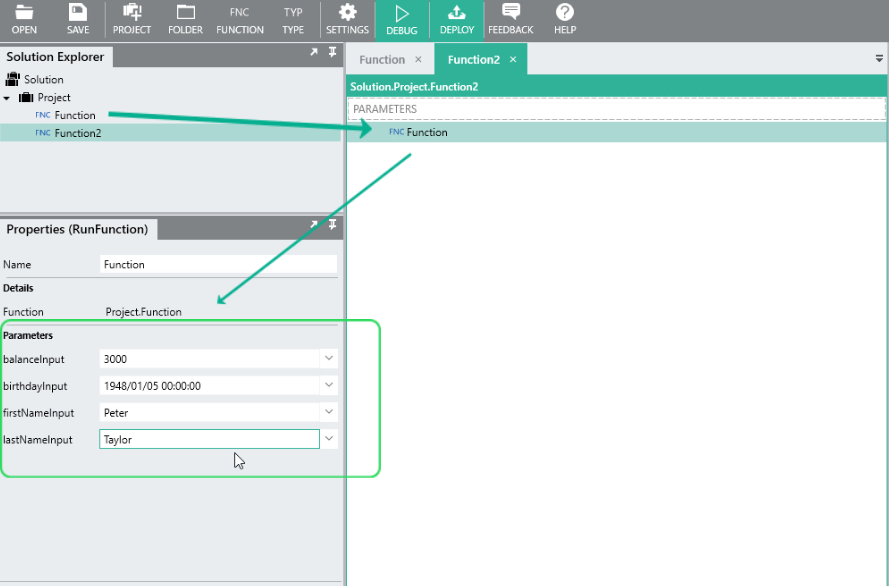
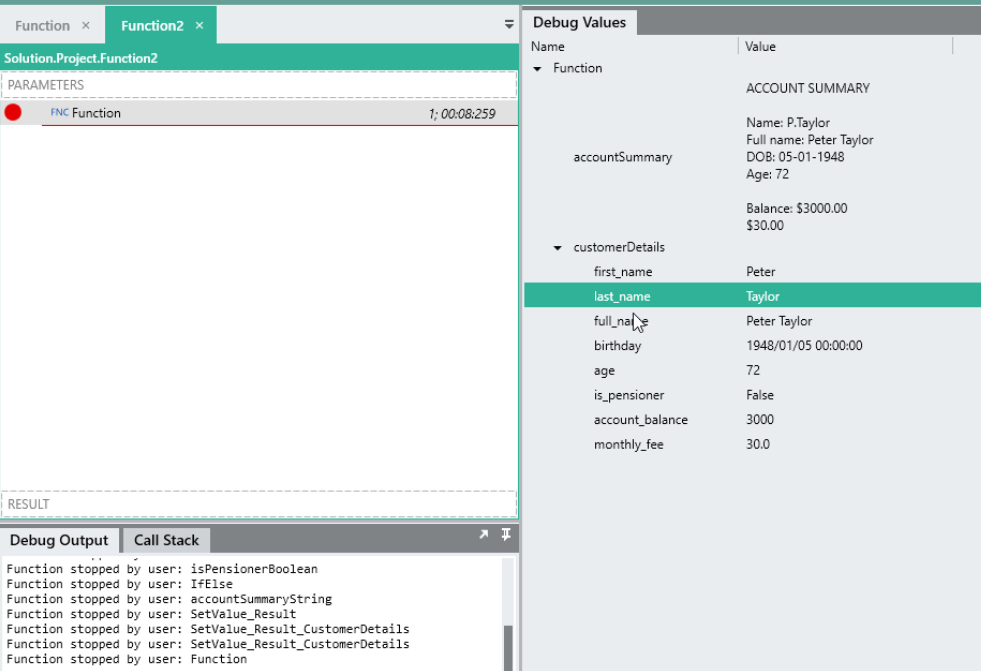
When ‘Function2’ (above) is run, a function call will be made to ‘Function’ passing in the values as input parameters.

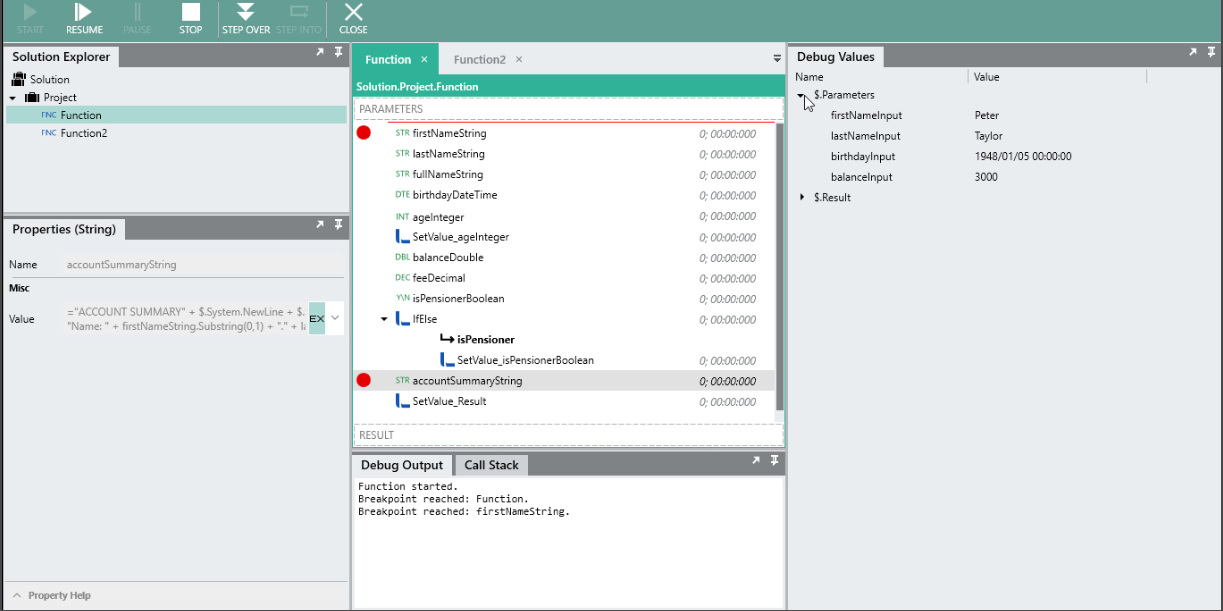
While debugging, you are able to step into a sub-function by clicking on the debug option.
Adding output result values of the function
Now that we’ve added input parameters to the function, lets get the function to return a result when it is called from another function. In this case, lets return the value of ‘accountSummaryString’ as a result of the function.
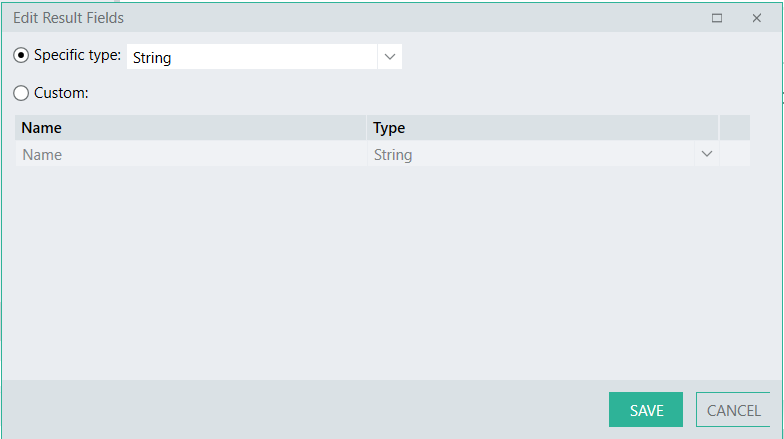
This is done by creating a result field just like we did with the input parameters:
This value can then be set using a SetValue function.
In this case, we are going to set the result ‘accountSummary’ to the value of ‘accountSummaryString’ like below:
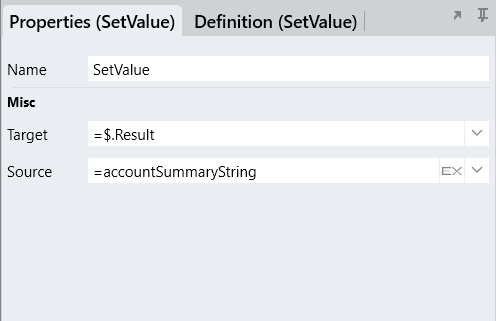
This result value is then accessible to the parent function that calls this function.
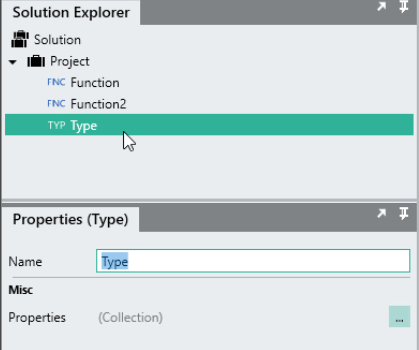
Defining a Type
In the above tutorial, we’ve just dealt with the basic data types and how to set them. However, if you look at the function it looks quite messy. What if we could define a single ‘customer’ object that would hold all the fields in a single reference and can be used to structure data in our application? This is where custom user defined types come in.
In Linx you are able to create complex types containing fields of basic types, lists and other user complex types. These types are represented in a JSON format allowing you to parse strings of data into structured objects. The advantage of using types is that you only need to define a type once and then you are able to reference the data structure for inputs, outputs and general data throughout your application in any function or service.
To create a new type, you can either import a JSON or XML string and Linx will automatically create the necessary fields.
Alternatively you are able to manually create the objects with the type editor by clicking the ![]() button.
button.
This will create a blank type for you to define:
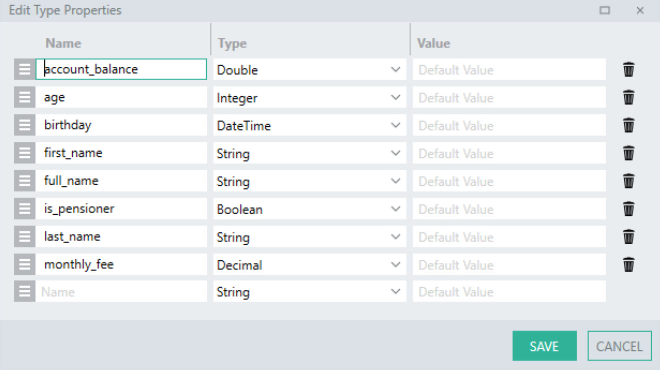
In our case, we are going to create a ‘customer’ type which will contain the below properties:
Now that we have created the ‘customer’ type, we are able to reference it throughout our application. To introduce to the idea, go back to the user function we were working on. Drag the ‘customer’ type from the Solution Explorer onto the user function above the ‘accountSummaryString’.
This will create instance of the ‘customer’ type which exists within the scope of the function just like the other types.
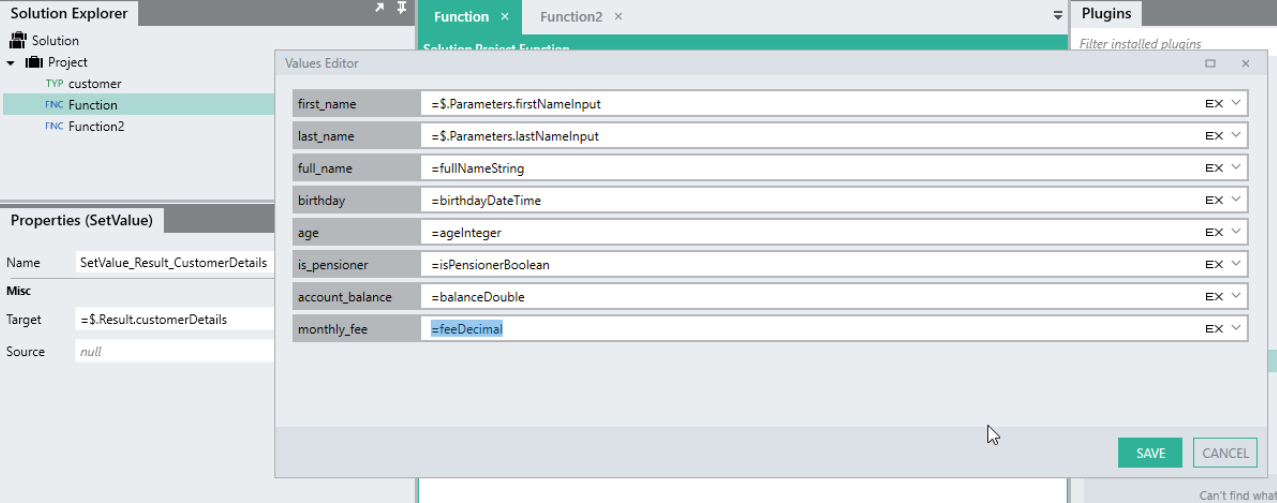
Just like other types, you are able to set values of the custom type by expanding the field editor. You are then able to hard-code values, reference dynamic data values and use expressions to modify data.
To demonstrate, expand the ‘customer’ type in the function and for the field values, reference the basic type within the scope of the function like below:
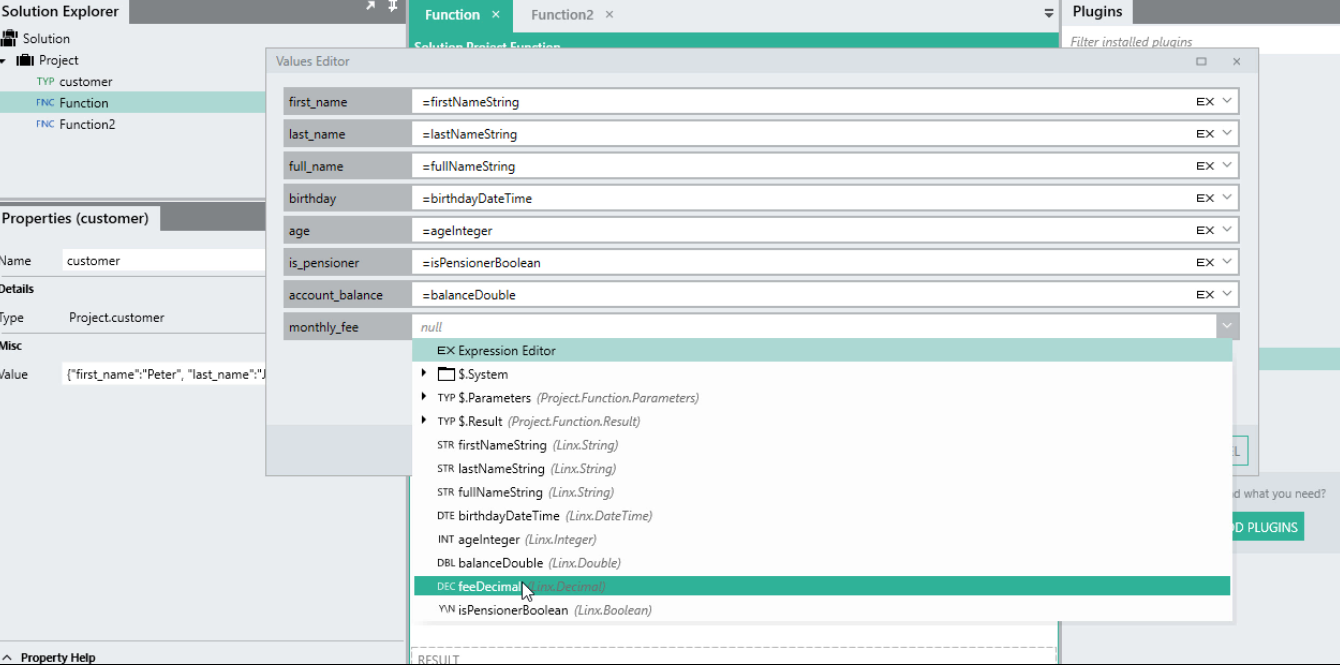
At runtime, the values will be stored as JSON like below:
{
   "first_name":"Peter",
   "last_name":"Taylor",
   "full_name":"Peter Taylor",
   "birthday":"1948-01-05T00:00:00",
   "age":72,
   "is_pensioner":false,
   "account_balance":3000.0,
   "monthly_fee":30.0
}
When the ‘customer’ type is reached in the function, all the values are contained in a single object.

You are able use custom types as input parameters or result values. In our case, lets return a ‘customer’ type from the function:

You can set the individual fields using a SetValue function:
With user defined types, you are able to set all the field values at once by referencing ‘UserType’ and using the field editor, or setting specific fields by setting the target as ‘UserType.fieldName’.
When our user function is called from a parent function, the ‘customer’ object will be available as the result of the function:
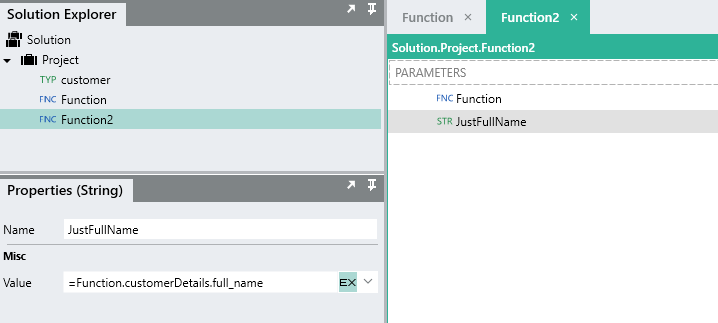
Individual fields can be extracted from the returned type by selecting the value from the drop down like below:
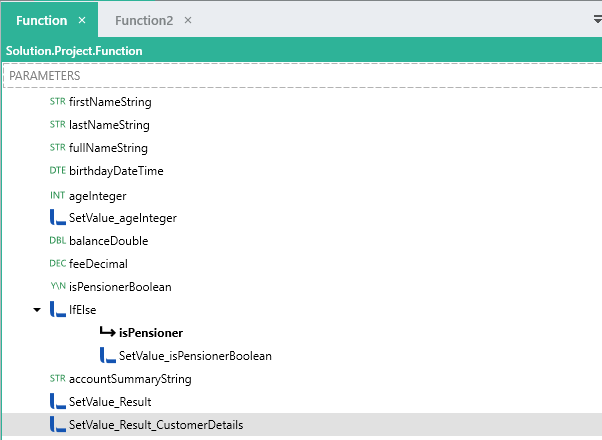
Now that we’ve created a re-useable function that takes in some ‘customer’ fields and returns a ‘customer’ object. Let’s make the function more manageable by building a similar function but just in a more streamlined manner.
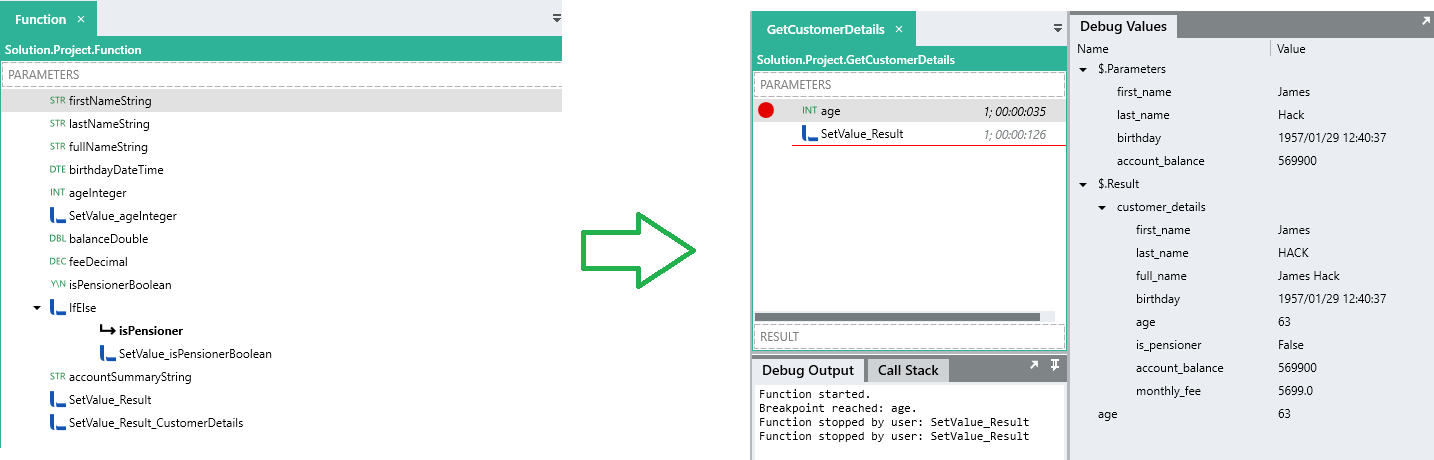
Add a new function to your application and give it the name of ‘GetCustomerDetails’.
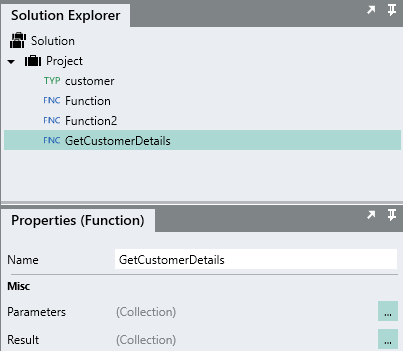
Configure the ‘GetCustomerDetails’ function to have the below input parameters just like last time:
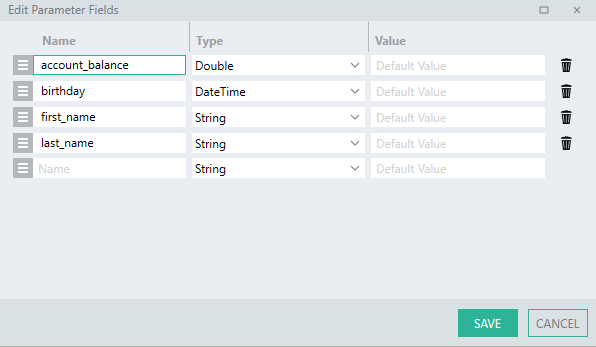
For the result of the function, set the type to ‘customer’.

Add a SetValue to the function. We will use this to set the values of the result ‘customer’ type.
For the field references, we can reference the value striaght, or perform maniupulations and calculations with exptessions.

For the customer.age, we need to calculate this, and will be using this calculated value in determining the value of the customer.is_pensioner field. Because you can reference a types “self” i.e. this_type.age, we need to create a type within the scope if the function so both fields can access it.
This is done by just adding an integer type above the SetValue function and performing the calculation in there.
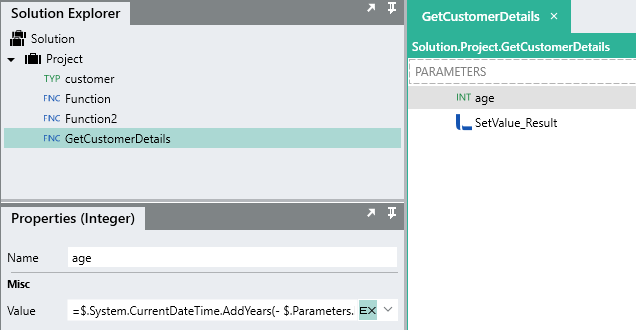
Now the ‘age’ type is available to reference for the other values in the SetValue function.
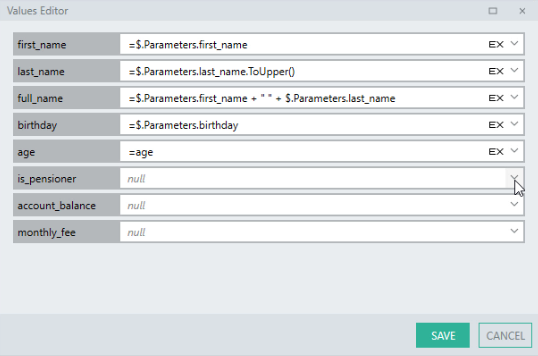
For the customer.is_pensioner field, we can just perform an equation using the local ‘age’ type above in the function , this equation will evaluate to a boolean type and therefore can map directly to the output type of the field.
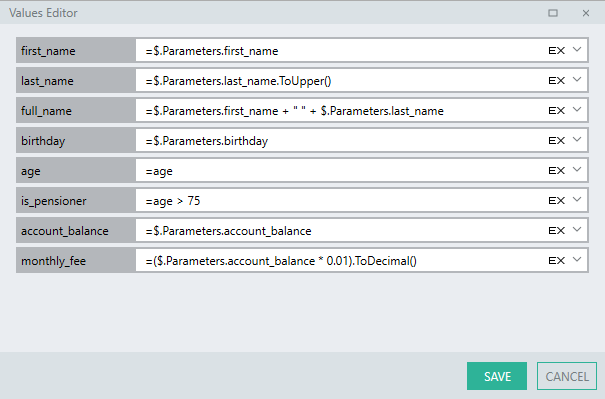
The customer.monthly_fee is calculated first, and because the input parameter account_balanceis a double, the whole result needs to be converted into a decimal type to map correctly to the customer.monthly_fee type.
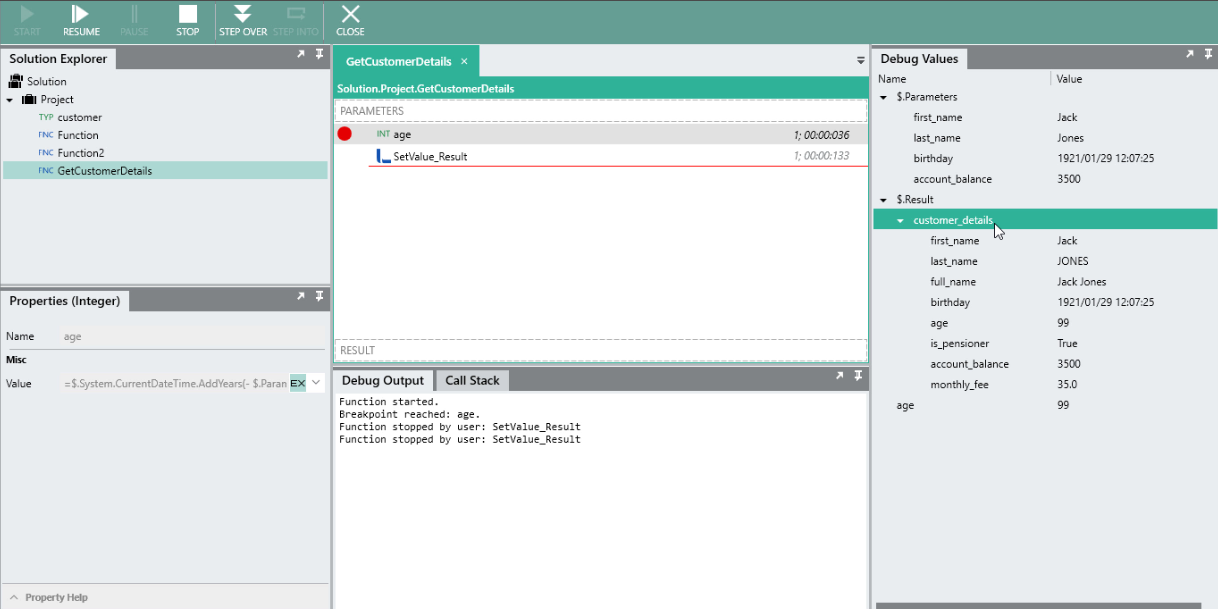
Now when you debug, the function ‘GetCustomerDetails’ takes in the same input parameters and returns similar results to what we did earlier, but just in a much more clean way.
Next steps? 
The next tutorial explorers dealing with the list type.