Introduction
The OAuth 2.0 Authorization Framework enables third-party applications such as a Linx Solution to obtain access to protected resources (i.e account details, documents etc) from a host (i.e. Microsoft, Facebook, GitHub etc. ) with permission from a resource owner (user). This is achieved by orchestrating an approval interaction between the resource owner, the host and the third-party application.
The authorization action by the resource owner (user) typically happens only once and following that there is a cycle of client-to-server re-authorization that ‘refresh’ the application’s authentication credentials.
The advantage of using the OAuth 2.0 flow is that a resource owner’s personal credentials (i.e. password and username) are never shared and the resource owner does not have to pre-configure anything on their side, only action the authorization when requested.
In order to implement the OAuth 2.0 - Authorization Code Grant flow in Linx, a combination of hosting and consuming REST web services will be used. This will allow resources owners to authorize your application to access their resources without any manual intervention.
The below sections are covered in this guide:
- Authorization Code Grant flow overview
- Building a basic generic authenticator with Linx
- Automating the whole flow
- Storing and retrieving the access token
For personal support queries, please contact support@linx.software or reply on this article.
Authorization Code Grant flow
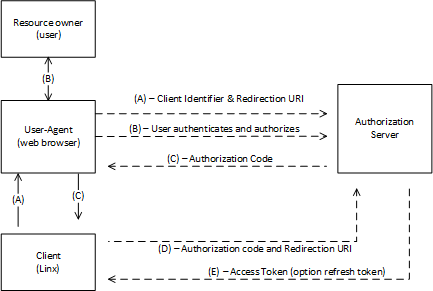
The below diagram illustrates the OAuth 2.0 - Authorization Code Grant:
-
(A): The flow is initiated by the resource owner (user) triggering the flow from the user-agent (browser) - this is done by the user browsing to a URL which will execute a request against a Linx API (client).
The API will respond with an
authorization URLand will direct the resource owner’s
user-agent (browser) to the authorization endpoint.The client includes its client identifier, requested scope, local state, and a redirection URI to which the authorization server will send the user-agent back once access is granted (or denied).
-
(B): The resource owner then authorizes (or denies) the client’s access request via the user-agent (broswer).
-
(C): The authorization server redirects the user-agent back to the client using the
redirection URI provided earlier (in the request or during client registration).The
Redirect URLwill be a Linx API endpoint which will then receive the below details.The redirection URI includes an authorization code and any local state provided by the client
earlier. -
(D): The client requests an access token from the authorization server’s token endpoint by including the authorization code received in the previous step. When making the request, the client authenticates with the authorization server. The client includes the redirection URI used to obtain the authorization code for verification.
-
(E): The authorization server authenticates the client, validates the authorization code, and ensures that the redirection URI received matches the URI used to redirect the client in step (C). If valid, the authorization server responds back with an access token and, optionally, a refresh token.
Building a basic generic authenticator with Linx
In the following sections we will be covering how to build an automated authenticator that will allow you to connect to any API via OAuth 2.0.
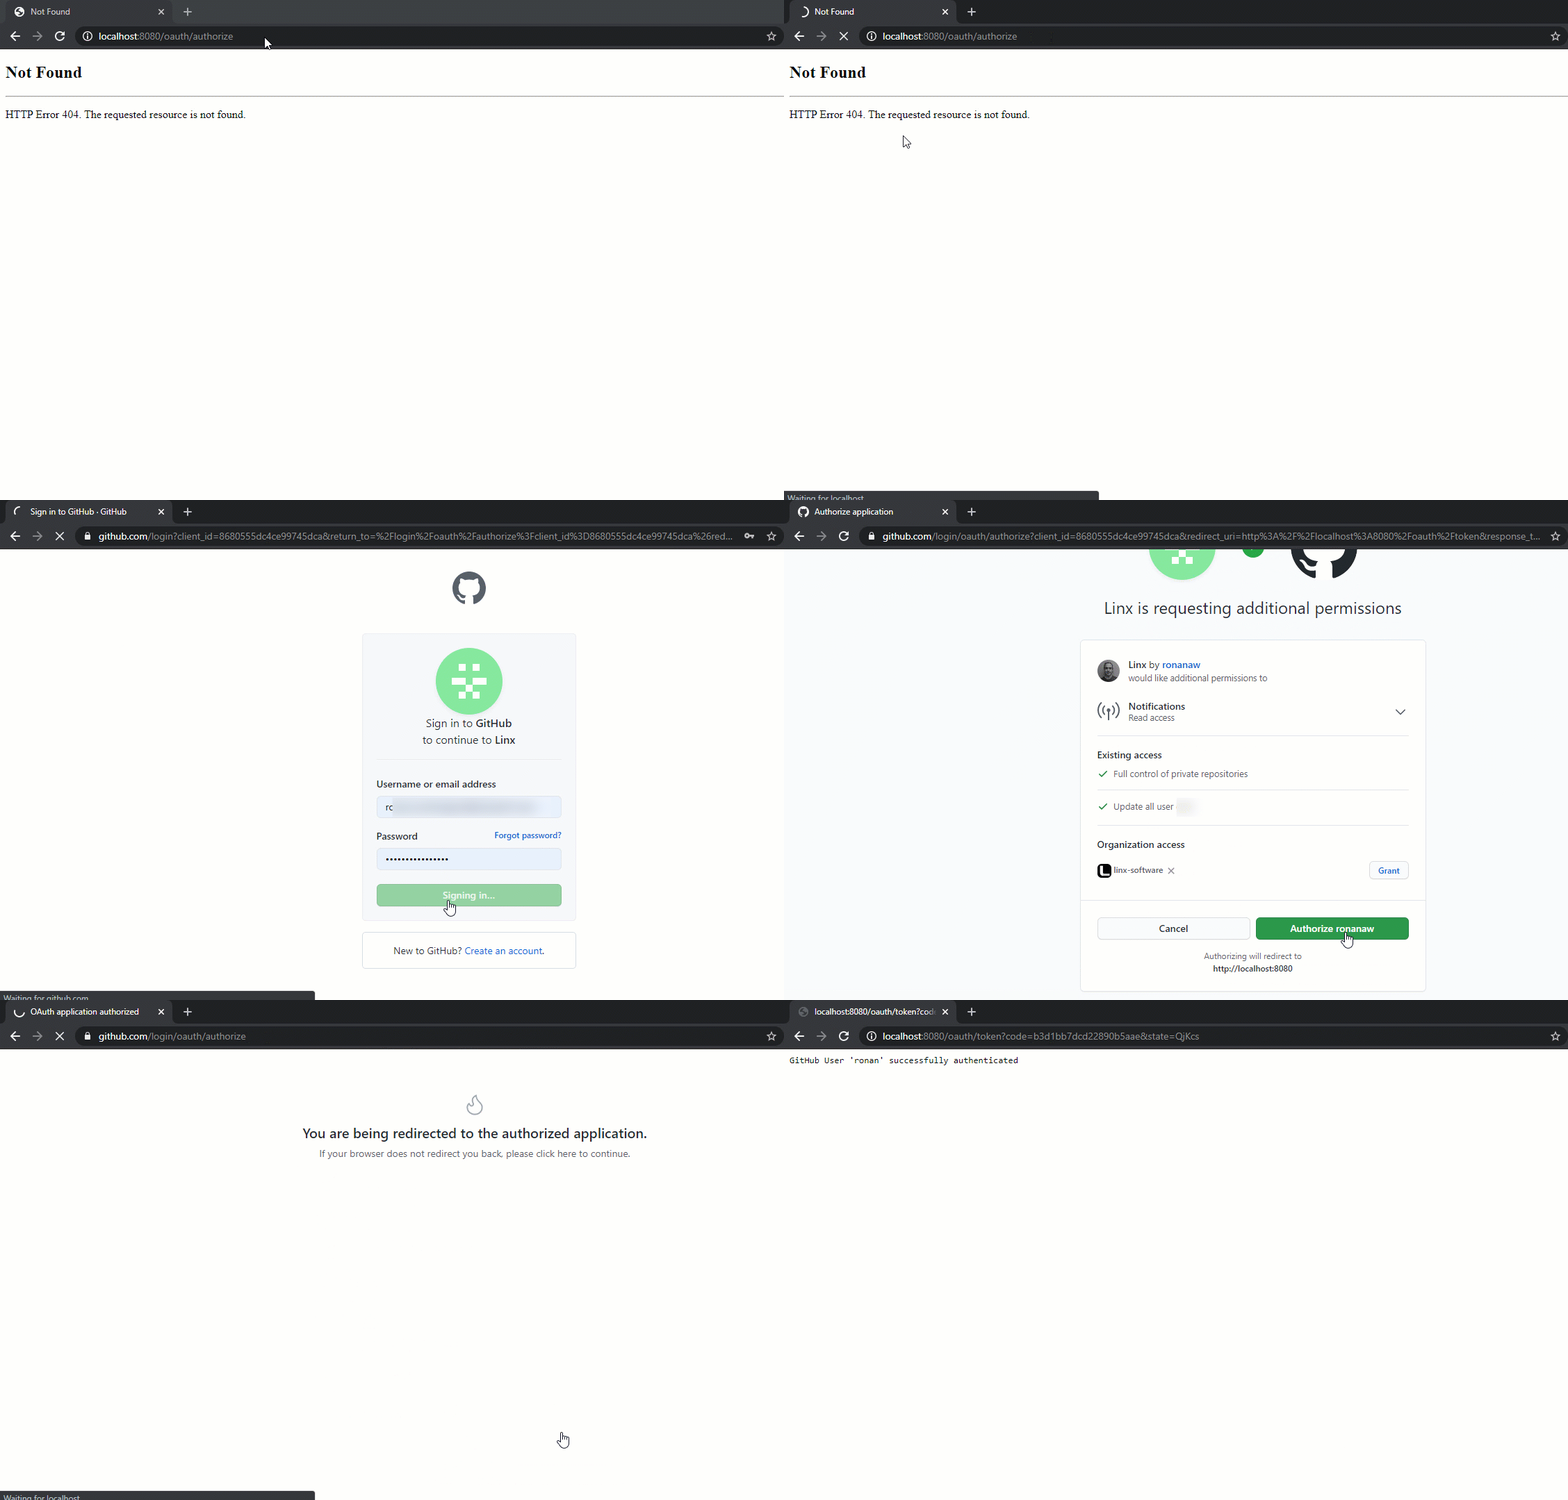
The resulting user flow will look like the below:
Feel free to contact support@linx.software and we'll assist.
A sample Solution has been provided below to aid understanding and provide a "basic" template for implementing the OAuth 2.0 flow in Linx.
Linx5 GenericOAuth2Authenticator.lsoz (26.3 KB)
Linx6.0.5 GenericOAuth2Authenticator.zip (47.4 KB)
Registering your application
In this tutorial, I will be using the example of connecting to GitHub.
Before connecting to your target API, you need to gather the below details:
- Client credentials: The Client ID and Client Secret (sometimes referred to as App ID/App Secret). These are obtained by registering an application on the provider’s website or developer portal.
- Endpoint URIs: The Authorization and Token generation URIs should be available on the official documentation of the platform you are trying to connect to.
- Redirection URI: The redirect URI or Callback URL is used to return the Access Token. This is set when registering the application and can be changed at a later stage.
In order to generate the above information, you need to register your App on the providers website/developer portal.
For GitHub, ensure you register an "OAuth application".
After you have registered your application, you should have:
- Client ID
- Client Secret
- Redirect URI
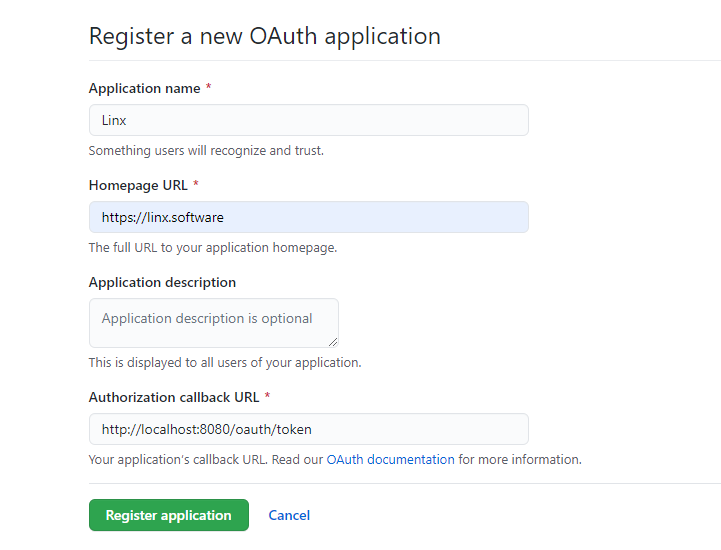
Example of registering a new application (GitHub):
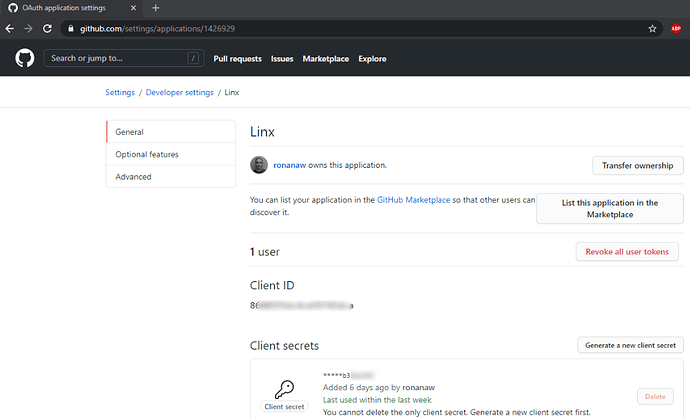
Application’s (client) identifiers (GitHub):
Important: Ensure you generate a client secret and store it somewhere for later:
![]()
Authorization Request
Overview
The Authorization Request involves the client (Linx) constructing a URI which points to the target host authorization endpoint. The resource owner (user) is directed to this URI following by the user-agent (web browser) , following this, he/she will authorize the application to have access to the protected resource (typically indicated by the scope parameter).
The Authorization URI is in the following format:
{host}{authorize-path}?response_type={response-type}&client_id={client-id}&scope={scope}&state={state}&redirect_uri={redirect-uri}
| Name | Description | Example | |
|---|---|---|---|
{host} |
REQUIRED | Host server | https://github.com |
{authorize-endpoint} |
REQUIRED | Authorization endpoint for Host server | /login/oauth/authorize |
{response_type} |
REQUIRED | Value must be set to code |
code |
{client_id} |
REQUIRED | Client identifier generated on target system application registration | 8527f38c3c4a0d8726fa |
{scope} |
OPTIONAL | Optional list of access scopes , depending on the host | repo, user |
{state} |
RECOMMENDED | Random string of characters used to verify the response from the server and prevent cross-site forgery | QjKc |
{redirect_uri} |
OPTIONAL | Redirect URI where the server will send a request to containing the authorization code after a successful authorization |
http://localhost:8080/oauth/token |
The built up URI will be similar to the below:
https://github.com/login/oauth/authorize?response_type=code&client_id=xxxxxxxx&scope=repo, user&state=QjKc&redirect_uri=http://localhost:8080/oauth/token
Try it yourself by manually creating the
Authorization URI with your client credentials.The Authorization URI will need to be browsed to every time you want to re-initiate the token generation flow. You can save this URI somewhere for quick reference, however, during development you’ll most likely need to remove and re-add apps, and therefore generate new client identifiers. In order to make life easier in such cases we are going to get Linx to build up the Authorization URI for us.
This will be a process Function that takes in a number of client credentials that we generated in the previous step.
The process Function will return a single output which will contain that input values, built up using string manipulations. This way, whenever the client identifiers change, we can update a single value in our Linx Solution and regenerate the Authorization URI.
To create a generic process Function that will generate and return the Authorization URI:
-
Create a new Solution.
-
Add a Process and rename it to
GenerateAuthorizationUri. -
Configure the GenerateAuthorizationUri
processFunction to have the below $.Input values:hostauthorize_endpointresponse_typeclient_idscopestateredirect_uri
Tip:
When adding $.Inputs , you can set the default values for debugging by setting the Value to the default for that input.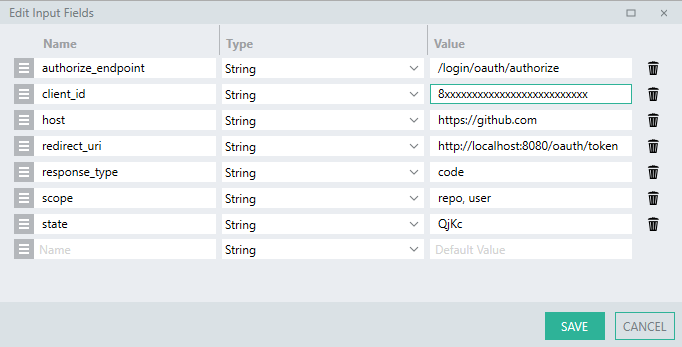
-
Configure the GenerateAuthorizationUri
processFunction to have a single $.Result with the Name ofuri. -
Add a SetValueFNC to the process.
This will be used to build up a string combining the inputs into the proper format.
-
For the Target, reference
$.Result.uri. -
For the Source, use an expression to build up the query values of the uri along with the input client credentials:
=$.Input.host + $.Input.authorize_endpoint + "?" + "response_type=" + $.Input.response_type + "&client_id="+$.Input.client_id+"&scope="+$.Input.scope+"&state="+$.Input.state+"&redirect_uri=" + $.Input.redirect_uri -
Debug the GenerateAuthorizationUri process.
-
When the
processFunction completes, take a look at the Debug Values panel and take note of the$.Result.urivalue.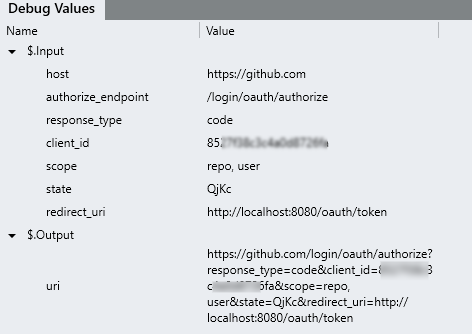
-
Copy the
uriand paste it in your web browser. -
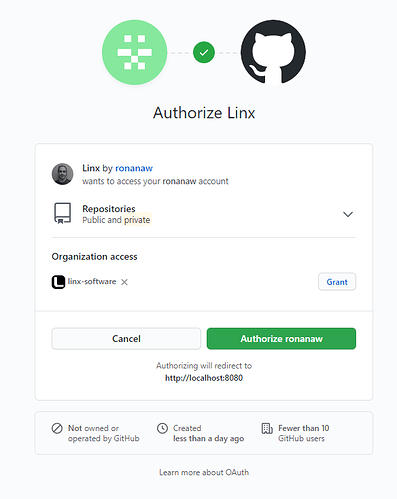
You should be promoted to authorize your application:
-
Once you’ve granted access, your
user-agent(browser) should redirect you to theRedirect URIthat you set earlier, i.e.http://localhost:8080/oauth/token. -
The URL will contain 2 query parameters:
- code: Authorization code returned from Authorization Server to use for generating tokens.
- state: Random string to link flow requests.
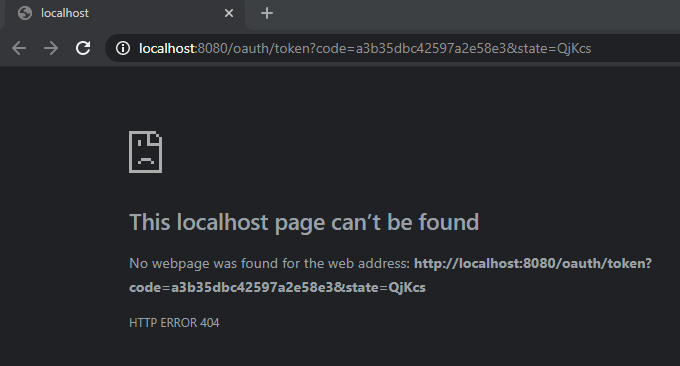
For the next section we will be using the value of the code parameter. The state parameter will be touched on later.
Exchange Authorization Code for an Access Token
Overview
After the Authorization Response has been recieved, the code parameter can be exchanged with the host for an access token.
This typically involves making a POST request to the token issuing endpoint , with a Content-Type of URL encoded , submitting the identifiers below as the list of URL encoded content parameters.
    POST https://github.com/login/oauth/access_token?
       client_id={client-id}
       &redirect_uri={redirect-uri}
       &client_secret={client-secret}
       &code={authorization-code}
       &state={state}
If successful, a (200) OK response will be returned containing a JSON string containing access token related data in varying formats similiar to the below:
    {

      "access_token": "EAAkXlZBnWqyEBAIaOnwmOph34B3y9ooVBSPiMB07ut7FQcHFAXDFkwo9UcVihyiZB4DhcFqjrtHam",

      "token_type": "bearer",

      "expires_in": 5178671

    }
The value contained in the access_token field will then be submitted in the Authorization header with the value of Bearer {access_token}.
-
Add a new
processFunction and rename itExchangeCodeForToken. -
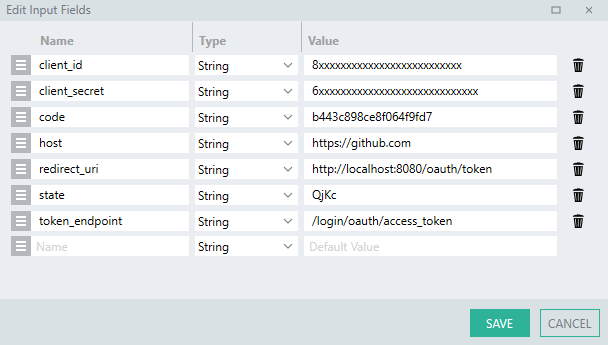
Add the following $.Input parameters:
hosttoken_endpointclient_idclient_secretstateredirect_uricode
Configure the default values of these fields like before, you will need to generate a Client Secret if you haven’t done so already.
-
Add a CallRESTEndpointFNC to the ExchangeCodeForToken process.
-
Set the URL with an expression which will combine the input
hostandtoken_endpointvalue:=$.Input.host + $.Input.token_endpoint -
Change the Method to
POST. -
Set the Body format as
URL Encoded Content. -
A URL encoded body field will appear:

Expand the editor and add the parameters like below:

-
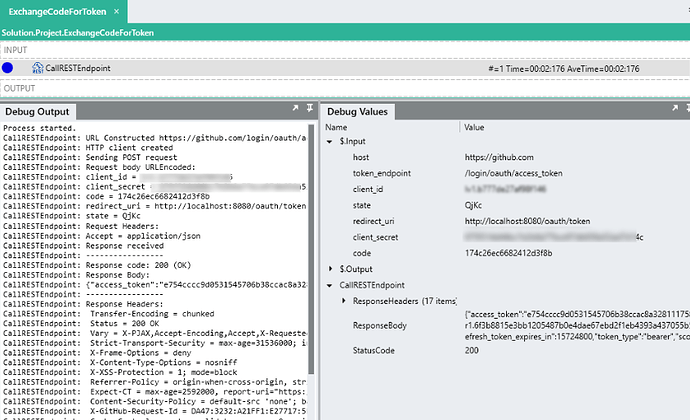
Debug the ExchangeCodeForToken with the correct
$.Inputvalues (Copy thecodeparamter from the redirection URL and add it to the Solution).When the request is made, the variables will be encoded and submitted like below:
POST https://github.com/login/oauth/access_token HTTP/1.1
Content-Type: application/x-www-form-urlencoded
Host: github.com
Content-Length: 182
Connection: Keep-Alive

client_id=8xxxxxxxxxx&client_secret=6xxxxxxxxxxxxxx&code=0ae113efsabd60ee0b81e&redirect_uri=http%3A%2F%2Flocalhost%3A8080%2Foauth%2Ftoken&state=QjKc
Caution:
Theauthorization codeis only valid for a certain period of time. If it has expired, you will need to re-initiate the flow by generating the Authorization URL again with the GenerateAuthorizationUri process.If the request was successful a response should be returned with a
ResponseBodylike below:access_token=9810c091ecf4899525c19c2d98a662762c6b2b2c&expires_in=28800&refresh_token=r1.b03080d2fd959ddb0ec4d4db708bb878ebdccc808773d997cd9f67e28de9633ec2bf7583f1bdc4d2&refresh_token_expires_in=15724800&scope=&token_type=bearerThis response is a single string value, which is not typical of token responses. Typically, access tokens are returned as
application/json. With GitHub, you are able to specify the content type of the response object by adding anAcceptheader value. -
Add a Header to the request like below:
[ { "Name":"Accept", "Value":"application/json" } ] -
Debug the ExchangeCodeForToken with the correct
$.Inputvalues. -
The
Response Bodyshould now still be a single string, but it is inJSONformat like below:{ "access_token":"e754cccc9d0531545706b38ccac8a32811175852", "expires_in":28800, "refresh_token":"r1.6f3b7b03a437055b5414fef7fa52c294a18d9259057ab2c4", "refresh_token_expires_in":15724800, "token_type":"bearer", "scope":"" }
Returning the access token
The current response is returned as a StringTYP . In order to parse the text into the respective fields, the response object needs to be imported as a CustomTYP.
.Once imported, the Output type can reference this structure and the fields will be parsed.
-
Import the
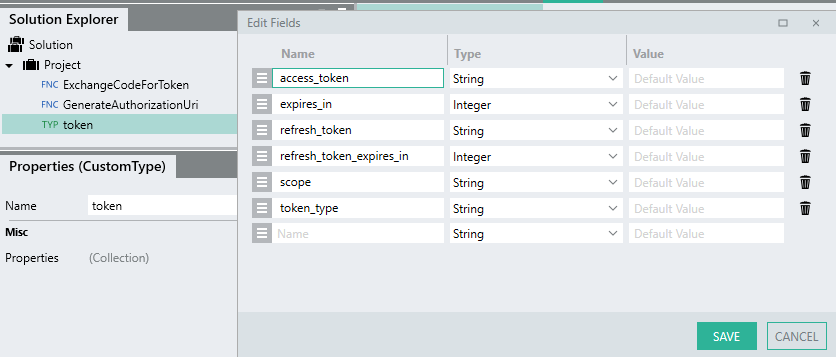
Response Bodyas a CustomTYP and give it the nametoken. -
You should have a tokenTYP like the below:
-
Set the Output type of the CallRESTEndpoint in the ExchangeCodeForToken process.
-
Add an $.Result to the ExchangeCodeForToken
processFunction with a Name oftokenand the Type ofProject.Token.This will return the entire
tokenobject details which will allow us access to all the details when the ExchangeCodeForTokenprocessFunction is called. -
Add a SetValueFNC to the end of the ExchangeCodeForToken process.
-
For the Target, reference
$.Result.token. -
For Source, reference
CallRESTEndpoint.ResponseBody. -
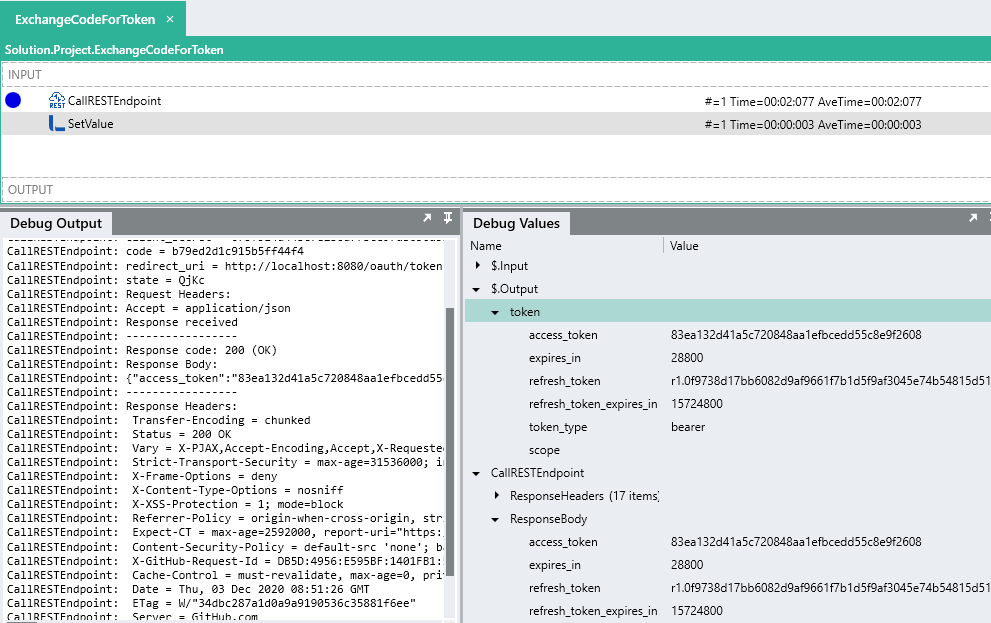
Debug the
processFunction again and take note of how theResponse Bodyhas been deserialized into thetokenobject and the token returned as an output:Tip:
Copy the the value of theResponseBody.token.access_tokenand save it for the next section.
Using the access token
To demonstrate how access token’s are used in a request, the below steps outline how to add an Authorization header with the value of Bearer {token}.
Extending the example of GitHub, a request is going to be made to the /user endpoint.
The token generated from the earlier step will be added to the Authorization header.
The response will contain information related to the authenticated user.
-
Create a new
processFunction and rename itGetAuthenticatedUser. -
Add an
access_token$.Input parameter. -
Add a CallRESTEndpointFNC to the GetAuthenticatedUser process.
-
Set the URL as
https://api.github.com/user. -
Expand the Headers editor and add the header with a Name of
Authorization. -
For the Value , use an expression like below:
="Bearer " + $.Input.access_token -
Debug the GetAuthenticatedUser process, copy and paste the
access_tokenfrom the previous step into the$.Input.access_token.The request should fail with an output like below:
Response code: 403 (Forbidden) Response Body: Request forbidden by administrative rules. Please make sure your request has a User-Agent headerTo resolve the issue add the following as the
User-Agentheader:Mozilla/5.0 (Windows NT 6.1) AppleWebKit/537.36 (KHTML, like Gecko) Chrome/47.0.2526.111 YaBrowser/16.3.0.7146 Yowser/2.5 Safari/537.36
-
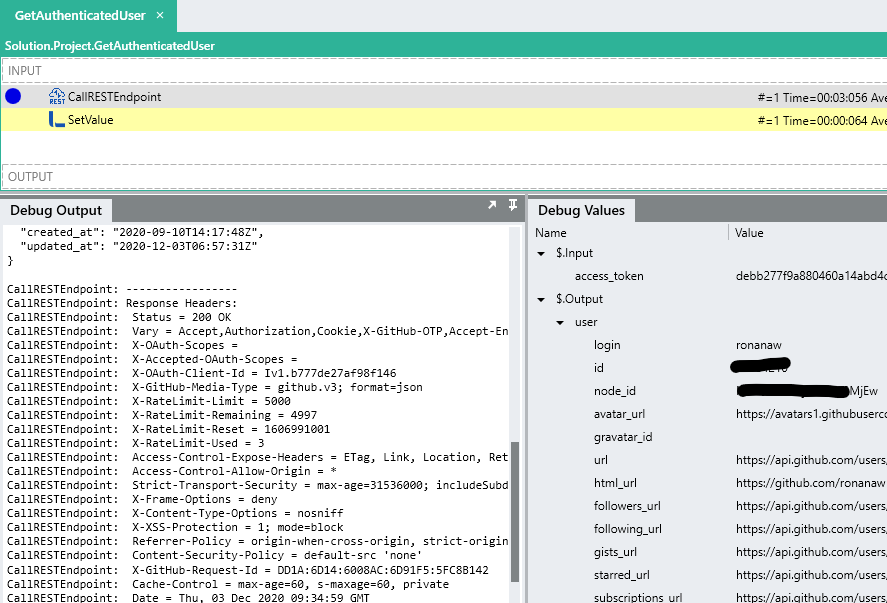
Debug the GetAuthenticatedUser
processFunction again, you should recieve a200 (OK)like below:CallRESTEndpoint: URL Constructed https://api.github.com/user CallRESTEndpoint: HTTP client created CallRESTEndpoint: Sending GET request CallRESTEndpoint: Request Headers: CallRESTEndpoint: Authorization = Bearer debb277f9a880460a14abd4cdd474d7406fc6724 CallRESTEndpoint: User-Agent = Mozilla/5.0 (Windows NT 6.1) AppleWebKit/537.36 (KHTML, like Gecko) Chrome/47.0.2526.111 YaBrowser/16.3.0.7146 Yowser/2.5 Safari/537.36 CallRESTEndpoint: Response received CallRESTEndpoint: ----------------- CallRESTEndpoint: Response code: 200 (OK) CallRESTEndpoint: Response Body: CallRESTEndpoint: { "login":"yourlogin", "id":11111, "node_id":"xxXXXX111XXX1", "avatar_url":"https://avatars1.githubusercontent.com/u/xxxx?v=4", "gravatar_id":"", "url":"https://api.github.com/users/youruser", "html_url":"https://github.com/youruser", "followers_url":"https://api.github.com/users/youruser/followers", "following_url":"https://api.github.com/users/youruser/following{/other_user}", "gists_url":"https://api.github.com/users/youruser/gists{/gist_id}", "starred_url":"https://api.github.com/users/youruser/starred{/owner}{/repo}", "subscriptions_url":"https://api.github.com/users/youruser/subscriptions", "organizations_url":"https://api.github.com/users/youruser/orgs", "repos_url":"https://api.github.com/users/youruser/repos", "events_url":"https://api.github.com/users/youruser/events{/privacy}", "received_events_url":"https://api.github.com/users/youruser/received_events", "type":"User", "site_admin":false, "name":"youruser", "company":"yourusercompany ", "blog":" ", "location":"", "email":null, "hireable":null, "bio":" ", "twitter_username":null, "public_repos":1, "public_gists":0, "followers":0, "following":0, "created_at":"2020-09-10T14:17:48Z", "updated_at":"2020-12-03T06:57:31Z" } -
Import the response as a CustomTYP and use it to return details from the GetAuthenticatedUser process. (This will be used later in the tutorial).
Well done, you’ve successfully implemented a Generic OAuth 2.0 Provider with Linx, however, in its current state, the application is basic and requires manual intervention.
Automating the whole flow
So far, we’ve created custom processes to successfully:
- generate an authorization URL
- make a request for an access token
- use the access token in the request
However, it still requires manual intervention for the most part.
In order to automate the entire authentication flow as well as add in some nice to haves, we are going to do the following:
- recieve a request to generate the authorization URI
- generate an authorization URI
- return and redirect user-agent to the authorization URI.
- receive the redirection request containing the authorization code.
- automatically make a request for an access token using the authorization code
- use the access token in the request
The result will be the below:
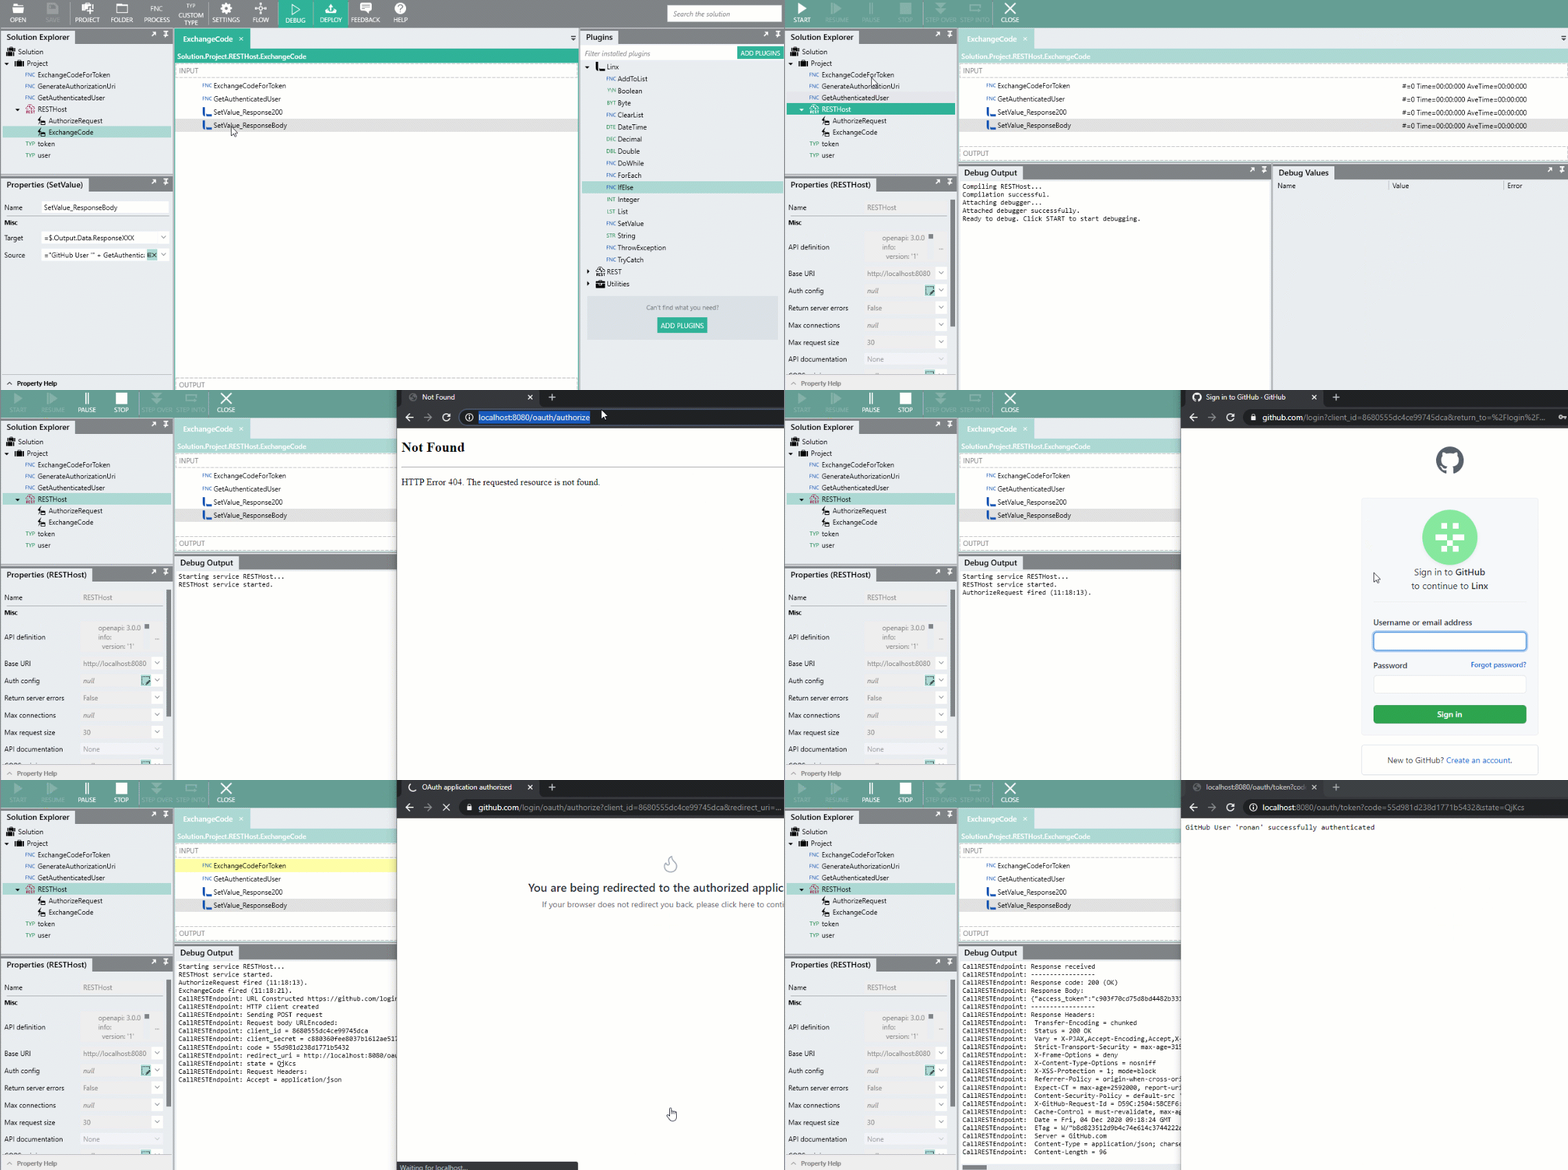
Automatically re-direct users to the Authorization URI
Currently, you need to manually debug the GenerateAuthorizationUri process Function and copy out the URL and then browse to it.
To make life easier, we are going to create a REST operation that will receive a GET request. When the user browses to this hosted url, the operation is executed, it will then make a call to the GenerateAuthorizationUri process Function which will return a uri.
In the response of the operation, the uri will be returned in the Location header along with an Status Code of 301 (Redirect). What this does is that when a request is made to the operation, the response redirects the user-agent (browser) to the authorization uri.
The advantage of this is that you can set up a static URL to navigate to (this can be a bookmark in your browser or a link on a page) - when you browse to this url, the current client identifiers will be used to generate the authorization uri.
-
Add a RESTHostSVC to your Solution.
-
Set the Base URI as
http:localhost:8080 -
Import the below API definition:
     openapi: 3.0.0
     info:
       version: '1'
       title: LinxOAuth2
       description: Linx web service to automate the Authentication Code Grant flow
     paths:
       /oauth/authorize:
         get:
           description: Generates authorization URL for user authentication.
           operationId: AuthorizeRequest
           parameters:
             []
           responses:
             '301':
               description: Redirect
               headers:
                 Location:
                   schema:
                     type: string
This will create a AuthorizeRequest operation in the Solution Explorer.
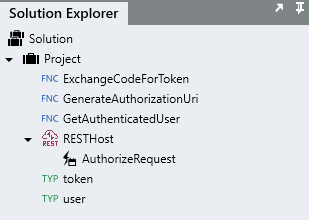
When the AuthorizeRequest operation is called, it will execute the GenerateAuthorizationUri
processFunction and return the output of it.
-
Drag the GenerateAuthorizationUri
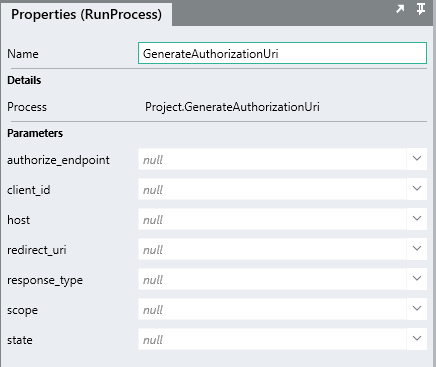
processFunction from the Solution Explorer, onto the AuthorizeRequest operation selected in the canvas panel.You will notice the the local
processFunction call to the GenerateAuthorizationUriprocessFunction has empty input parameters:
 Note:
Note:
The default values that were set only apply when debugging the ~~process~~ [*Function*](https://linx.software/docs/releasenotes/linx/5.20.2.0/) and not when you make a ~~process~~ [*Function*](https://linx.software/docs/releasenotes/linx/5.20.2.0/) call to that Process.You could “hardcode” the inputs like below:
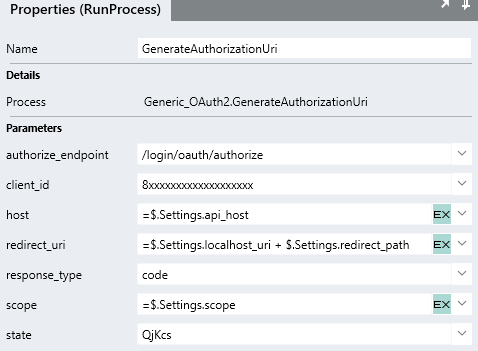
However, client identifiers often change and going back into this operation to change them will cause issues.
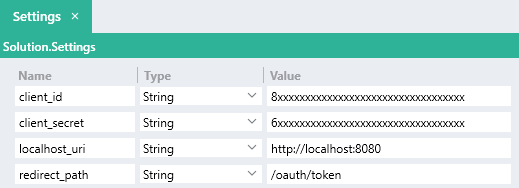
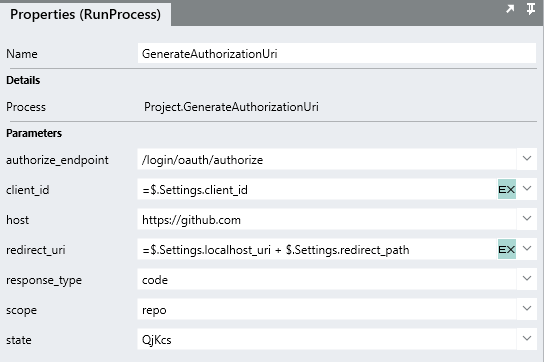
To resolve this, its generally best practice to store variables like this as a constant or
 $.Setting of the Solution and reference the $.Settings.value when needed:
If you debug the AuthorizeRequest operation, you will see the GenerateAuthorizationUri
processFunction return aurioutput containing the built up uri string. -
In order to return this
uriin the response and redirect the user-agent to this address we first need to indicate in the response that this is a(301) Redirectwhich will make the user-agent navigate to the value provided in theLocationheader.To do this, the
$.Result.Data.HttpContext.StatusCodeneeds to be set to301.The
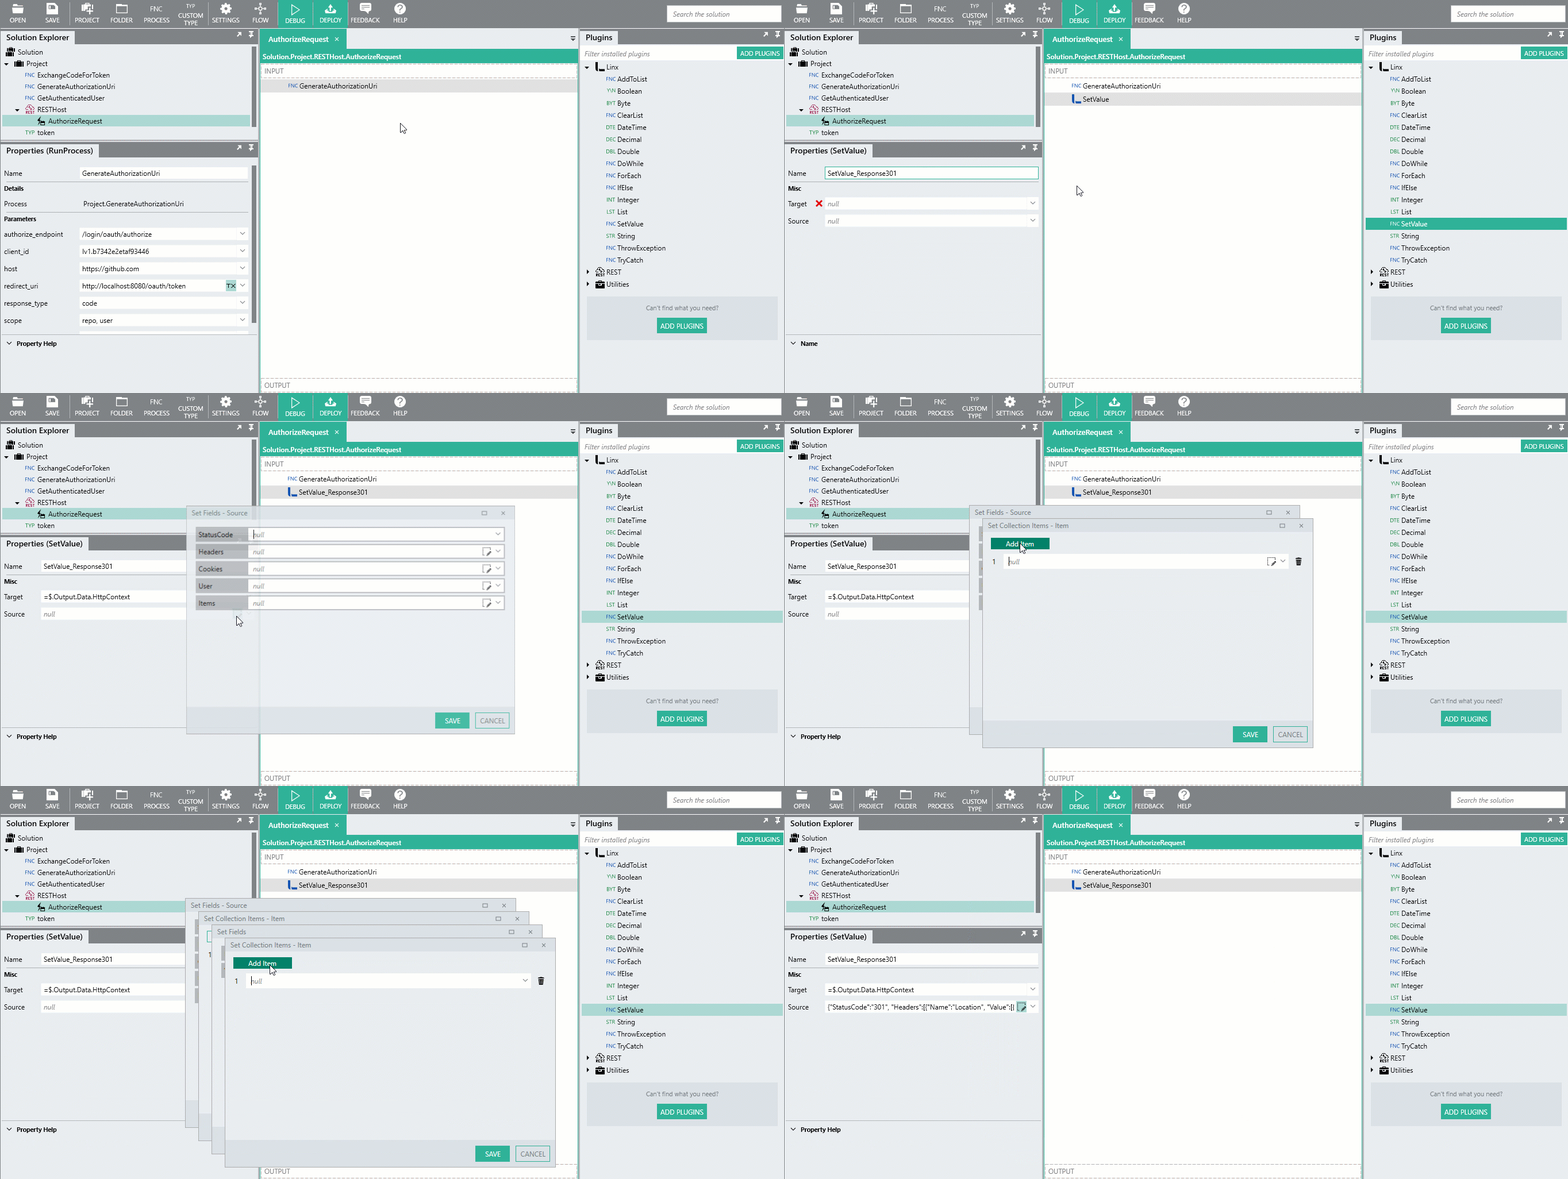
Locationheader then needs to be added to the response which will contain the location of the redirect address which in this case will be the generated authorization uri.Add a SetValueFNC to the AuthorizeRequest operation and rename it
SetValue_Response301. -
For the Target reference the whole
$.Result.Data.HttpContextobject. -
For the Source, expand the field editor.
-
Set the StatusCode as
301. -
Expand the Headers editor and add a
Locationheader which references the output of the GenerateAuthorizationUriprocessFunction like below:
To test the above out, we are going to locally host the REST web service and use it to make requests against.
To host a REST web service locally:
-
Right-click on the RESTHostSVC in the Solution Explorer.
-
Click ⮞ Debug.
-
Once the Debugger has initialized, click ⮞ Start
-
In your browser, make a request to THIS URI.
Caution:
While developing, you will most likely make several repeating requests in your browser. As a result the browser may store a cache of some of the information which leads to errors during the flow. To resolve this, clear your cache or initiate the request in an incognito window. -
If successful, you should be redirect to the GitHub authorization page to login.
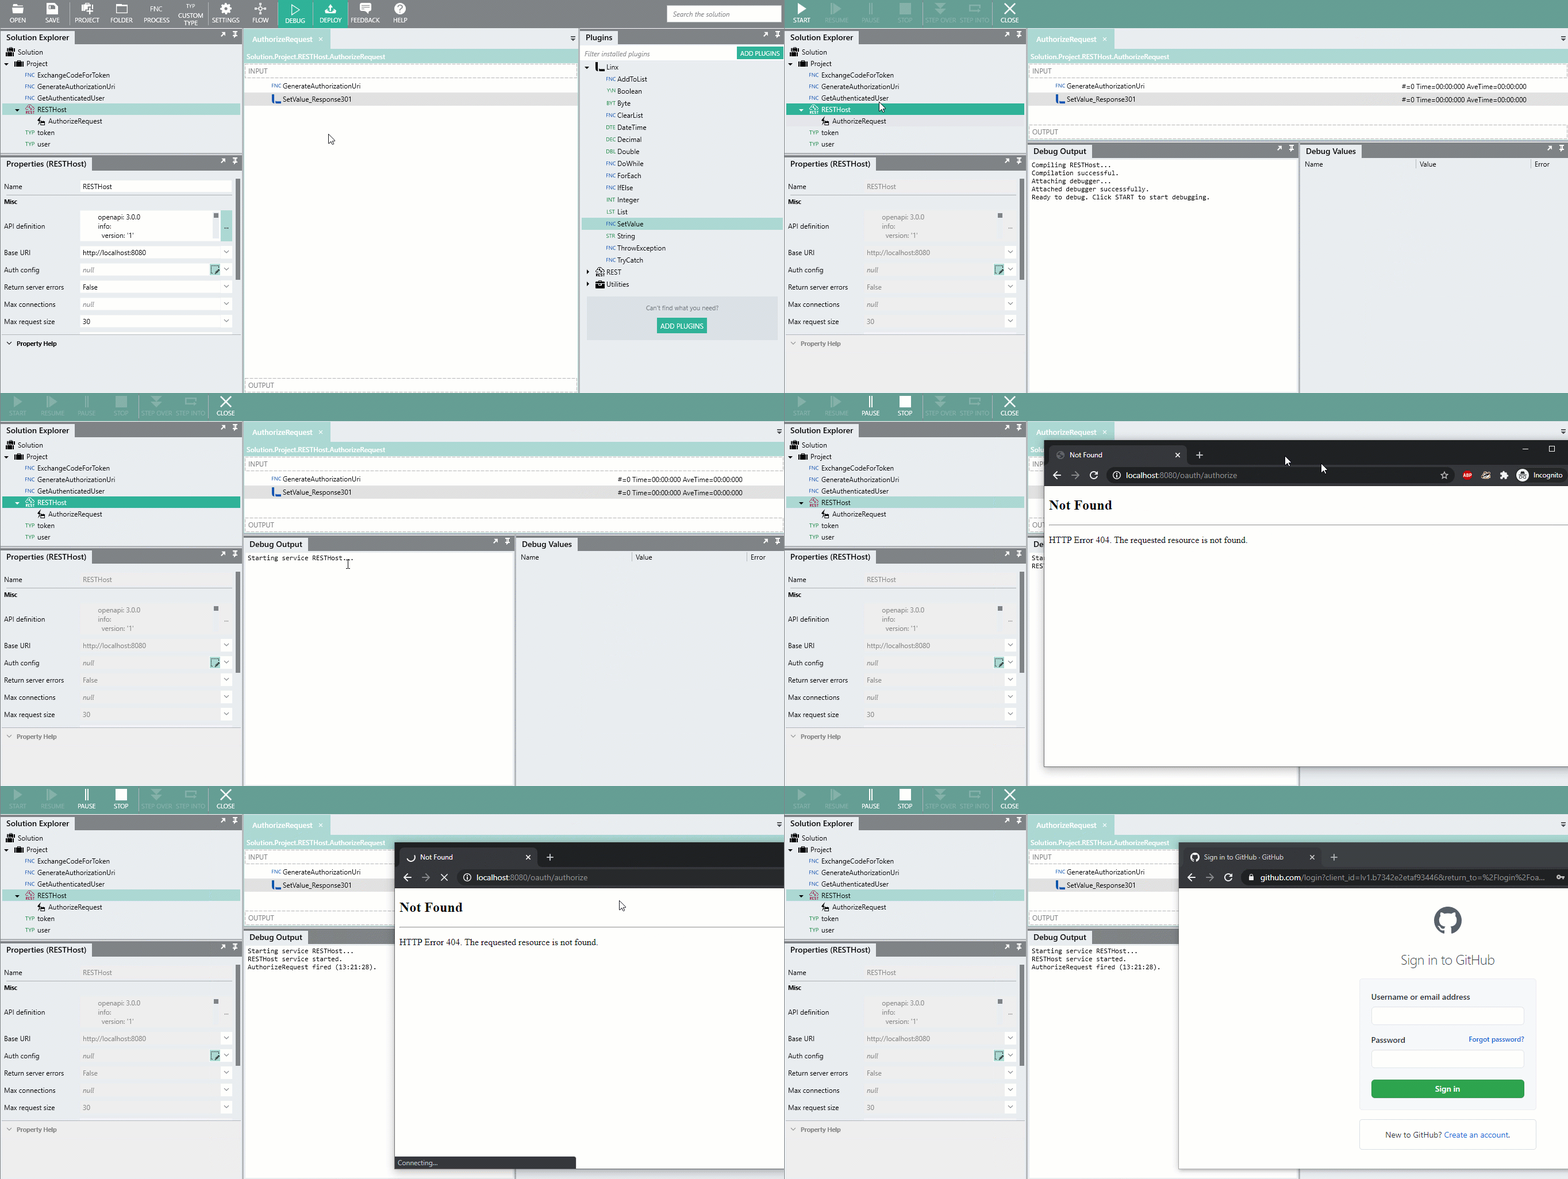
Each time you need re-generate an authorization code, just navigate to the /authorize url.
Bookmark the
http://localhost:8080/oauth/authorize uri in your web browser to make testing easier.Automatically request tokens after authorization.
Currently, when you authorize the application, you will be redirect to the redirect URI which would be:
http://localhost:8080/oauth/token?code=a3b35dbc42597a2e58e3&state=QjKcs
Your browser will display a (404) Not Found error like below:
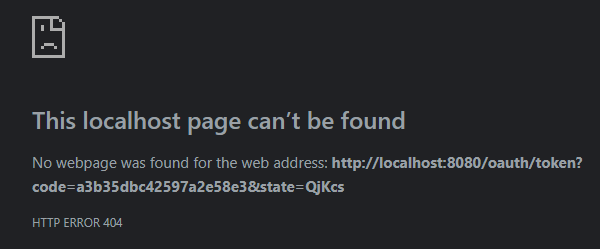
This is because there is no host listening on that address.
We are now going to add an ExchangeCode operation to our RESTHostSVC and host it on the redirection uri.
The operation will take in the code and state parameters as part of the query string.
The operation will then call the ExchangeCodeForToken process Function from earlier.
The code passed in with the URL would be passed into the ExchangeCodeForToken process Function to exchange with the Authorization Server.
Once the token has been generated, it will be passed into the GetAuthenticatedUser process.
A request would then be made using the token to return the currently authenticated user’s details.
These details will then be returned in the Response Body of the operation.
-
Add the below path and parameters to the API definition:
       /oauth/token:
         get:
           description: Generates Access Token
           operationId: ExchangeCode
           parameters:
             - in: query
               name: state
               schema:
                 type: string
             - in: query
               name: code
               schema:
                 type: string
           responses:
             default:
               description: ResponseXXX
               content:
                 text/html:
                   schema:
                     type: string
This will create an ExchangeCode operation in the Solution Explorer:

The operation recieves 2 input parameters:
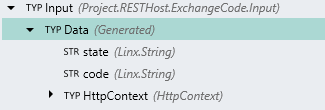
The operation is configured to have a generic
Response Bodyof a StringTYP .

-
Drag the ExchangeCodeForToken
processFunction from the Solution Explorer onto the ExchangeCode operation. -
Configure the input values for ExchangeCodeForToken
processFunction call the like below: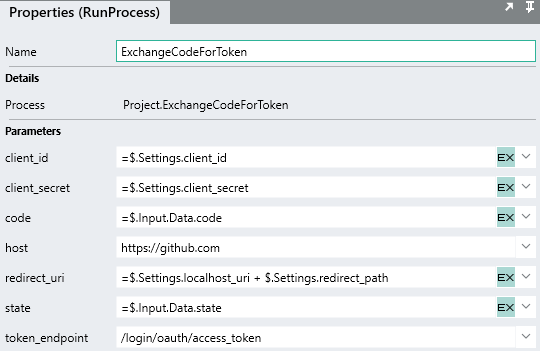
You will see how the
codeandstateinput values reference the$.Input.Data.codeand$.Input.Data.stateof the operation. -
Once the ExchangeCodeForToken
processFunction completes successfully, we will return a simple text message confirming the successful authentication.First the status code of the response must be set to indicate the result i.e.
200,401,403etc.To do this, drag a SetValueFNC below the ExchangeCodeForToken
processFunction and rename it toSetValue_Response200. -
For the Target, reference
$.Result.Data.HttpContext. -
Expand the Source and set the value of the Status Code field to
200.This indicates the request result was successful.
-
For the
Response Body, we are just going to return a simple text message.Add another SetValueFNC and rename it
SetValue_ResponseBody.For the Target, reference
$.Result.Data.ResponseXXX.For the Source, set it as the text “OAuth 2.0 flow success!”
-
Debug the RESTHostSVC like below and navigate to the
/authorizelocal endpoint from earlier:
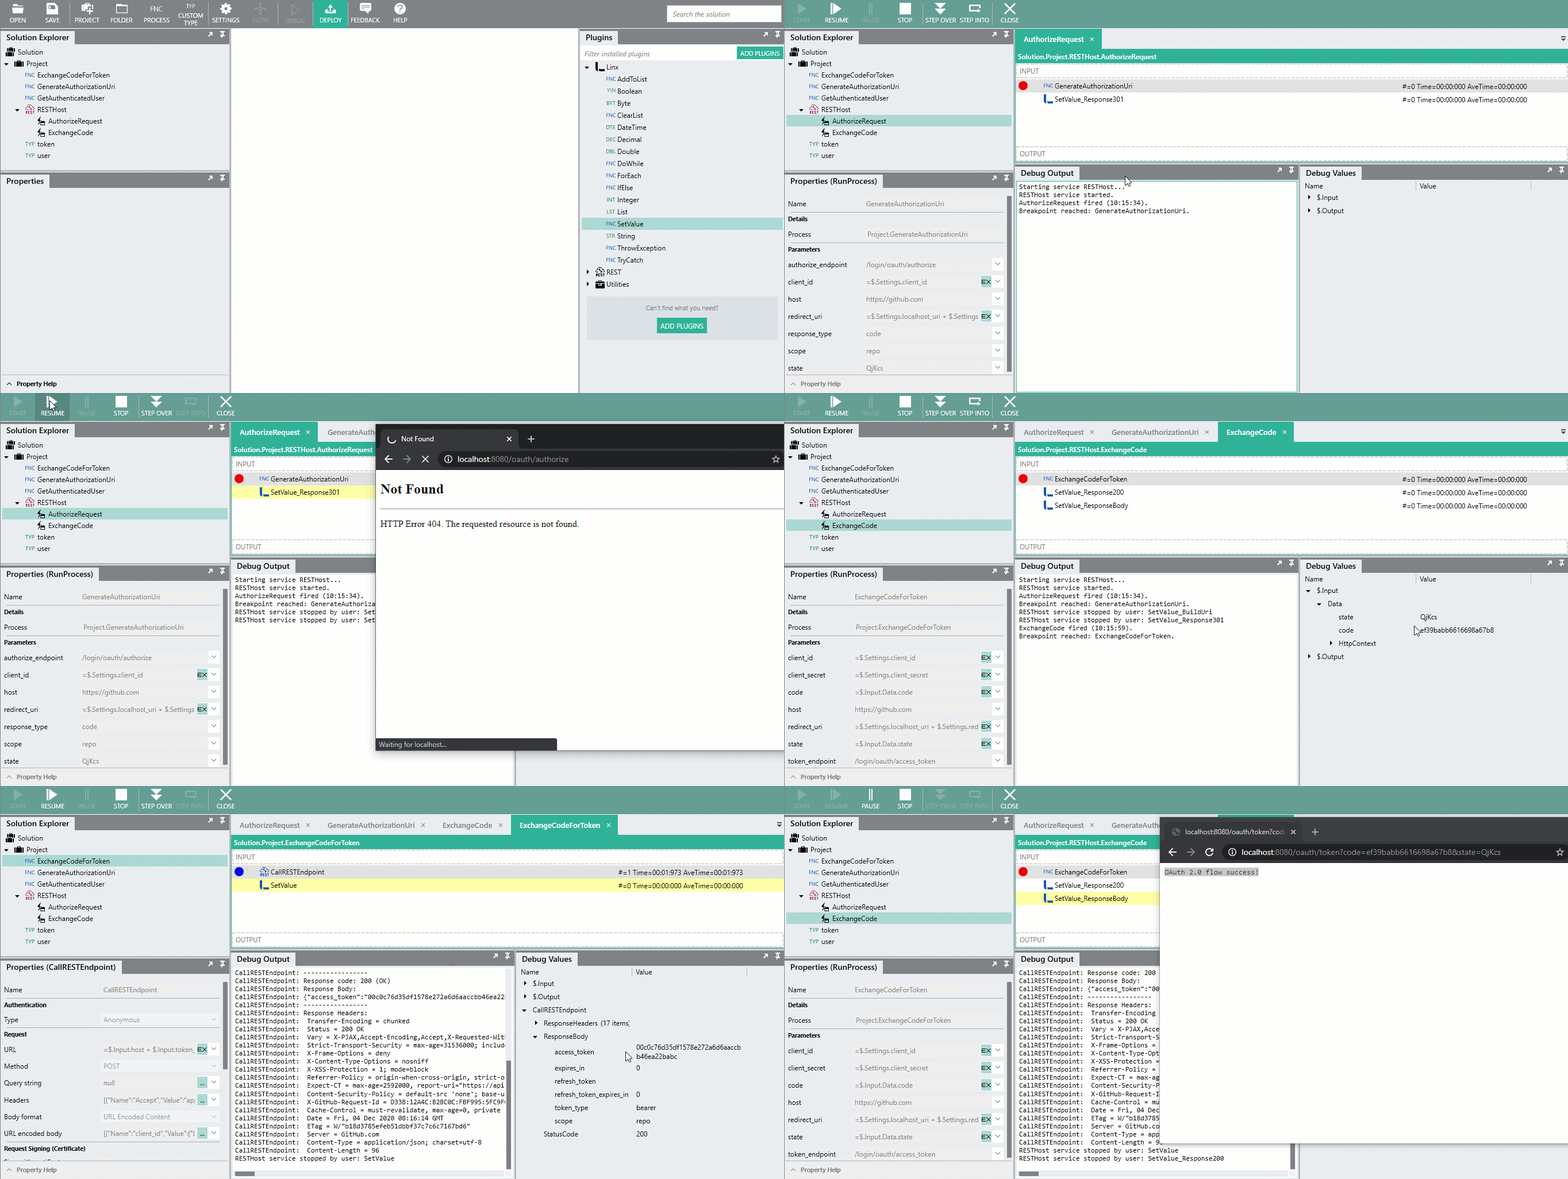
Now, after you authorize the application, the user-agent makes a request to the
Redirect URIwhich is our ExchangeCode operation.The
codeandstateparameters are parsed from the query string and then passed into the ExchangeCodeForToken process.Once completed, the operation returns a message to the user-agent.
Full flow (no step through):
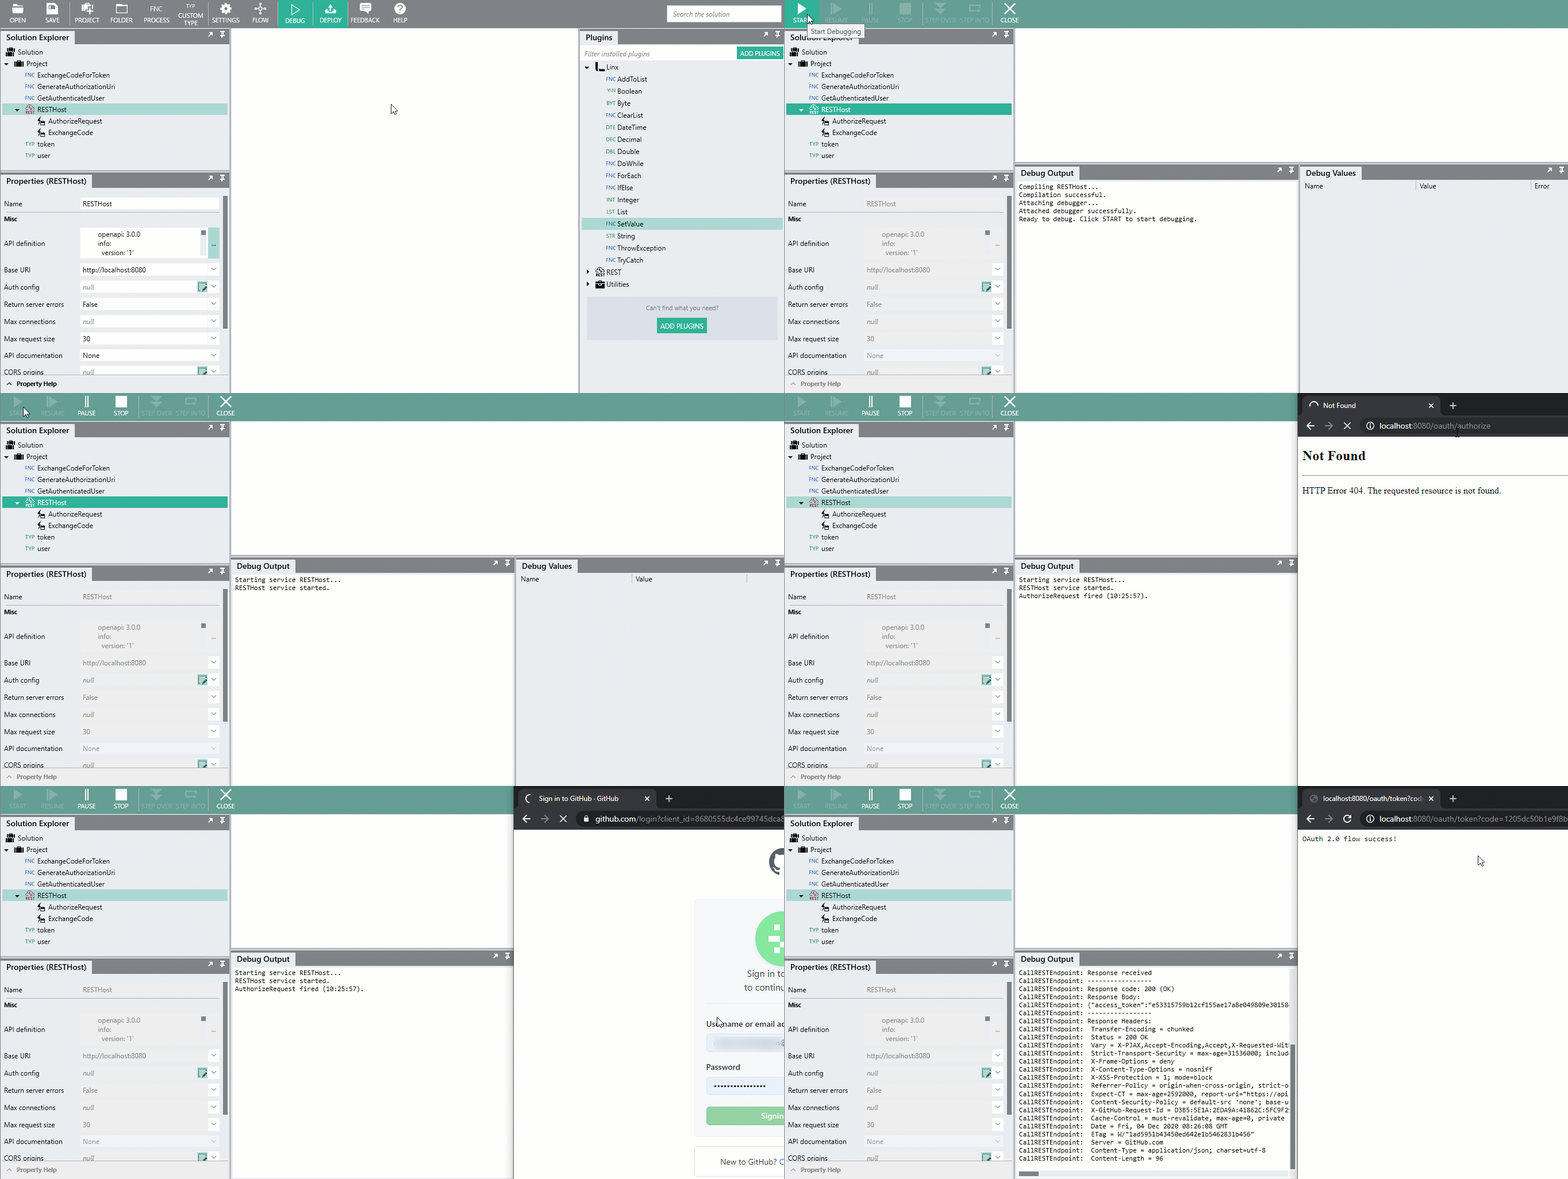
Customizing the response
To personalize the response, we are going to use the GetAuthenticatedUser process Function to return details of the user that just granted access to the application. This is done purely to demonstrate using the access token when making a request.
-
Drag the GetAuthenticatedUser
processFunction from the Solution Explorer, into the ExchangeCode operation, positioning it right below the ExchangeCodeForToken process. -
For the
access_tokeninput of GetAuthenticatedUser, reference the token generated from the ExchangeCodeForTokenprocessFunction like below:=ExchangeCodeForToken.token.access_token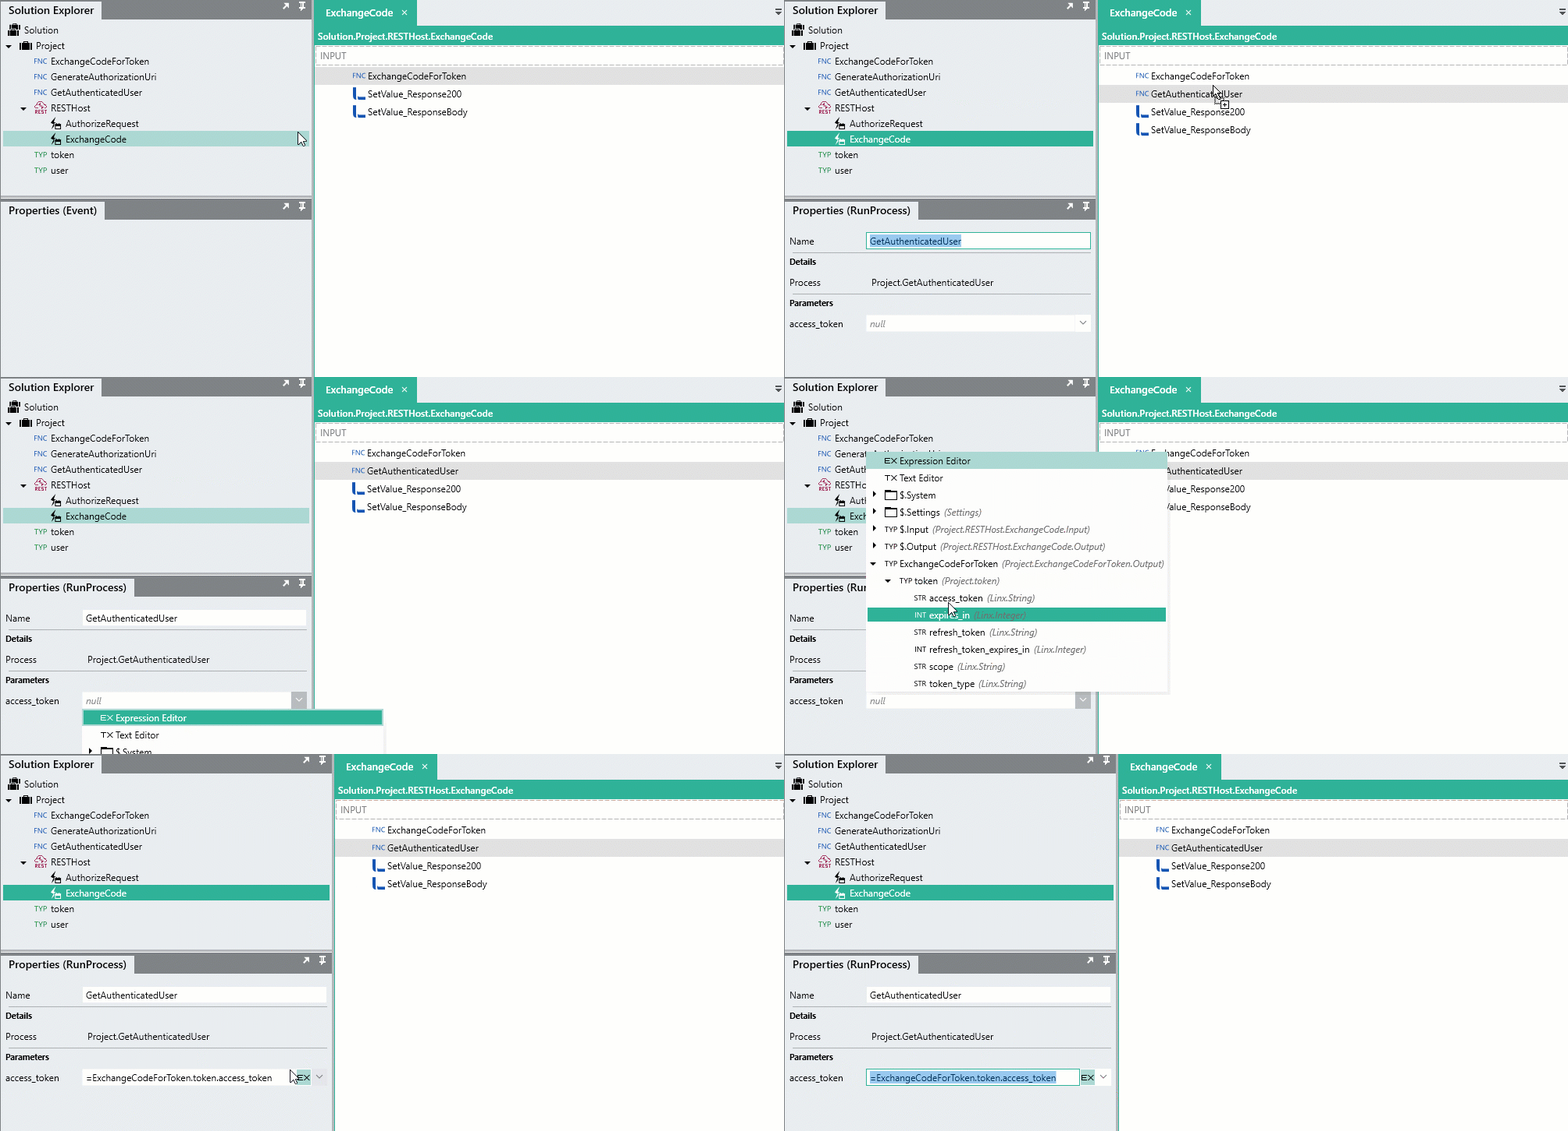
-
We now use the user details returned from the GetAuthenticatedUser
processFunction to personaize the response message.Alter the Source of the SetValue_ResponseBody like below:
="GitHub User '" + GetAuthenticatedUser.user.name + "' successfully authenticated"Now, when the flow completes, a personal message is returned.

Storing and retrieving the access token
In its current state, the Solution successfully generates and uses the access token. However, to re-authorize and generate a new token each time a request is made is impractical. As Linx does not persist data unless stored as a setting, you will need to store the token in a datasource of some kind (database, text file), in order to retrieve for later use in requests.
To demonstrate the concept, we are going to create a generic process Function that will store the access token object in a local text file.
Typically, access tokens would be stored in a database, for the use in this demonstration we will use a file instead as some users may have not set up a database
We are then going to create a generic process Function that will return the token details when they are needed n a request.
Logging the token
-
Create a new
processFunction and rename itLogToken. -
For the $.Inputs, add a
tokenfield and reference theProject.tokenobject as the Type. -
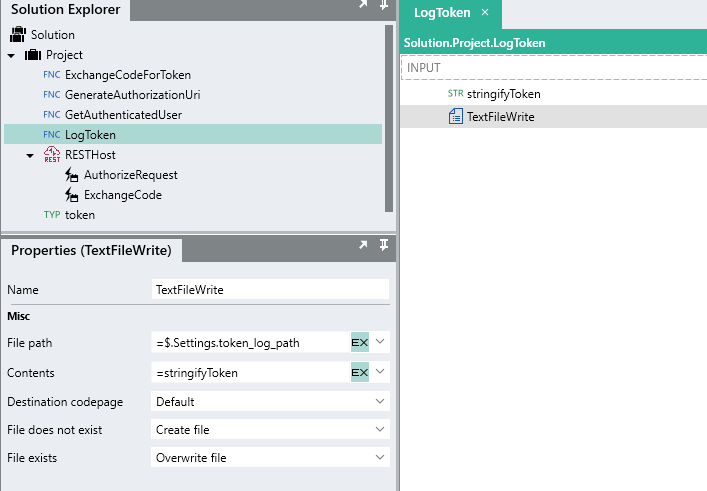
Within the LogToken process, add a TextFileWriteFNC .
-
For the File path we are going to create a
 $.Setting value which will store the location of the file.
We can then reference this value when reading and writing from the file.
-
For the Contents. we want to store the whole
tokenobject as plain text.Caution:
If you reference a whole CustomTYP object as a string input i.e. when writing the contents of a file, the custom type details will not be able to be converted into text implicitly. In order to explicitly convert a CustomTYP into text, you need to assign it to StringTYP first.To explicitly convert the token into text o use for storage, add a StringTYP instance to the
processFunction and rename itstringifyToken.For the Value, reference the whole
$.Input.token. This will explicitly converted the custom type structure and values into aJSONstring. -
For the Contents of the TextFileWrite, reference
stringifyToken. -
Ensure the File exists is set to
Overwrite.This means that if the file exits already, then the current contents of the file will be overwritten.
You are then able to make a process Function call to the LogToken process, in the ExchangeCode operation, passing in the token that was just generated (i.e. ExchangeCodeForToken.token):
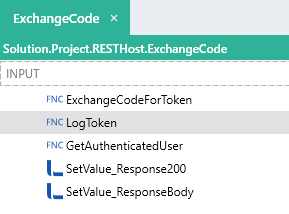
Now, if you re-initiate the whole flow again, the token response object will be logged in the “token.txt” text file:
Retrieving the token
By storing the whole JSON string of the object, we are able to read the contents back out and assign them directly into our tokenTYP, this makes working with the individual fields easier.
We are now going to build a process Function that will read the contents from “token.txt”, assign it to the tokenTYP and return the details. This process Function can then be called from other processes when a request is made. The latest stored token will be returned and then can be used in the Authorization header.
-
Create a new
processFunction and rename itRetrieveToken. -
For the $.Result, add a
tokenfield and reference theProject.tokenobject as the Type. -
Within the RetrieveToken process, add a TextFileReadFNC .
-
For the File path, reference the same $.Settings value that was used when writing to the file (i.e.
$.Settings.token_log_path). -
For the Return options, select
Complete.This will read the entire contents fom the file as a single StringTYP .
-
As the JSON stored in the file maps directly to the
tokenTYP, we can use a SetValueFNC to assign the output of the TextFileRead directly to the$.Result.tokenof the RetrieveToken process.
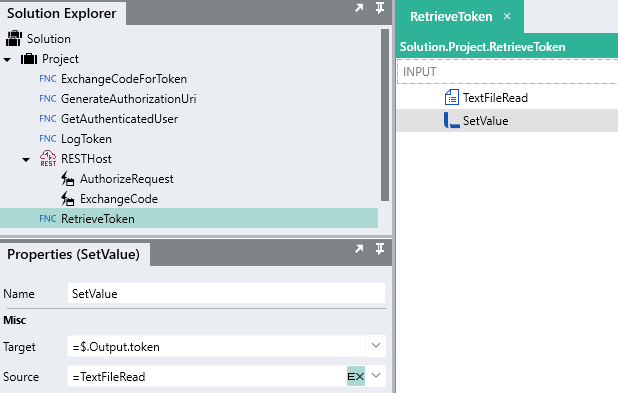
You are then able to call RetrieveToken wherever you need the current access token to make a request.
To demonstrate:
- Remove the
$.Input.access_tokenfield for the GetAuthenticatedUser process. - A validation error should appear as the
$.Input.access_tokenfield no longer exists. Instead of passing in the current access token value to the GetAuthenticatedUser process, we can just make a call inside of the GetAuthenticatedUserprocessFunction to the RetrieveToken process.
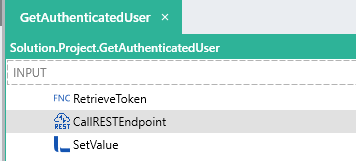
- We can then use the token details returned for the
Authorizationheader of the CallRESTEndpoint like below:="Bearer " + RetrieveToken.token.access_token
Now when re-initiate the flow, the generated token will be logged in a file. When the user details are requested, the latest token details are retrieved from the local text file and submitted with the request.
You’re set to go!
If you’ve followed the above guide, you should have a better understanding of the OAuth 2.0 flow as well as have a practical understanding of building a basic OAuth 2.0 authenticator with Linx. Hopefully, you should now be able to connect to your API of choice using the above tutorial as a base template.
Look out for more samples and post in the Linx Community.
For personal support queries, please contact support@linx.software or reply on this article.
