A scenario may arise where you have a Word document that you want to populate by utilizing Linx.
In Linx, there exists an Excel plugin which allows one to read/write excel spreadsheets using the built in functions, with Word documents however, there is not a built-in plugin but rather one must create a workaround in order to populate a Word document. The good news is that it is not required to have Microsoft Office/Word installed on the machine that Linx is running off.
Feel free to contact support@linx.software and we'll assist.
Please note the terms ‘Process’ and ‘Custom Type’ have been depreciated and have been replaced with ‘Function’ and ‘Type’ respectively. More details here.
Sample Solutions
Linx 5.22.0 WordPopulate.lsoz (9.2 KB)
Linx 6.0.5 Linx6.zip (13.3 KB)
Sample word document test.docx (11.3 KB)
Summary:
-
Unzip the Word document
-
Search through the XML contents for placeholders and replace with values
-
Zip the Word Document Files creating a new Word Document.
Download the attached word document and change the path in the settings accordingly
1) Create Type “Dictionary” (PlaceholderAndValue)
*Note: Not specifically needed for this example but it demonstrates the functionality of replacing placeholders with values. *
- Create a Type called ‘PlaceholderAndValue ‘ which will hold a Placeholder and Value, this will be used as a “dictionary”. The type will be looped through and depending on the Type. Placeholder string, if found in the doc, they will be replaced by the Type .Value.
2) Create the Placeholder replacement Function(Linx 5.20.2.0) (PopulateWordDocument)
-
Using the GenerateRandom function: Generate a “random” number which will then be converted into a string which will be used as the temporary file location for the Unzipped word document file to be generated to (see below).
-
Using the Unzip function: Unzip the “template” location and extract the files to the WordDocTemplateFullPath+RandomNumberGeneratedAbove.Base64String. This will create a number of new files in the target location, one of them being the xml content of the wod document.
-
Using a TextFileRead function: Read the file located at WordDocTemplateFullPath+RandomNumberGeneratedAbove.Base64String + "\word\document.xml". For the ‘Read Type’, use ‘Complete’.
-
Assign the output of the TextFileRead function to a string type (In the example, it is named FileContents).
-
Using a ForEach function: Assign the list to loop through as the list type of your Type created at the beginning of this Function(Linx 5.20.2.0) (this can be an input parameter like the example, or it can be a Type list within the Function). This will be used to loop through all the possible placeholders and their corresponding values.
-
Within the ForEach execution path, add a SetValue function and set the Target = FileContents (String Type). For the source property, here you will do the replacing:
FileContents.Replace(ForEach.Loop.Placeholder, ForEach.Loop.Value.Replace("$.System.NewLine", " </w:t> <w:br/> <w:t> ").Replace("\n", " </w:t> <w:br/> <w:t> "))
What the above command will do is replace any placeholders in the file which match the current Type.Loop.Placeholder with the Type.Loop.Value. Furthermore it will take care of new line characters as well.*
-
Once the ForEach.Type has completed, the FileContents type will contain the file contents with the replacement done.
-
For usability sake , you can then add a String Type , named ‘RootPath’, set the value of this to:
$.Input.DocxFileFullPath+GenerateRandomTempFolderName.Base64String+"\"*Note: It doesn’t necessarily have to be the input, but must achieve the goal of taking the initial Doc file path , concatenating it will the random string generated at the beginning of Function(Linx 5.20.2.0) + “\”. This will be used as the root path of the extracted files.
-
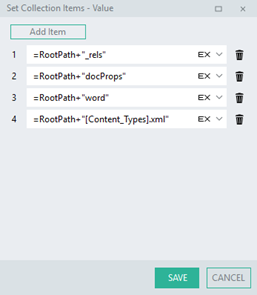
Now, create a List Type of Type = String, named ‘ListOfFiles’. Now add the below items to the List:

If you look at the “unzipped” files, they resemble the above structure:

This will be used in the “zipping” Function(Linx 5.20.2.0) in the next step.** -
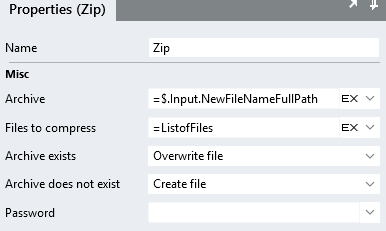
Using the Zip function, We must now, “zip” these files back again in order to have a complete Word Document. Configure the Zip function like below:

For the “Files to compress”, assign it to the List of files that you created earlier.
This will create a new word document in the supplier new file path.
-
Finally, we need to clean up the files so there aren’t a bunch of unzipped files all over the place. To do this, simply use the DirectoryDelete function and point it to the ‘$.Input.DocxFileFullPath+GenerateRandomTempFolderName.Base64String’ location. This will then remove the unzipped Word document folder structure.
3) Putting it all together (TestProcess)
So now we have made a Type “Dictionary” and our Word populating Function(Linx 5.20.2.0) we will now need to combine these to achieve our goal.
-
Create a new Function
-
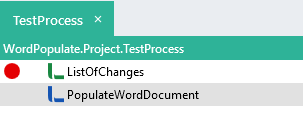
Add a List Type of Type Type.PlaceholderAndValue
-
Add items to the list which contain the placeholders of the document and their corresponding values.
-
Below the list, add the Function(Linx 5.20.2.0) created above ‘PopulateWordDocument’
-
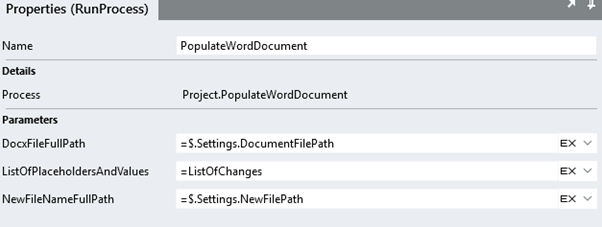
For the ‘PopulateWordDocument’, pass in the location of the template Word doc, the List of Type created in step (2) and then finally the file path of the result Word doc


Now, run the Function(Linx 5.20.2.0) and you should end up with a new Word document with the placeholders replaced. In the supplied example, you can see the difference between the Original (Left) and the New Word Document (right) :

The replacement Function(Linx 5.20.2.0) is just to demonstrate the scenario of having a template word document which you might want to populate with Custom Names, Account balances etc.