Currently the Linx ExcelRead/ExelWrite functions can slow down performance when reading/writing large volumes of data from/to an Excel spreadsheet.
To improve performance of these reads/writes it is suggested that you make use of the Linx Database plugins (specifically ExecuteSQL) to achieve this goal.
Initial Setup:
You will need to download and install Microsoft Access Database Engine 2016(English)
This driver allows for SQL to create a connection to an Excel spreadsheet.
LINX Components to Use:
-
Plugin: Database
_ Function: ExecuteSQL
_ Function: BeginTransaction
Connection Strings:
To successfully connect to a Excel spreadsheet you will need to define the source in the connection string of the ExecuteSQL function, it should like:
Provider=Microsoft.ACE.OLEDB.12.0;Data Source=;Extended Properties="Excel 12.0;"
Description of connection string taken from here
Provider : It is the main oledb provider that is used to open the excel sheet. This can be Microsoft.Jet.OLEDB.4.0 for Excel 97 onwards Excel file format or Microsoft.ACE.OLEDB.12.0. So far it is tested with upto Excel 2010 version.
Data Source : It is the full path of the excel workbook. Replace with the full path of your existing excel workbook/ file.
Extended Properties (Optional) : Extended properties can be applied to Excel workbooks which may change the overall activity of the excel workbook from your program. The most common ones are the following :
-
HDR : It represents Header of the fields in the excel table. Default is YES. If you don’t have fieldnames in the header of your worksheet, you can specify HDR=NO which will take the columns of the tables that it finds as f1,f2 etc.
-
ReadOnly : You can also open excel workbook in read only mode by specifying ReadOnly=true; By Default Readonly attribute is false, so you can modify data within your workbook
MaxScanRows : Excel does not provide the detailed schema definition of the tables it finds. It need to scan the rows before deciding the data types of the fields. MaxScanRows specifies the number of cells to be scanned before deciding the data type of the column. By default the value of this is 8. You can specify any value from 1 – 16 for 1 to 16 rows. You can also make the value to 0 so that it searches all existing rows before deciding the data type.
For example: Provider="Microsoft.ACE.OLEDB.12.0";Data Source="#FilePath" ; Extended Properties="Excel 12.0;HDR=NO;IMEX=3;MAXSCANROWS=10000;READONLY=FALSE"
When using this connection string in a ExecuteSQL function, you can make use of the expression editor to dynamically change the data source, for example:
=$.Settings.ExcelConn.Replace("#FilePath",$.Settings.FilePath ) or something similar.
LINX Settings:
Apend the existing LINX Settings in the demo to match your environment, i.e. SQL Connection, file paths etc.
SQL Commands:
READ:
How to read complete excel sheet?
Below is the sample command string to read the complete data in an excel sheet:
_Select _ from [NameOfExcelSheet$]*
Here, NameOfExcelSheet is the name of an excel sheet. Excel file can have multiple sheets. So, one has to specify the name of the sheet in order to fetch the data.
This command string reads the complete excel sheet.
Note: This may read empty rows, columns as well if there is any hidden data or there are empty rows in b/w the filled data.
How to specify range to read a block of data from excel sheet?
Below is the sample command string to read the complete data in an excel sheet:
_Select _ from [NameOfExcelSheet$ A1:E5 ]*
And, text after ‘$’ sin specifies the range of data to be read. Thus, as per the above command string, it will read the data from the excel cell A1 till E5. In other words, it will read 5 rows from row# ‘1’ to ‘5’ and 5 columns from column# ‘A’ to ‘E’.
WRITE:
To write to an excel spreadsheet you can use the INSERT command like below:
INSERT INTO [Sheet1$] (Col1Name, Col2Name, Col3Name)
VALUES (‘firsttextcol’, 2, ‘4/11/2009’);
OR for a specific range of cells without headers you can use:
INSERT INTO [Sheet1$A1:C10]
VALUES (‘firsttextcol’, 2, ‘4/11/2009’),
‘secondtextcol’, 3, ‘5/12/2009’);
DELETE:
This will remove the contents of the selected cells, unfortunately you cannot remove entire rows or cells but merely clear them.
DELETE FROM [Sheet1$A1:C10] WHERE F1 = ‘xxx’
UPDATE:
Updates can be used like normal, to change values or to clear certain contents that meet the criteria. You are able to add WHERE clauses by references the columns and the criteria to meet.
UPDATE [Sheet1$A1:AK1]
SET
F1 = NULL ,
F2 = NULL ,
F3 = NULL ,
CREATE:
The create statement on Excel file is used to define the range of the workbook that you will be using. This method creates a SQL ‘table’ of sorts in the sheet.
CREATE TABLE [Sheet1$]
(
[xCol1x] VARCHAR (50) ,
[xCol2x] VARCHAR (50) ,
[xCol3x] VARCHAR (50) ,
[xCol4x] VARCHAR (50) ,
)
DROP
The DROP TABLE command will remove all the data in the sheet, unfortunately you are not able to remove/delete the sheet itself.
DROP TABLE [Sheet1$]
Building a processFunction (To demonstrate the processFunction there is a demo: BigExcelWriter_HeaderWrite_DEMO.lsoz (13.4 KB)
You will need a new Linx processFunction first to begin adding functions, take a look at or use the demo as a base:
- Create a new .xlsx file
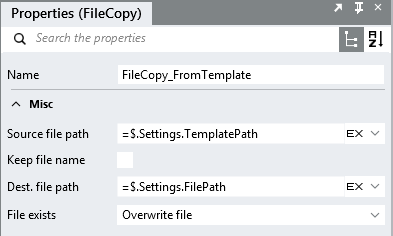
The one limitation of this method is that a .xlsx file will need to exists first before any command can be execute. Unfortunately, you will not be able to use these command on an Excel spreadsheet if it was created or written by the Linx ExcelWrite function. To get around this issue, and to avoid manually creating an Excel file, you can create a "template.xlsx" file stored in a file location that won’t change, this will just be a blank Excel spreadsheet. You can then make use of the Linx FileCopy function which can copy the "template.xlsx" into your "live" location with a new file name for example "FundTrades_20190101.xlsx".
![]()

- Creating a new table in the spreadsheet
The way in which SQL communicates with Excel, the Excel spreadsheet that you are working with needs to have its "columns" created in order to perform SQL actions (inserts, updates, selects).
To do this:
You can either append the existing [Sheet1$] with additional headers (Note: As with SQL you can use ‘’ to indicate headers with spaces in them i.e. [My Column Name]:
CREATE TABLE [Sheet1$] ([MyCol1] INT, MyCol2 VARCHAR(50), MyCol3…etc
You can create a new named sheet (Note: When creating a new sheet you do not need to use the character ‘$’. Additionally, you will not be able to "delete" the Sheet1$ if you do, only clear any data inside the sheet: See section DROP TABLE COMMAND ):
CREATE TABLE [MyNewSheet] (MyCol1 INT, MyCol2 VARCHAR(50), MyCol3…etc
- Now that the ‘table’/sheet is created, you have a data range to work with. Now to insert some data into the worksheet.
Defining File Info: In some cases, files will need a file Header section which adds details about the type of file (this is dependent on the context/use of your file). In the example, the file header section is created by looping through a SQL list and inserting the data into the defined range. Note: Because you have created the "table", when inserting you do not have to define the headers, only the range in which it will insert, but this range will need to include the first row as this is where you column headings are defined:
INSERT INTO [Sheet1$A1:B6] – This will insert the values in 2’s so in A2:B2; A3:B3; A4:B4 --etc
VALUES
(
@{getHeaderTopSection.ForEachRow.Col1},
@{getHeaderTopSection.ForEachRow.Col2}
);
- Creating the ‘table’ headers where your main content of the file will be, similarly to the above you need to define the range that matches the amount of columns you want inserted:
INSERT INTO [Sheet1$A1:AK30]
VALUES
(
‘ID Number’,
'First Name ', … etc
You can pass in dynamic variables or outputs in the normal way by dragging the desired variable into the insert.
- Writing the bulk load of your data using a DB Transaction
To insert large volumes of data into the Excel spreadsheet, you can make use of the Linx BeginTransaction function to significantly improve the writing times compared to the ExcelWrite function. Note: In the demo processFunction there is a loop, this is just to simulate large amounts of data being outputted.
To do this:
Drag the BeginTransaction function onto the processFunction pain. Then as the connections string, use:
Connection Type: OLE DB
Connection string: Use the same connection string as the previous ExecuteSQL function.
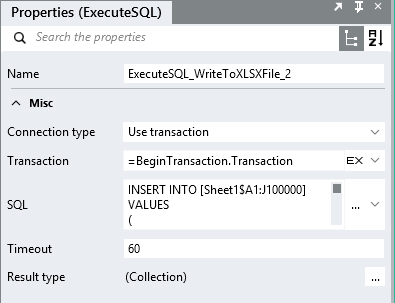
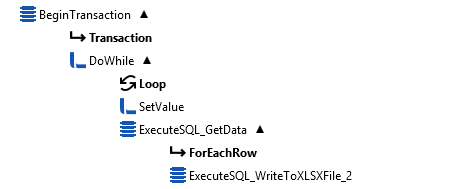
Within the transaction you can have you data retrieval query from your DB and then below this you can have the SQL Insert like below (Note: Again the range must be correctly defined, so if you are writing 10k records in 10 columns then the range should be more than the expected row count to ensure the processFunction doesn’t fail). Make sure your data retrieval and data writing SQL functions are within the ‘Transaction’. For the connection string for the SQL Read, use your normal DB connection, and for the OleDB SQL Write function, make the connection type = ‘Transaction’ and the connection string = BeginTransaction.Transaction

INSERT INTO [Sheet1$A1:AK100000]
VALUES
(
@{ExecuteSQL_GetData.ForEachRow.A1},
@{ExecuteSQL_GetData.ForEachRow.A2},
@{ExecuteSQL_GetData.ForEachRow.A3},
Your processFunction should look similar to the below:

- Clearing contents
You may want to clear you contents of your header row for example, you can just make use of the UPDATE command like below:
UPDATE [Sheet1$A1:AK1]
SET
F1 = NULL ,
F2 = NULL ,
F3 = NULL ,
F4 = NULL ,
F5 = NULL ,
The above should set you up with all the operations you need to interact with a Excel file through the LINX Database components. Take a look at the demo for a more thorough understanding.