Import conventions
You are able to import JSON or XML data as a CustomTypeTYP in order to work with the data as objects.
Importing a CustomTypeTYP
To import a new CustomTypeTYP:
- Right-click on the Solution Explorer and click Import Custom Type.
- Past the XML or JSON data into the editor.
- Edit the Name field.
- Click Create
- A new CustomTypeTYP will appear in the Solution Explorer:
This means that if your first item doesn’t contain all the possible variations of the object, then the CustomTypeTYP will only contain the object structure of the first item.
It is thus suggested that you import a JSON or XML schema to ensure the full variation of the object structure is created.
The below conventions apply when importing a CustomTypeTYP :
Naming conventions
When importing JSON or XML data as a CustomTypeTYP , the following naming conventions apply:
-
A field name can only start with the following characters:
- a - z
- A - Z
- _
-
A field name can only contain the following characters:
- a - z
- A - Z
- 0 - 9
- _
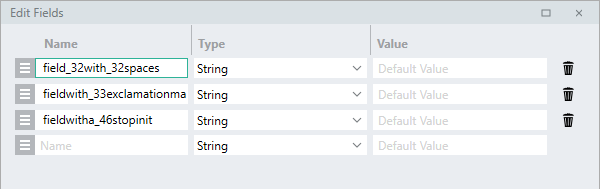
Any invalid characters are replaced with an underscore (“_”) followed by the ASCII value of the character.
For example, the below JSON object:
{
	"field with spaces": "string",
	"fieldwith!exclamationmark": "string",
	"fieldwitha.stopinit": "string"
}
Will be imported into Linx as:
{
   "field_32with_32spaces":"string",
   "fieldwith_33exclamationmark":"string",
   "fieldwitha_46stopinit":"string"
}
The original field names will be parsed during assignment from the data into this CustomTypeTYP.
Data type conversion conventions
The following basic types will get converted into the following Linx type:
| Data type | Example | Linx type | Linx Deserialization |
|---|---|---|---|
| Boolean | False | BooleanTYP | False |
| Byte | 90 | IntegerTYP | 90 |
| DateTime | “2020-06-15T11:37:55.4215671+02:00” | DateTimeTYP | 2020/06/15 11:37:55 |
| Decimal | 1.1234567891123457 | DoubleTYP | 1.12345678911235 |
| Double | 1.12345678911235 | DoubleTYP | 1.12345678911235 |
| Integer | 50 | IntegerTYP | 50 |
| String | “mystringtext” | StringTYP | mystringtext |
To demonstrate, import the following JSON string as a Custom Type TYP:
    {

      "boolean_field": true,

      "byte_field": 90,

      "datetime_field": "2020-06-15T11:37:55.4215671+02:00",

      "decimal_field": 1.1234567891123457,

      "double_field": 1.1234567891123457,

      "integer_field": 1,

      "string_field": "mystring"

    }
Lists
When importing a list object into Linx, only the child list item object will be imported as a CustomTypeTYP . This is to say, if you import a list of orders , Linx will create a single order CustomTypeTYP . You can then use a ListTYP and set the Type to this CustomTypeTYP .
For example, take the below JSON which is a list of coin objects containing cryptocurrency related information:
        [
          {
            "id": "01coin",
            "symbol": "zoc",
            "name": "01coin"
          },
          {
            "id": "02-token",
            "symbol": "o2t",
            "name": "O2 Token"
          },
          {
            "id": "0cash",
            "symbol": "zch",
            "name": "0cash"
          }
        ]
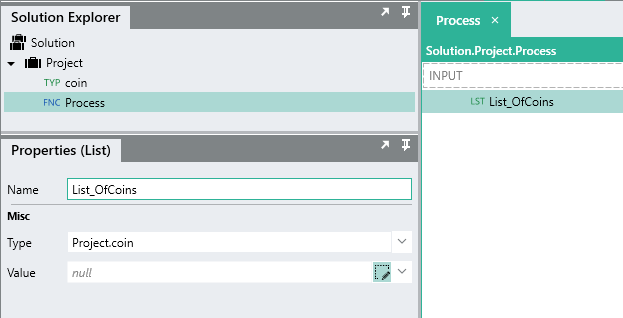
When this is imported into Linx, only the child coin object is imported.
You can then create a ListTYP with the Type of coin.
DateTime fields
In Linx, the DateTimeTYP has to contain a valid DateTime value, If a CustomTypeTYP contains a field of the type DateTimeTYP , then this field cannot be assigned a NULL value at runtime, if the above does happen, then a similar error to the below will be thrown:
Error converting value {null} to type 'System.DateTime. Path 'message', line 1, position 800.
    Null object cannot be converted to a value type.
As you can see from the exception error message above, a DateTimeTYP
cannot be assigned a null value.