Introduction
Shopify exposes a REST API for 3rd party applications to integrate with.
This guide will cover connecting to the Shopify Admin API with Linx and some request examples.
Creating a Linx application and connecting it to Shopify involves the following steps:
- Creating a custom app and generating an access token.
- Configuring Linx to authenticate
- Customizing requests
Feel free to contact support@linx.software and we'll assist.
Resources:
- Shopify REST API reference documentation: Developer documentation related to the Shopify Admin API.
- Solution.lsoz (28.1 KB): Template Linx application. Open it in your Linx Designer to follow this guide.
If you have any queries regarding specifics about integrating with Shopify or want further examples, reply to this article or connect with: support@linx.software
Enable custom app development
Before you can create a custom app for your Shopify store, you need to enable custom app development. Only the store owner can enable custom app development.
Steps:
- From your Shopify admin, go to Apps.
- Click Develop apps.
- Click Allow custom app development.
- Read the warning and information provided, and then click Allow custom app development.
Create and install a custom app
After you’ve enabled custom app development, you can create and install a custom app in your Shopify admin. You need to set API scopes to determine which parts of your store the custom app can access. After the app is installed, you’ll receive access tokens that the app uses to access information from your store using Shopify’s APIs.
The store owner, and collaborators and staff members with the relevant permissions, can create and install custom apps.
Once you’ve generated the access token, you are able to start making API requests.
Create the app
- From your Shopify admin, go to Apps.
- Click Develop apps.
- Click Create a custom app.
- In the modal window, enter the App name and select an App developer. The app developer can be the store owner, or any staff or collaborator account with the Develop apps permission.
- Click Create app.
Select API scopes
After you create a custom app, you can assign API scopes to it.
In this guide, we will be working with Customers and Products but feel free to add more scopes as needed and these permissions can always be updated at a later stage.
In the app’s overview page, navigate to the Configuration tab where you can assign permissions:
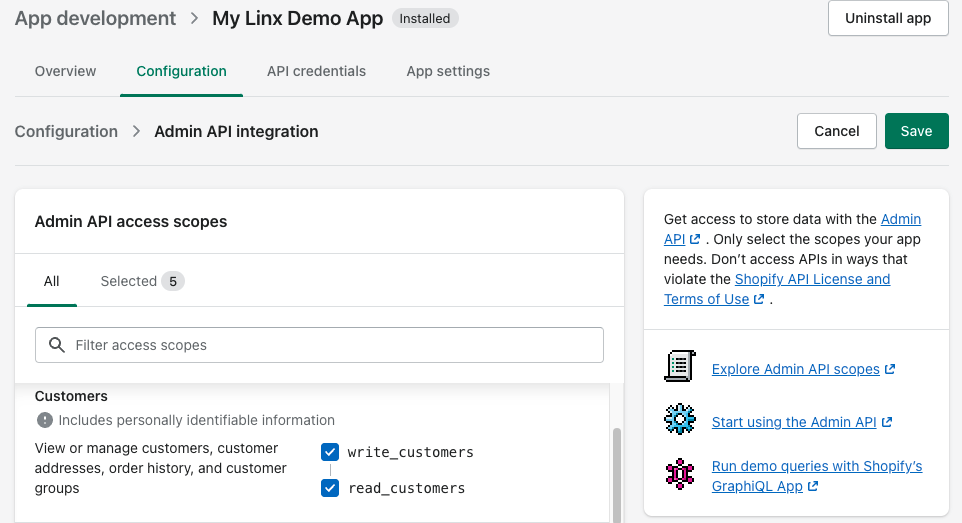
Once you’re done selecting the relevant scopes, click ‘Save’ in the top left corner.
Install the app and get the API access tokens
After you’ve set API scopes for your app, you can install the app. You’ll get your API access tokens after you install which will allow you to connect to your store via API.
- Click Install app.
- In the modal window, click Install app.
- Get the access token: Go to the Admin API access token section and click Reveal token once.
- Copy this token and save it for later use.
Connect to Shopify
Now that you’ve installed a custom app on the Shopify admin and generated the access token, you can now start making requests to the Shopify Admin API with Linx.
In this section you are just going to make a basic request in order to see how it is achieved in Linx and to test the connectivity.
- Open your Linx Designer.
- Create a new Linx Solution.
- Click on the
 button in the Plugins panel on the right.
 - Search for the ‘REST’ plugin and click ADD.

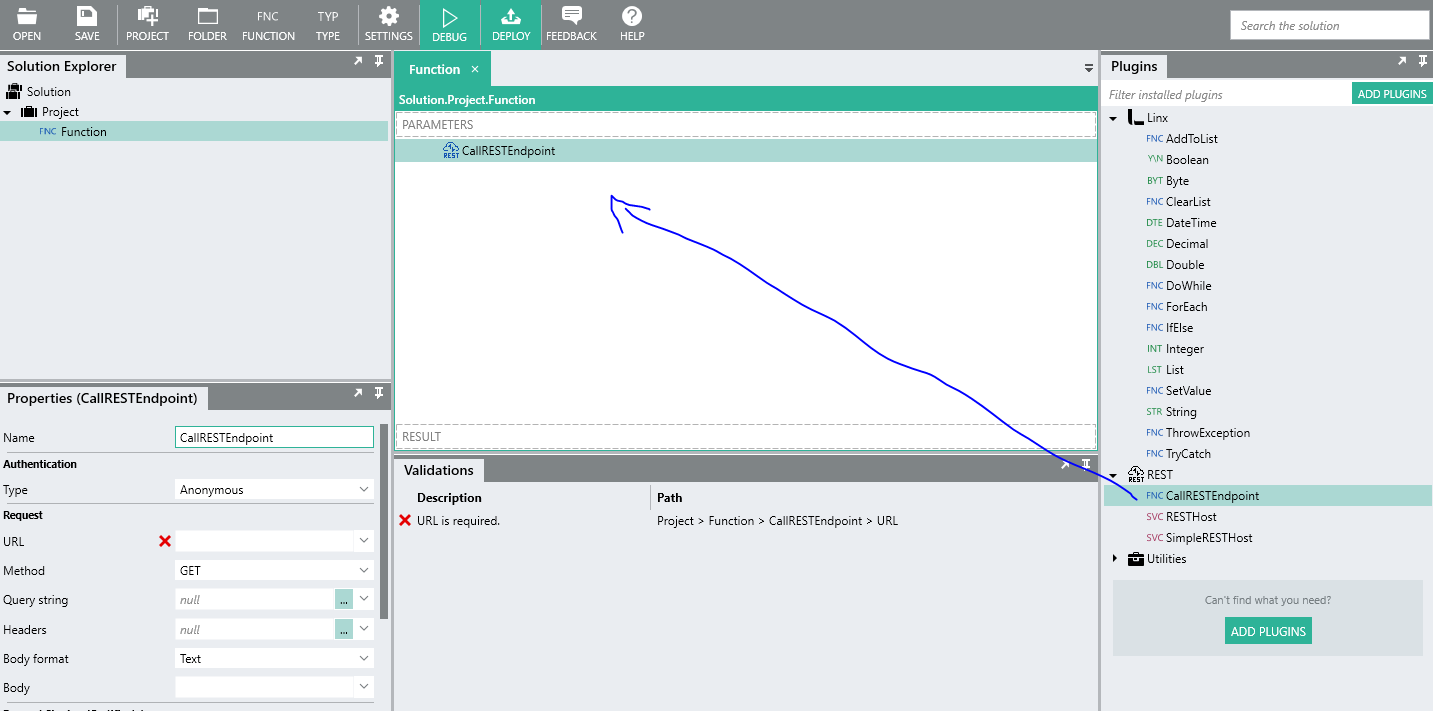
- The REST plugin contains functions related to REST APIs, in our case we are going to make use of the CallRESTEndpointFNC, which allows you to make requests against a REST endpoint.
Now that you’ve setup the needed plugins in your Linx Solution, you can begin to make requests to the Shopify API.
Requests made to the Shopify API require the following properties at a minimum:
- Base URL: This is the custom url that references your instance of Shopify and takes the following structure:
https://{shop_name}.myshopify.com/admin/api/{api_version} - Endpoint: This is the particular endpoint of the resource that you want to interact with, so for example the ‘Products’ endpoint is
/products.json, this is appended to the Base URL. - Authentication header: Requests are authenticated by including your apps access token in the
X-Shopify-Access-Tokenheader.
To demonstrate, we are going to make a a simple request which will return a list of customers:
-
Drag a CallRESTEndpointFNC from the Plugins panel onto a user defined function.
-
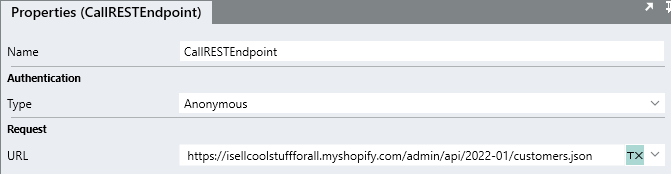
Configure the URL property to be a combination of the Base URL and Endpoint.
In my case my store name is
isellcoolstuffforalland the API version is2022-01, and then the endpoint is/customers.json.This will mean that my URL is:
https://isellcoolstuffforall.myshopify.com/admin/api/2022-01/customers.jsonNote:
Take note of the .json appended to the endpoint path. -
Add the custom URL to the CallRESTEndpointFNC as the URL property:
-
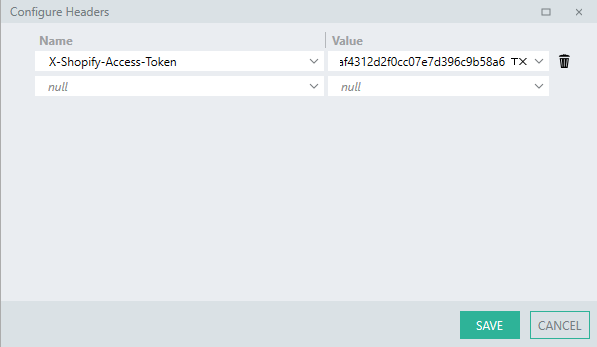
Next, you need to configure the authentication header which can be done by expanding the Headers property by clicking the … icon.

-
Add a header with the Name of
X-Shopify-Access-Tokenand then for the Value, paste the access token you copied earlier and click ‘Save’.
-
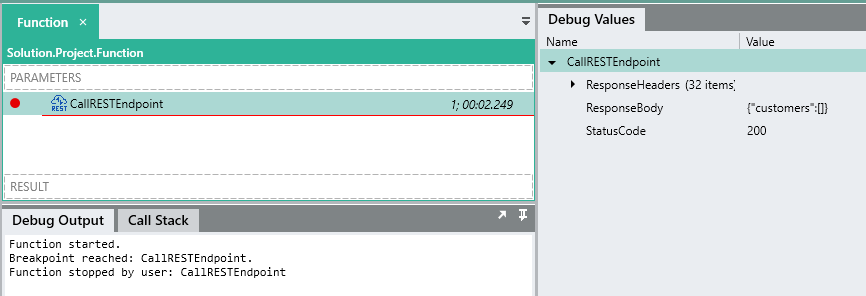
Now you can make a test request to see if everything is configured correctly. To make the request, add a Breakpoint on the CallRESTEndpointFNC.
-
Click on ‘DEBUG’ in the top menu bar.
-
Once the Solution has compiled, click ‘START’.
-
The process will immediately pause at it encountered a breakpoint. Now click ‘STEP OVER’.
-
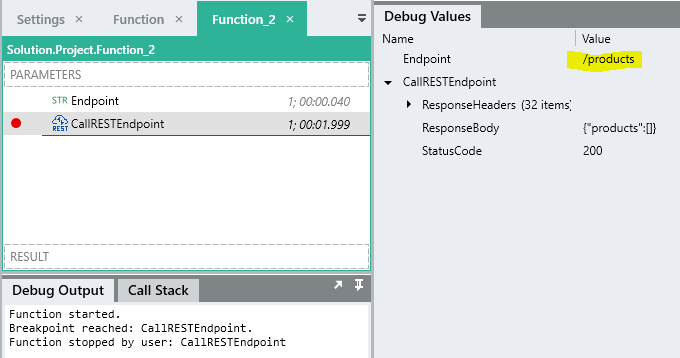
A request should be executed and you should be able to see the successful result
StatusCode: 200of the request in the Debug Values panel on the right:
Re-using configuration properties
In the above example, we connected to the Shopify API using our custom URL and access token, however, these were hardcoded which is not very practical in the real world when we need to develop multiple requests.
In order to make it easier and quicker to configure these requests, it is best practice to create $.Settings values for all the needed constants in our application which may change at a later stage. By making these $.Settings values, we can reference them throughout our Linx application and update them in a single place to have application wide effects.
-
Open the Linx Solution’s
 $.Settings.
 -
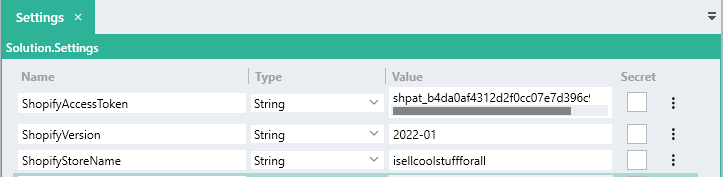
Add a setting named “ShopifyAccessToken” and paste your access token in here from earlier.
-
Next add the below settings which we use to build up the base URL.
- ShopifyVersion:
2022-01(dependant on current version) - ShopifyStoreName:
isellcoolstuffforall(Replace this with your actual store name).
- ShopifyVersion:
-
Next we are going to add a dynamic setting which will concatenate the other settings to form our base url at runtime.
- Add a new setting called ‘ShopifyBaseURL’
- For its value, set it exactly like below:
https://{ShopifyStoreName}.myshopify.com/admin/api/{ShopifyVersion}This will use the values of the other settings so that you do not have to constantly update one long string value.

Now that we’ve created our neccessary $.Settings, lets go back to our request that we were previously working with and reference these Solution wide values.
-
Alter the URL property to reference the $.Settings.ShopifyBaseURL:

-
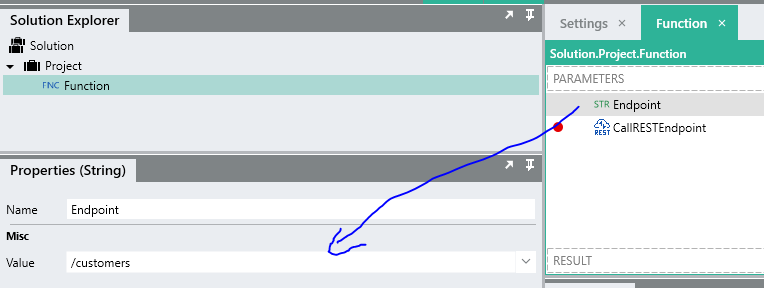
We could make this even simpler by creating a
Stringtype above the CallRESTEndpointFNC which will hold the specific resource endpoint, in this case/customers.
-
Next we can just reference this
Endpointvariable in the URL property like below:

-
Now we just need to edit the header property to reference the access token stored as the setting:

-
You can Debug the function like before and the request will execute like before.
The advantage of doing the above is that you are able to quickly copy and modify functions, without hardcoding any values or delving into each property. So, for example if you now wanted to make a request to the ‘/products’ endpoint, you could copy the whole function and only change the Endpoint variable to /products.
Querying and modifying data
So far, we have made simple requests in order to test out our configurations but we havent done anything meaningful in terms of working with the data both in terms of posting data objects or working with the response data objects.
The below examples are demonstrations of interacting with the Shopify API and Linx.
Querying customers
The below example deals with the Customer object. The function makes a GET request to the /customers endpoint which returns a JSON string response containing a list of all the customers. The response is then imported by Linx into a custom type object which is then used to structured the response body.
Before continuing, ensure that you have actual Customers created on your Shopify store.
To make things more usable in our Solution, I have created a Project called ShopifyAPI and nested a folder called Customers which will contain functionality related to Customers. Within this folder I have created 2 more folders with the names Requests (we will organise all our functions that execute requests in here) and then Types which will contain our custom data objects that we will use later.I’ve also gone back to our original function which we used to test out the initial configuration and renamed it to GetCustomers:

Now lets debug the GetCustomers function like before:
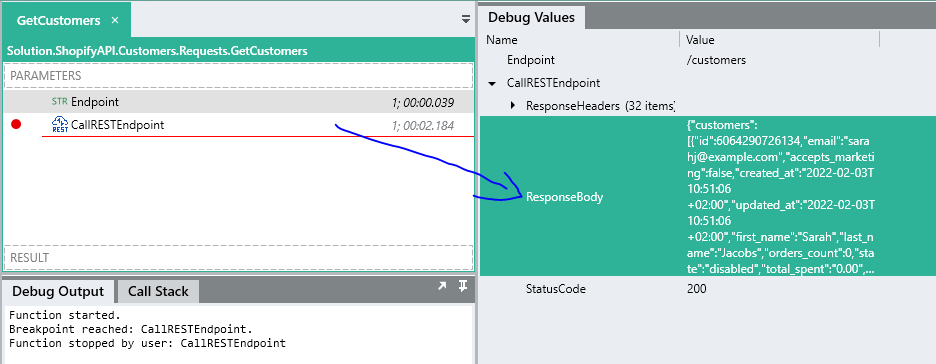
Since there are actual customers on my Shopify store, the response body now contains a JSON structured list of customer’s data.
The response body is a JSON string like below:
{"customers":{
   "customers":[
      {
         "id":6064290726134,
         "email":"sarahj@example.com",
         "accepts_marketing":false,
         "created_at":"2022-02-03T10:51:06+02:00",
         "updated_at":"2022-02-03T10:51:06+02:00",
         "first_name":"Sarah",
         "last_name":"Jacobs",
         "orders_count":0,
         "state":"disabled",
         "total_spent":"0.00",
         "last_order_id":null,
         "note":"Sarah is one of the top cusomters",
         "verified_email":true,
         "multipass_identifier":null,
         "tax_exempt":true,
         "phone":null,
         "tags":"surf shop",
         "last_order_name":null,
         "currency":"ZAR",
         "addresses":[
            {
               "id":7555927933174,
               "customer_id":6064290726134,
               "first_name":"Sarah",
               "last_name":"Jacobs",
               "company":"Beach Vibes Bar",
               "address1":"13 Strand Street",
               "address2":"",
               "city":"Cape Town",
               "province":"",
               "country":"",
               "zip":"7833",
               "phone":"",
               "name":"Sarah Jacobs",
               "province_code":null,
               "country_code":null,
               "country_name":"",
               "default":true
            }
         ],
         "accepts_marketing_updated_at":"2022-02-03T10:51:06+02:00",
         "marketing_opt_in_level":null,
         "tax_exemptions":[

         ],
         "sms_marketing_consent":null,
         "admin_graphql_api_id":"gid:\/\/shopify\/Customer\/6064290726134",
         "default_address":{
            "id":7555927933174,
            "customer_id":6064290726134,
            "first_name":"Sarah",
            "last_name":"Jacobs",
            "company":"Beach Vibes Bar",
            "address1":"13 Strand Street",
            "address2":"",
            "city":"Cape Town",
            "province":"",
            "country":"",
            "zip":"7833",
            "phone":"",
            "name":"Sarah Jacobs",
            "province_code":null,
            "country_code":null,
            "country_name":"",
            "default":true
         }
      },
      {
         "id":6064290234614,
         "email":"johnd@example.com",
         "accepts_marketing":false,
         "created_at":"2022-02-03T10:49:38+02:00",
         "updated_at":"2022-02-03T10:49:38+02:00",
         "first_name":"John",
         "last_name":"Doe",
         "orders_count":0,
         "state":"disabled",
         "total_spent":"0.00",
         "last_order_id":null,
         "note":"John is our longest paying customer",
         "verified_email":true,
         "multipass_identifier":null,
         "tax_exempt":true,
         "phone":null,
         "tags":"electrician",
         "last_order_name":null,
         "currency":"ZAR",
         "addresses":[
            {
               "id":7555927245046,
               "customer_id":6064290234614,
               "first_name":"John",
               "last_name":"Doe",
               "company":"Flash Electricity",
               "address1":"1 Electric Avenue",
               "address2":"",
               "city":"Cape Town",
               "province":"",
               "country":"",
               "zip":"7900",
               "phone":"0216262777",
               "name":"John Doe",
               "province_code":null,
               "country_code":null,
               "country_name":"",
               "default":true
            }
         ],
         "accepts_marketing_updated_at":"2022-02-03T10:49:38+02:00",
         "marketing_opt_in_level":null,
         "tax_exemptions":[

         ],
         "sms_marketing_consent":null,
         "admin_graphql_api_id":"gid:\/\/shopify\/Customer\/6064290234614",
         "default_address":{
            "id":7555927245046,
            "customer_id":6064290234614,
            "first_name":"John",
            "last_name":"Doe",
            "company":"Flash Electricity",
            "address1":"1 Electric Avenue",
            "address2":"",
            "city":"Cape Town",
            "province":"",
            "country":"",
            "zip":"7900",
            "phone":"0216262777",
            "name":"John Doe",
            "province_code":null,
            "country_code":null,
            "country_name":"",
            "default":true
         }
      }
   ]
}
This contains a higher level customers object, which is a list of customer objects relating to each customer.
In order to work with the individual data objects, we need to create a custom data type so Linx will know what to parse the response body into, this will allow us to work with individual field values in subsequent operations.
Copy the value of CallRESTEndpoint.ResponseBody from the Debug values panel or from the API documentation.
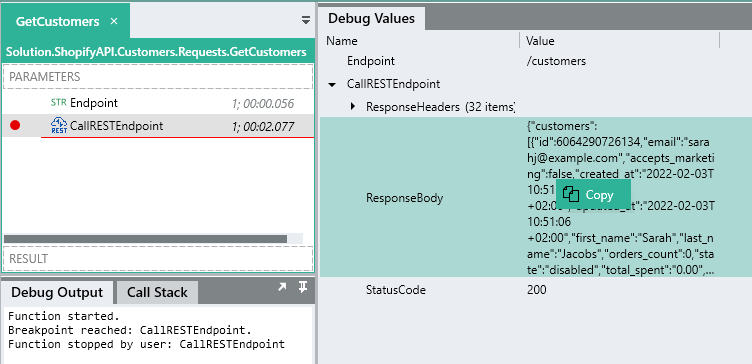
Import the copied JSON string as a new Type by pasting it in the editor.
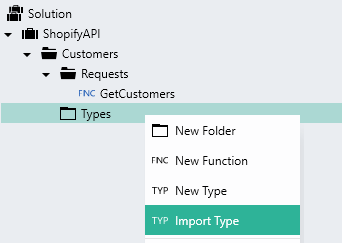
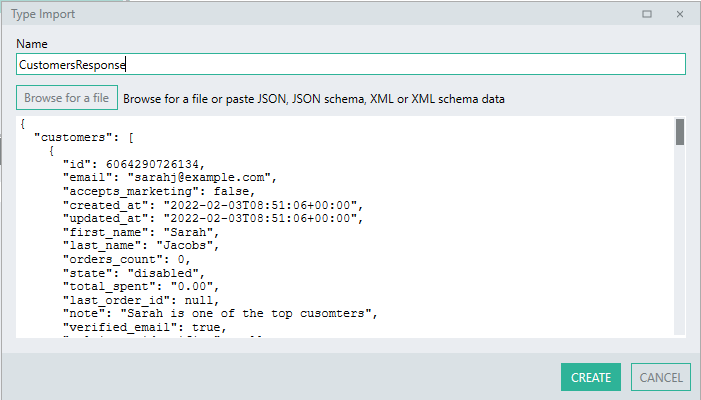

This will create a data object or type for you to structure the response data into.
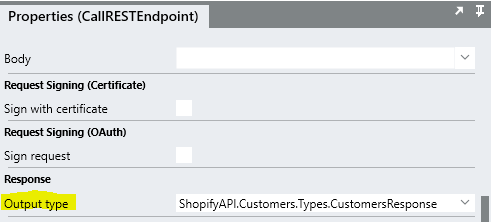
Next, we need to assign the response body of the request to this data object.
To do this, configure the CallRESTEndpointFNC to have an Output type of the newly imported user defined type.
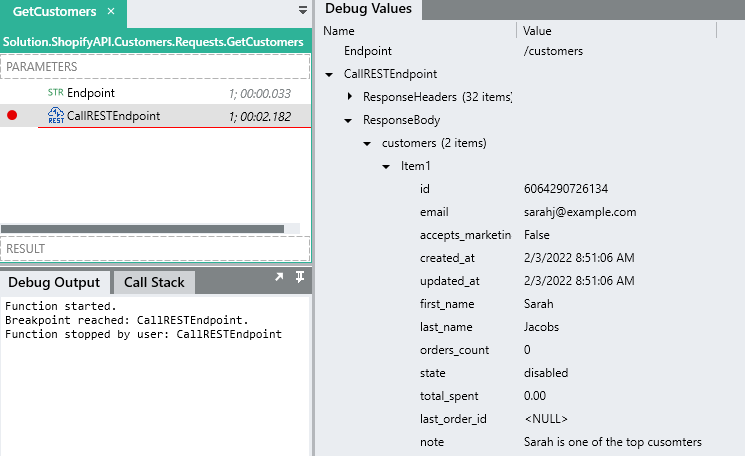
Now, when we debug the function again, the response body is structured into a data object for us to work with:
We could then access the individual items or fields by using additional functions, for example, if we wanted to return all the customer objects as a result of our GetCustomers function we could create a result parameter called ListOfCustomers.
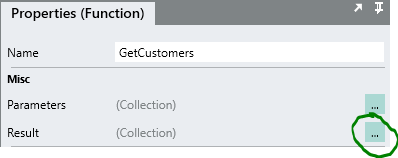
For the type, we first set it as List<>.

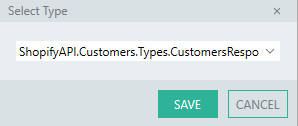
And then using the List type editor ![]() , we can reference the
, we can reference the CustomersResponse_customers:

Now, we want to loop through the output the CallRESTEndpoint function and add each customer object to the Result.ListOfCustomers, this can be done by using a ForEach function.
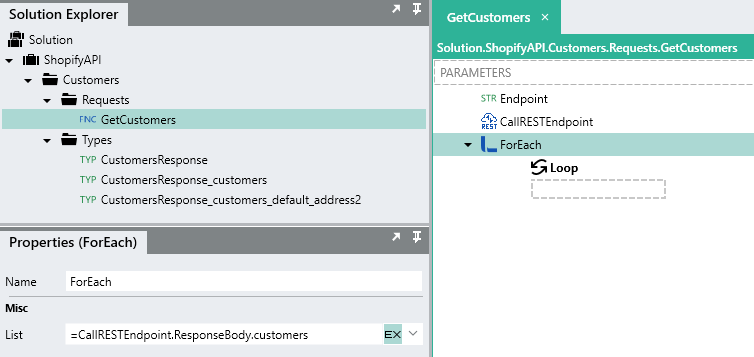
For each loop, we then use an AddToList function to add the current customer to the Result.ListOfCustomers:
Now, when the GetCustomers function is executed, it will return a ListOfCustomers:

Adding products
In the below example, a Product will be added to Shopify. This will involve making a POST request to the /products endpoint. A JSON structure containing details of a Product will be submitted as the request body.
Example request:
POST /admin/api/2022-01/products.json
{
  "product": {
    "title": "Burton Custom Freestyle 151",
    "body_html": "<strong>Good snowboard!</strong>",
    "vendor": "Burton",
    "product_type": "Snowboard",
    "tags": [
      "Barnes & Noble",
      "John's Fav",
      "Big Air"
    ]
  }
}
In the below example we are going to create a user defined function that will take in a products details as the input parameters. These details will then be assigned to the user defined type and submitted in a request.
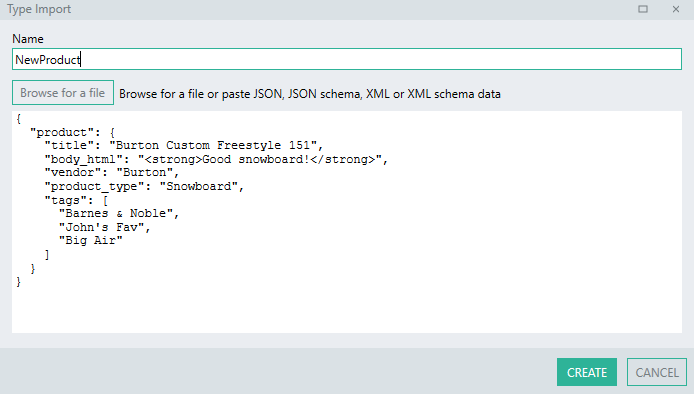
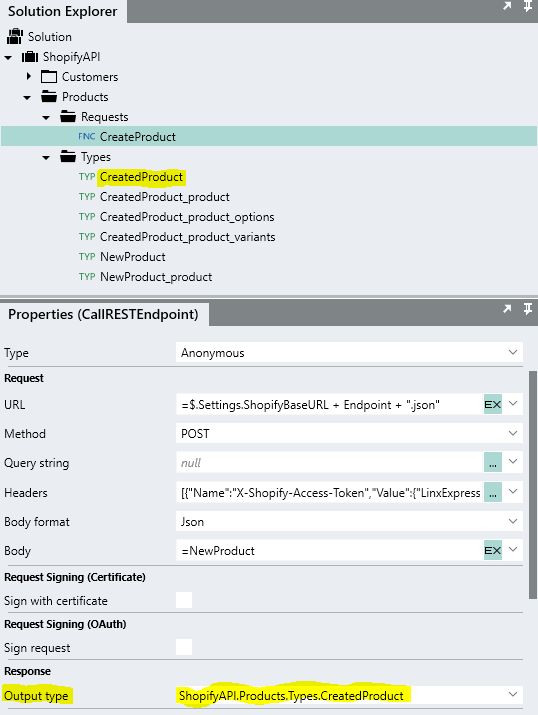
First, In order to submit a valid JSON data structured like the above, you need to create a user defined Type that matches the fields in the product object, either manually or by importing the provide JSON example like before as a new Type with the name of “NewProduct”. This will create two types, a parent NewProduct which holds a child NewProduct_product.
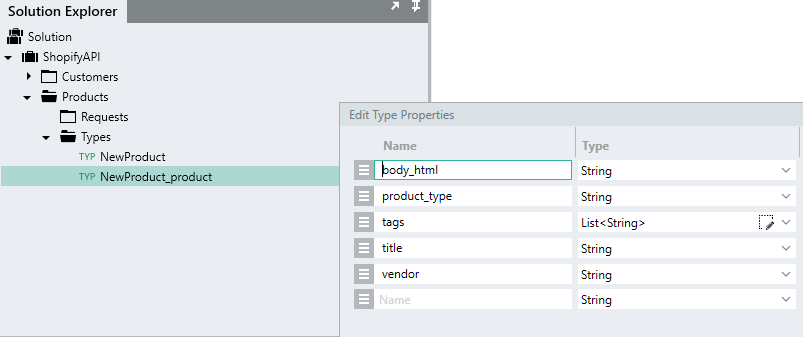
This user-defined NewProduct type is then available to reference across your Linx application to structure data.
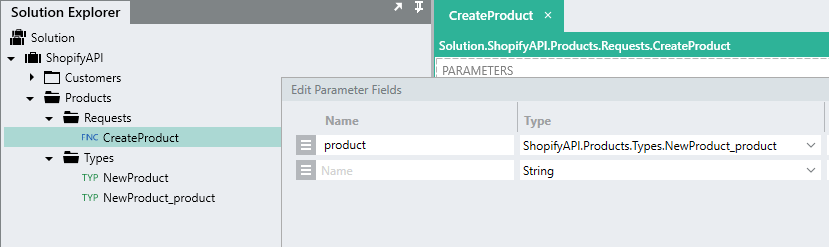
Next, we are going to create a user defined function that will take in data in this format and then submit this data to the Shopify API.
To do this, create a new user defined function with the name of “CreateProduct”, with an input parameter with the name of product and the Type of NewProduct_product. When this CreateProduct user defined function is called from somewhere else in the application, the structure of the child object will be able to be used to pass data through. The parent NewProduct object is only needed in the actual request and is not needed as an input parameter as it just creates another level, we can assign it later inside function.
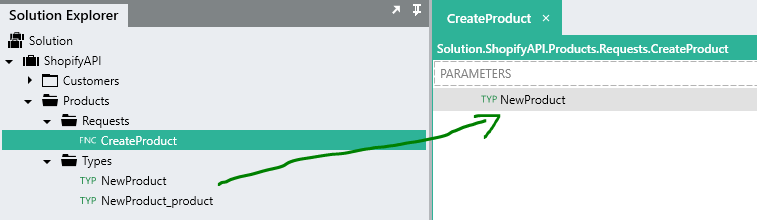
For the request body we are going to submit a NewProduct type from earlier in a JSON format. Currently, the CreateProduct function takes in an input parameter of the type NewProduct_product. However, for the request to succeed, we need to submit the entire structure of NewProduct. To do this, we need to assign the input parameter product details as the child NewProduct_product of NewProduct.
To do this, drag an instance of the NewProduct type from the Solution Explorer onto the CreateProduct canvas.
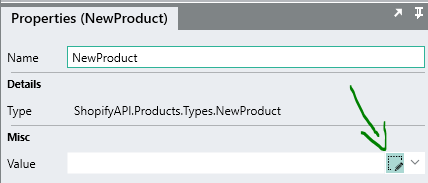
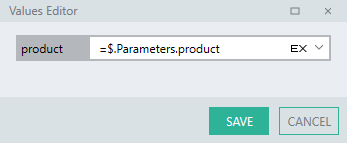
Expand its field values properties and in the product field, reference the input parameter product.
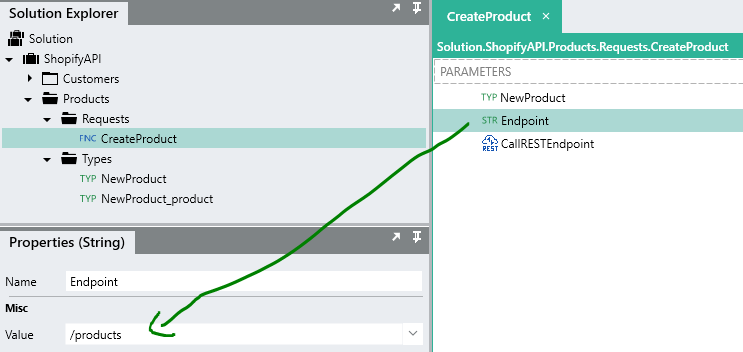
Now we need to configure the actual request to use this object, but since we’ve made our previous function very generic, we can go back to the GetCustomers function and copy the Endpoint variable and the CallRESTEndpoint function and paste it in the CreateProduct function.

We then need to make slight changes, so first alter the Endpoint variable’s value from /customers to /products:
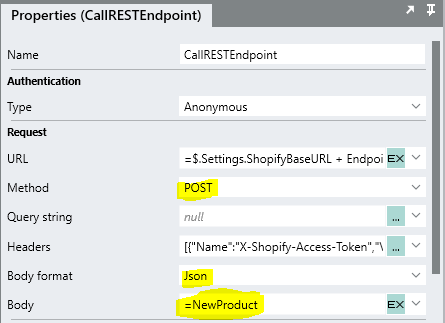
We then need to configure the CallRESTEndpoint function to make a POST request using the NewProduct as the request payload:
Change the Method of the request to POST and set the Body format as JSON. For the Body property, reference the local NewProduct.
Now we can make a request to test it out.
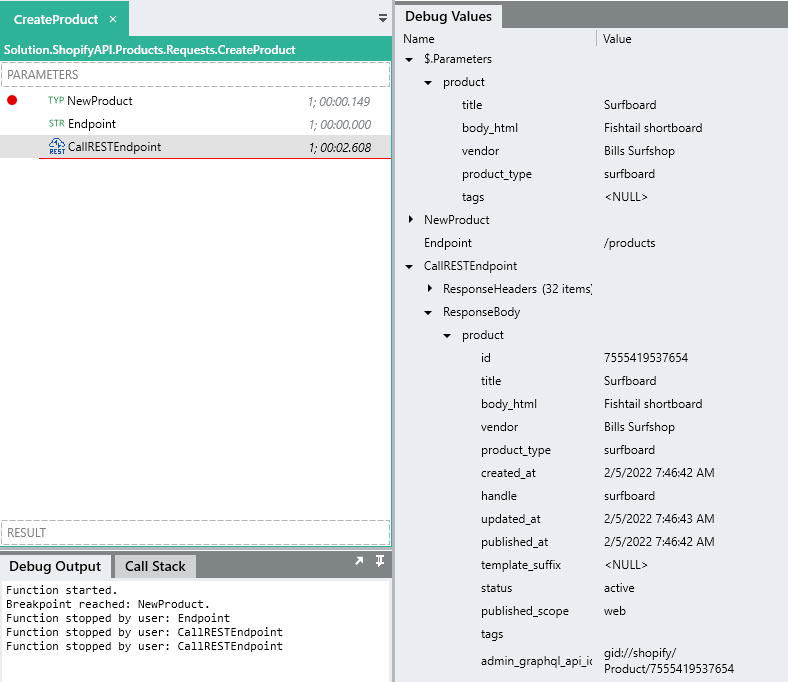
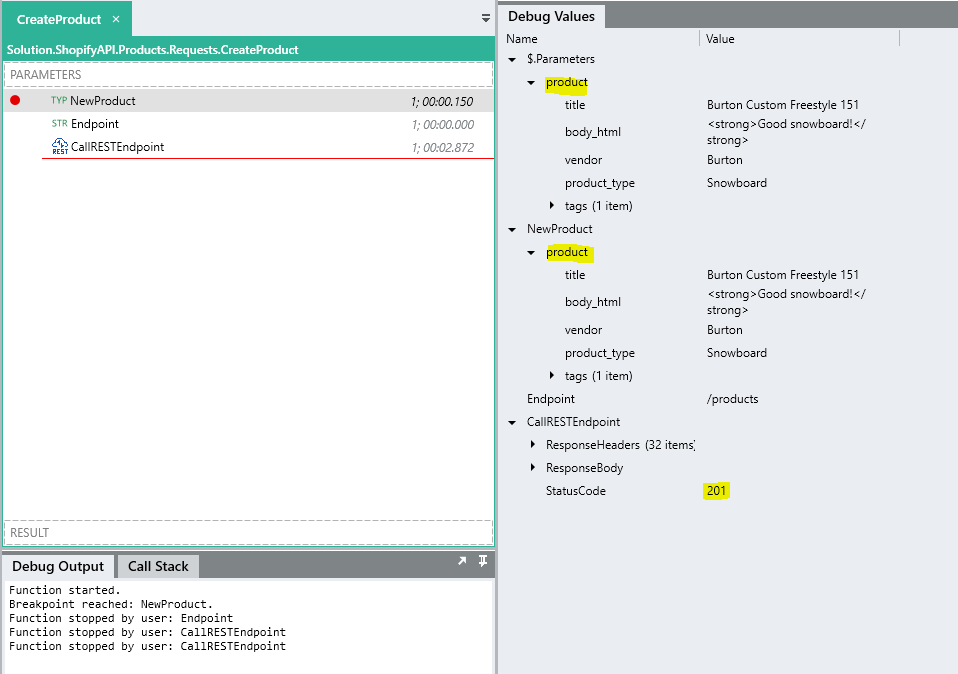
Debug ➤ the CreateProduct function and add debug input parameter values for the new product.
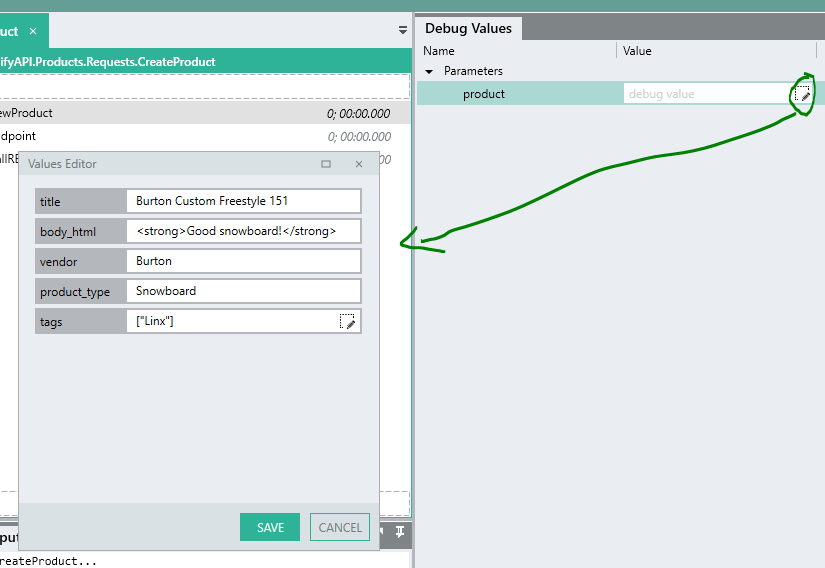
Add some breakpoints and logging to see how the input data is assigned to a local instance of the NewProduct type and then submitted as a JSON body with a successful 201 - Created response being returned.
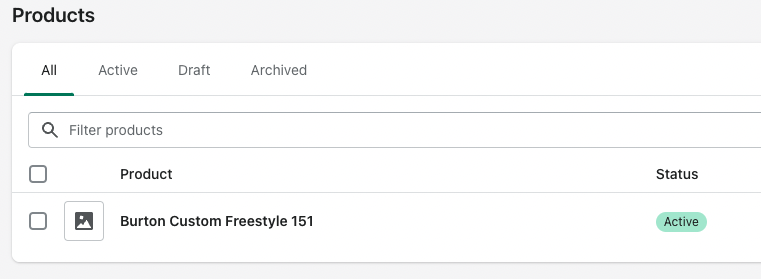
A new product should be visible on the Shopify products dashboard:
You can then import the response as a new user defined type by first setting the Output type of the CallRESTEndpointFNC to type String .
When a new product is now created, you can import the response body as a new type and then use this object to structure the response data like we did before.
The newly added details and some metadata including the new id are then available in subsequent functions such as logging them to a database with a ExecuteSQLFNC or writing to a file using a TextFileWriteFNC .