Consuming REST APIs
You are are able to make HTTP requests to any REST API using Linx. This allows you to connect to many of the main enterprise platforms (Google, Microsoft, Shopify etc.) as well as share data between applications.
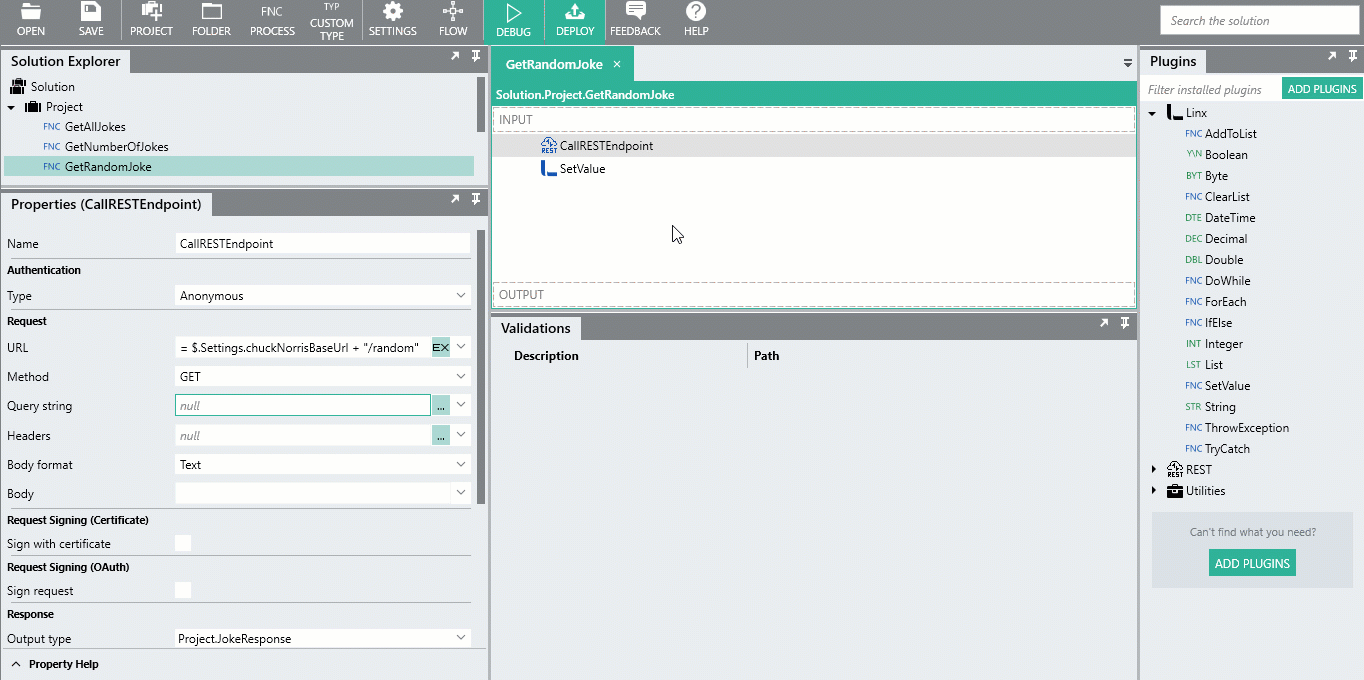
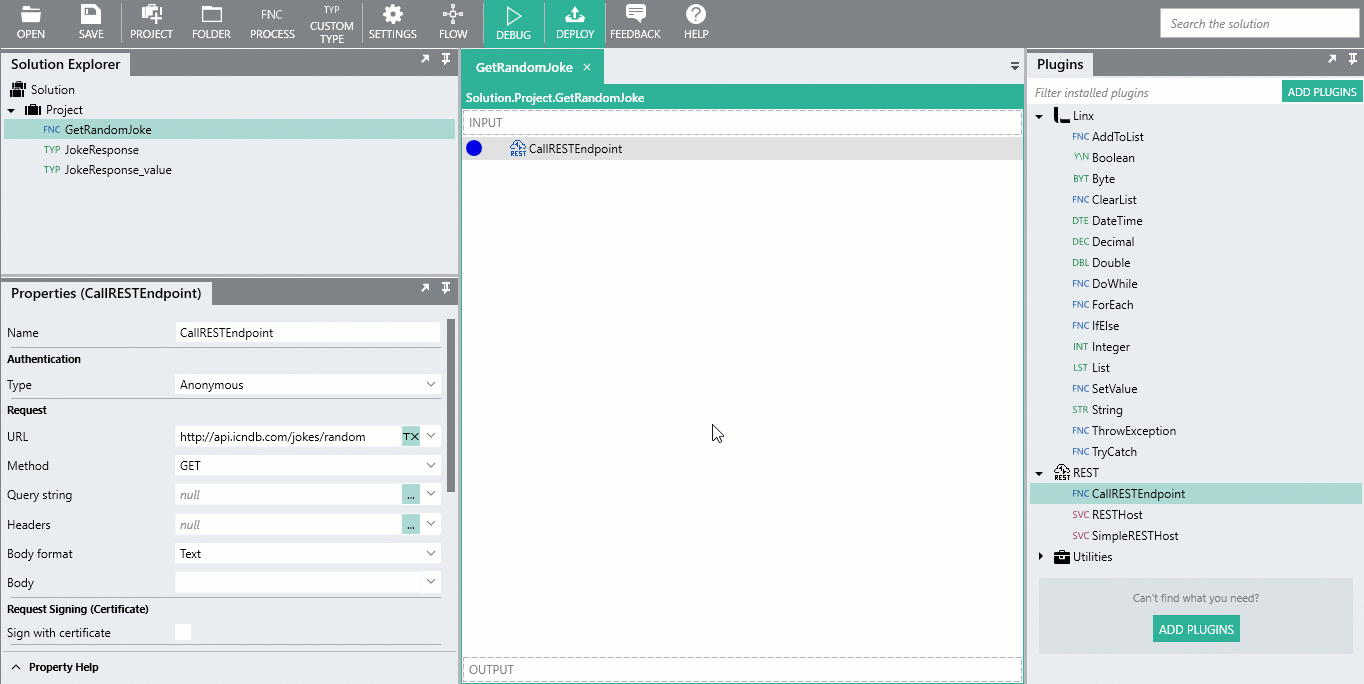
Connect to any REST API using the CallRESTEndpointFNC from the REST plugin.
The below sections are covered in this article:
CallRESTEndpoint Properties:
Authenticating requests:
Handling responses:
- Response status codes
- Setting the output type
- Import from API Documentation
- Import from an initial response
Please note the terms ‘Process’ and ‘Custom Type’ have been depreciated and have been replaced with ‘Function’ and ‘Type’ respectively. More details here.
CallRESTEndpoint Properties
The CallRESTEndpointFNC has the following properties which you will need to configure differently depending on the request type.
Authentication
The authentication properties refer to the built-in authentication structures created by Linx when a request is made.
Type
The type of built-in authentication format to use:
- Anonymous
- Basic
- Digest
- Windows
The following authentication schemes must be custom configured in the header or query of the request , for these schemes the Authentication Type property must be set to Anonymous:
- HTTP Bearer
- API Key
- OAuth 2.0
For authentication schemes that require custom authorization such as API Key or Bearer tokens, you will need to add this information to the respective part of the request such as the header.
For authentication schemes requiring certificate request signing or OAuth encryption key signing, these options are available in separate Properties.
Request
The below properties relate to the values needed to make the initial request.
Method
The HTTP Method of the request.
Linx supports the following HTTP methods when making REST requests:
GET: Typically used to retrieve information, you are unable to supply arequest bodyusing this method.POST: Typically involves sending information in therequest bodyto create an entity on the external system.PUT: Typically involves sending information in therequest bodyto update an entity on the external system. This results in the entities details being completely replaced.PATCH: Typically involves sending information in therequest bodyto update an entity on the external system. This results in the entities details being partially updated.DELETE: Typically used to remove entities from an external system, you are unable to supply arequest bodyusing this method.HEAD: Similar to theGETmethod, except no response body is returned, rather information is returned in the response headers.
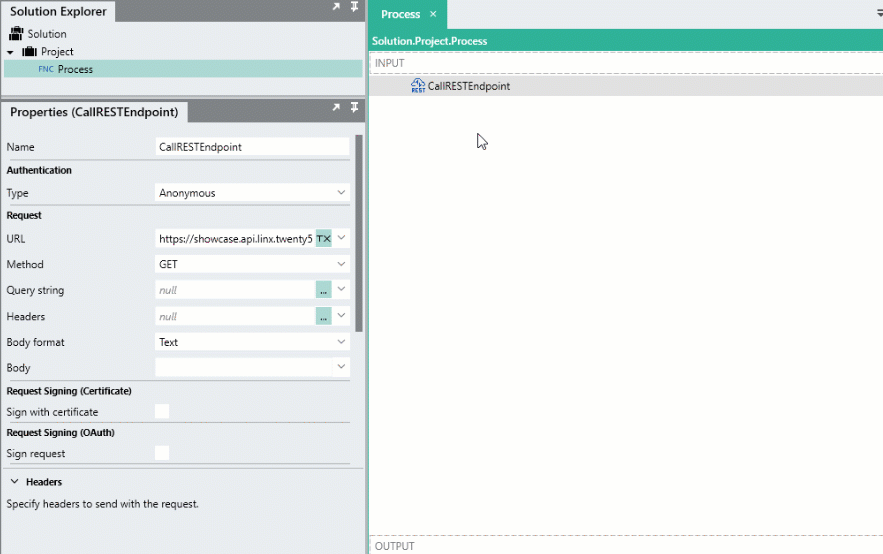
URL
The URL of the endpoint to request.
An example of a REST endpoint URL:
https://graph.microsoft.com/v1.0/users
You are able to set this property as:
-
TX: Plain text, this value will always remain the same.
Caution:Hard-coding a request URL may lead to issues if versions of APIs change or if you need to change environments.
- EX: Using an expression you are able to create dynamic URLs at runtime like the below:
The result of the above expression at runtime would be similar to the below := $.Settings.MicrosoftGraphAPI_BaseURI + "/users/"+ $.Input.User_IDhttps://graph.microsoft.com/v1.0/users/1227272-ASSDSD-2332349
Query string
You are able to add query parameters to the request which will then be URL encoded and will be appended onto the end of the request URL.
Typical usage involves submitting query values that are used for filtering on the target system.
In order to add query parameters, expand the Query string property of the CallRESTEndpointFNC
and add the query parameters.
It is advised that any query string values are added to the Query string property of the CallRESTEndpointFNC . This will ensure that the correct URL encoding takes place.
For example, if you made a request to https://graph.microsoft.com/v1.0/users with the below query parameters:
- email :
support@linx.software - name:
Team Linx
At runtime, the above query parameters will be URL encoded and appended onto the request URL as the query string:
https://graph.microsoft.com/v1.0/users?email=support%40linx.software&name=Team+Linx
You are able to set the query parameters as plain text, a $.Setting ![]() value or a result of an expression.
value or a result of an expression.
Headers
In the Header property, you are able to add header parameters to the request in the format of Name : Value pairs.
Linx automatically includes the following headers when making a request:
-
Content-Type: Depending on what was set as the Body format. -
Content-Length: The size of the request body. -
Authorization: Applicable when selecting theBasicbuilt-in authentication Type.
Custom authentication headers can be appended to this list by expanding the Headers property.
Typically this would involve authorization credentials being added to the headers in the case of Bearer or API Key authentication schemes.
See more about submitting custom authorization headers here.
In order to add header parameters, expand the Headers property of the CallRESTEndpointFNC and add your parameters.
You are able to set the header parameters as plain text, a $.Setting![]() value or a result of an expression.
value or a result of an expression.
Body format
This property refers to the Content-Type of the request body being sent.
The following types are available with their respective Content-Type header:
- Text:
text/plain; charset=utf-8 - XML:
application/xml; charset=utf-8 - JSON:
application/json; charset=utf-8 - Stream: No
Content-Typeheader is automatically added, you will need to supply the relevantContent-Typeheader specified by the target API. - URL encoded content:
application/x-www-form-urlencoded - Multi-part encoded content:
multipart/form-data; boundary=#boundaryvalue#
Whatever data value is in the Body at runtime, will be serialized into the Content-Type set by the Body format.
Body
This is where the data reference for the request body is set is set.
The data object referenced in the Body will be formatted by Linx automatically depending on the Body format.
Depending on what Body format is selected the available Body options will differ.
Typically, you would reference a CustomTYP as this value.
Response
This section allows you to configure the structure of the data that Linx will deserialized the response being returned from the web service into.
Output type
The type (basic or complex) of data structure to deserialized the response body into.
If you create a CustomTYP and you have formatted your response accordingly, you can point the Output type field at your user defined CustomTYP . After the request has executed, Linx will map the returned result to the specified structure.
Settings
Handle all status codes
Default: False
If left as False, an exception will be thrown at runtime if a HTTP Status Code not in the [200-299] range is returned (typically 4xx, 5xx).
To not throw an explicit exception, select the Handle all status codes . The UI will display 2 execution paths – Success and Error.
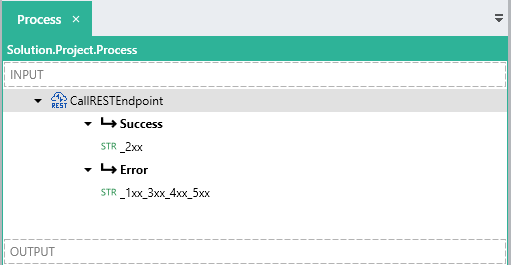
Responses with the HTTP Status Code in the range of [200 - 299] will go into the Success execution path, while all other responses will go into the Error execution path.
Invalid requests, e.g. invalid hostnames, will throw an explicit exception, and will not go into the Error execution path.
Timeout
The timeout value (in milliseconds) for the request.
If a request takes longer than this timeout value then a exception similar to the below will be shown:
Exception at CallRESTEndpoint:
Process.CallRESTEndpoint: Timeout of 100000ms reached. Task cancelled.
Typically this would indicate an issue on the server side, however with testing you must determine what the appropriate timeout value for this property is.
Timeouts are used to avoid ‘bottlenecking’ or ‘hanging’ in your application, whereby process Function flows may ‘stack up’ if a request is being attempted for too long.
Max response content size
The maximum amount of bytes response content can contain.
The purpose of this is to limit the amount of content retrieved in cases where you may request a heavy content URL, things such as incorrect URLs leading to full web pages are an example. If the size of the response is over this limit then the request will fail and an exception similar to the below will be shown:
Exception at CallRESTEndpoint:
Process.CallRESTEndpoint: Cannot write  more bytes to the buffer than the configured maximum buffer size: 65536.
In order to retrieve content over this size, increase the Max response content size of the CallRESTEndpointFNC to the desired size.
Authenticating requests
Authenticating requests in Linx has several approaches which depend on the security level and design choices of the target API.
The below sections highlight some of the most common authentication methods used in the industry today as well as how to submit requests with the relevant authentication in Linx.
Anonymous
This is the default configuration, no built in authentication credentials are submitted with the request.
If custom authentication credentials are required such as API keys or Bearer tokens then leave the Type as Anonymous.
HTTP Basic
Basic authentication refers to base64 encoded(username:password) credentials included in a Authorization header like below:
Authorization = Basic bXl1c2VybmFtZTpteXBhc3N3b3Jk
To submit HTTP Basic authentication credentials with a request:
- Set the CallRESTEndpointFNC Authentication Type to
Basic. - Complete the Username and Password fields that appear in the Properties.
When a request is made, the Username and Password will be automatically encoded and formatted into the required format for the Authorization header.

API Key
API Key authentication involves submitting a key in one of several places in a request (header, query). These API keys are usually generated on the source system front-end or provided by their support team. Due to the varying formats of API Key authentication, you will need to custom configure the appropriate API Key.
To submit API Key authentication credentials with a request:
-
Set the CallRESTEndpointFNC Authentication Type to
Anonymous. -
Expand the Headers editor
-
Add a new
Headerwith the Name of the API Key i.e.X-API-KEY,API-KEYetc. -
For the Value , add the API Key reference.
The API Key can be hardcoded as plain text, retrieved from a previous function such as an ExecuteSQLFNC or reference a $.Setting.
The example below submits a X-API-KEY header containing the API Key which is stored as a setting.
You are also able to add API Keys as query string values by expanding the Query string editor and adding the respective key in a similar format to the example above.
Bearer Tokens
Bearer token authentication involves submitting a token in the Authorization header with a value of Bearer {token} like below:
Authorization : Bearer eyJ0eXAiO ... 0X2tnSQLEANnSPHY0gKcgw
To submit a Bearer token with a request:
-
Set the CallRESTEndpointFNC Authentication Type to
Anonymous. -
Expand the Headers editor
-
Add a new Header with the Name of
Authorization. -
For the Value , open the expression editor.
-
Add the text
"Bearer " -
Combine the above with a reference to the
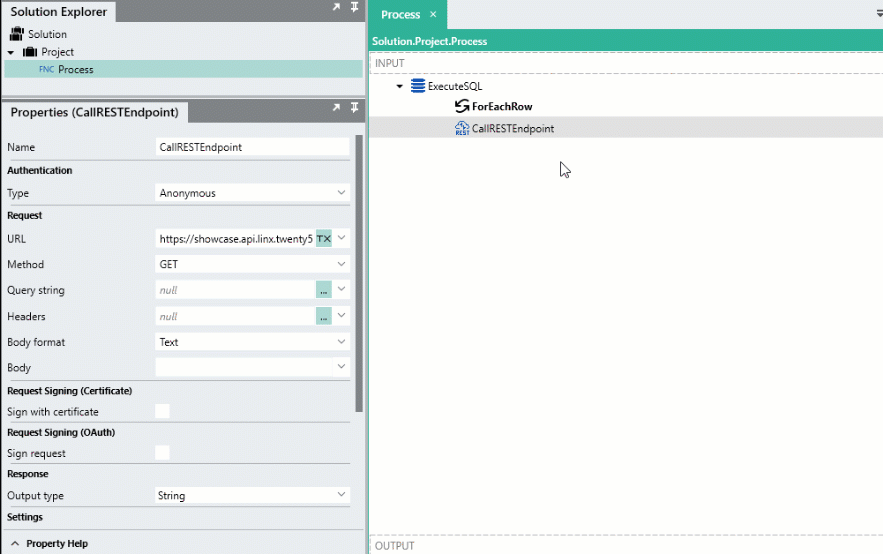
{token}value like below:= "Bearer " + ExecuteSQL.ForEachRow.TokenThe token value can be hardcoded as plain text, retrieved from a previous function such as an ExecuteSQLFNC or reference a $.Setting.
The example below retrieves a token value from a database using an ExecuteSQLFNC , then , using an expression, the Authorization header value is built up in the format of Bearer {token from database}:
Handling responses
There are several approaches for handling responses with a CallRESTEndpointFNC . It is intentionally left as dynamic as possible in order to give maximum flexibility.
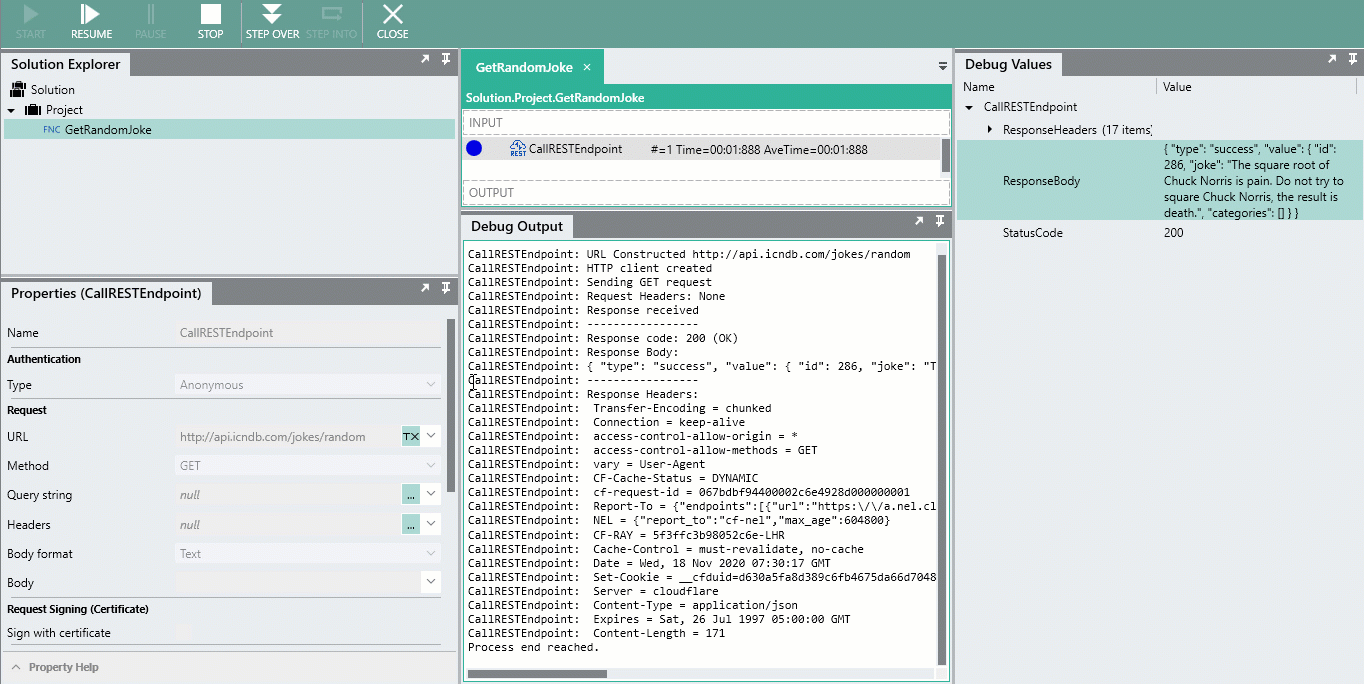
When you make a request using a CallRESTEndpointFNC , a response body will be returned (including no-content). The data contained in the response body will then be accessible to use in further Linx functions and services, for example, adding retrieved order records to a database.
The CallRESTEndpointFNC has the following output values:
- ResponseHeaders: Header list in the format
key:valuepairs which contain metadata associated with the response. - ResponseBody: The
Response Bodyof the object. This wil deserialized into the structure set as the Output type. - StatusCode: The HTTP Status Code of the request i.e.
200,404.
Response status codes
The most common response HTTP status codes are discussed below with regards to what they indicate and what troubleshooting can be done, for a full list of description visit here.
| Status Code | Description | ||
|---|---|---|---|
1XX |
Informational |
||
2XX |
Success |
The response was successful. | |
3XX |
Redirection |
The response contains resources that should be used in subsequent requests or redirection requests. | |
4XX |
Client Error |
The submitted request contained invalid formatting. | |
5XX |
Server Error |
A critical error occurred on the server-side of the request. |
Common
| Status Code | Phrase | Description | Probable error |
|---|---|---|---|
200 |
OK |
Successful request | |
401 |
Unauthorized |
Security validation failures or authentication failures. | Incorrect authentication credentials or incorrect format of submitted authorization credentials. |
400 |
Bad Request |
Indicates issue with request, typically an incorrect body has been submitted. |
Incorrect body format or type. |
415 |
Unsupported Media Type |
Indicates a request body has been submitted which is not allowed. |
Indicates that either an incorrect content-type header has been included or that the response body submitted does not correspond to an accepted format. |
500 |
Internal Server Error |
Indicates fatal error on the server side of the request, typically error details are excluded from this response. | Due to the issue being on the server-side, there is very little you can do due to the limited error information. |
Example of a unsuccessful request:
 Exception at CallRESTEndpoint:
 Process.CallRESTEndpoint : Response status code does not indicate success: 404 (NotFound).
To not explicitly throw an exception when an error status code is returned, select the Handle all status code property.
Setting the output type of the response
Typically, responses are returned as JSON (and XML occasionally), and this response body would normally contain several fields and objects related to the request.
An example of a JSON response
    {
      "id": "4668200040404",
      "inv_number": "gg_456",
      "date": "2020-06-15T11:55:01.7400485+02:00",
      "customer_id": "701",
      "total": 450.0,
      "status": "paid"
    }
By default, the CallRESTEndpointFNC Output type is set to a StringTYP . This means the whole response is returned from the function as text and no deserialization is performed on the data.
In order to make the response easier to manage and work with, you are able to create CustomTYP objects and set these as the output type of the CallRESTEndpointFNC function.
The response body will then be deserialized into this object, the individual fields and objects will then be available to use in conjunction with other functions in your process, operation or event.
Import from API Documentation
Typically, API documentation will provide examples of request and responses ( An example can be found from Microsoft Graph here ).
{
  "id": "contoso.sharepoint.com,2C712604-1370-44E7-A1F5-426573FDA80A,2D2244C3-251A-49EA-93A8-39E1C3A060FE",
  "displayName": "OneDrive Team Site",
  "name": "1drvteam",
  "createdDateTime": "2017-05-09T20:56:00Z",
  "lastModifiedDateTime": "2017-05-09T20:56:01Z",
  "webUrl": "https://contoso.sharepoint.com/teams/1drvteam"
}
You can copy this JSON out and import it as a CustomTYP.
In cases where the API documentation is lacking, you are able to retrieve a response by following the below section
Import from an initial request’s response
If the API documentation is limited, you are able to copy the text returned in the response body as a CustomTYP. This is done making a request to the endpoint and using the response as the base template for the CustomTYP.
In order to do this:
- Right click on the CallRESTEndpointFNC in your
processFunction and click Enable Logging. - Set the Output type to
String - Debug your Process.
- Copy the
response bodyreturned in the Debug Output . - Right-click on a Project in the Solution Explorer.
- Click Import Custom Type
- Paste the copied text in the editor and update the Name .
Be aware however, using this approach does leave room for error as you are relying on a single response to determine the structure for all subsequent responses. It is therefore suggested that you use several example responses to ensure all the necessary fields are added, additionally the more "safe" route is to define your Custom Type using a field editor or using JSON/XML schema.
If a response is returned that does not conform to the Custom Type then an exception will be thrown. If you are missing fields or need to alter the types, you are always able to add and edit a Custom Type’s fields using the field editor.
You are then able to reference the CustomTYP in the Output type of the CallRESTEndpointFNC.
Next steps?
Get started with consuming REST APIs.