Authentication
The below sections cover the implementation of the following Open API security schemes in RESTHost svc
Feel free to contact support@linx.software and we'll assist.
Note: You are able to implement additional custom authentication in the OperationEvent_BeforeOperation EVT, find out more here.
Sample: Take a look at the this sample Solution to help in understanding of secuirty implementation.
Basic Authentication
The following sections describe how to secure your RESTHost svc operations by using the HTTP Basic security scheme and custom authentication logic.
Applying security
In order to apply or attach an authentication scheme to an operation, you must first add the security scheme globally to the API definition, and then apply it to specific operations.
In the API definition, in the securitySchemes section, include the following “BasicAuth” security scheme definition (this is the arbitrary name you give the scheme):
    components:                 # Securirty schemes available to apply.
      securitySchemes:
          BasicAuth:            # Arbitary name for security scheme.
              type: http        # Can be one of 'http' or 'apiKey'.
              scheme: basic     # Type of HTTP scheme
Then, apply the security scheme to your chosen operation by adding “BasicAuth” (arbitrary name you gave the scheme) as a security scheme to the path in the API Definition:
  /helloworld:
    get:
      summary: Return the text 'Hello World!'
      description: Return the text 'Hello World!'
      operationId: HelloWorld
      security:
       - BasicAuth: []
      responses:
        '200':
          description: OK (200)
          content:
            application/json:
              schema:
                type: string
Implementing custom authentication
In the above example, operation HelloWorld, will now have the HTTP Basic security scheme named BasicAuth attached to it.
This will mean that when a request is made to the /helloworld endpoint:
-
The built-in security protocols validate the format of the Basic Authentication credentials in the form of the
Authorizationheader containing the valueBasicbase64encoded(username:password)."Key":"Authorization", "Value": [ "Basic YWRtaW46YWRtaW4=" ] -
The OperationEvents _AuthenticateEVT event is then executed which contains custom logic to validate the credentials (described below).
Linx implicitly handles the verification of the format of the credentials, that is to say that a check is done that the credentials are submitted in the Authorization header. However, custom logic still needs to be added in the OperationEvents_Authenticate EVT in order to extract, decode and validate the credentials according to custom rules.
Parsing Headers
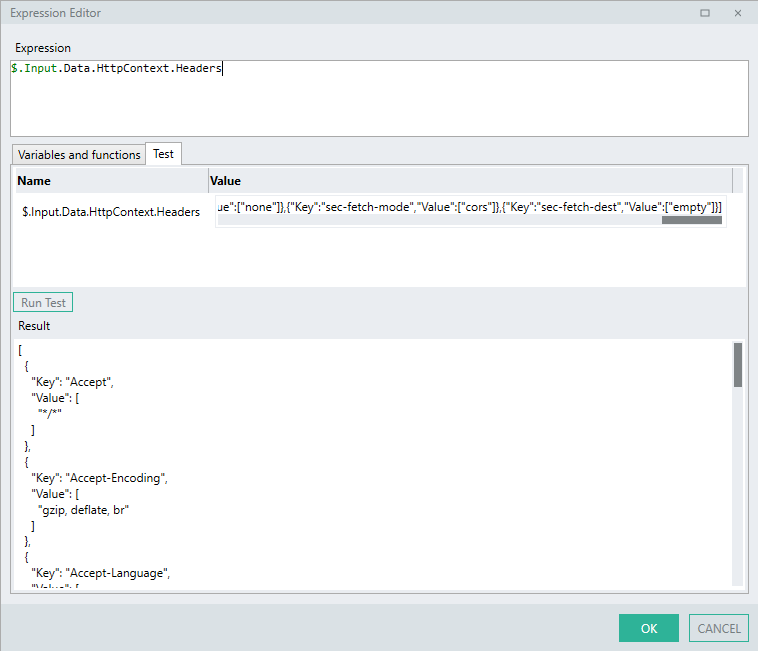
In order to validate these credentials in OperationEvents_Authenticate EVT, you need to parse the $.Input.Data.HTTPContext for the incoming headers for this Authorization header.
"Headers": [{
"Key":"Authorization",
              "Value": [
                        "Basic YWRtaW46YWRtaW4="
                       ]
}]
To parse the incoming headers, you are able to take 2 approaches:
-
Simple: Extract the value by using Linx functions to create a looping , decision structure.
-
Complex: Extract the value in a single expression making use of linq.
Simple
The 'simple' approach can be used by users who are not comfortable using complex linq expressions.
Linx Designer view - Authenticate Event - Custom Basic Authentication
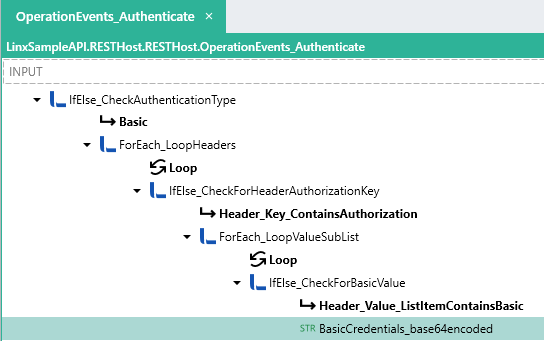
Process breakdown:
Described below is a custom logic flow which will result in the HTTP Basic encoded credentials being extracted from the HTTP Context Headers. (Note: This is for demonstration purposes only and your exact approach may differ).
-
IfElse_CheckAuthenticationType : An IfElse FNC performs a check on the AuthenticationData SchemeType.
-
Basic : If the
SchemeType == BasicAuth:-
ForEach_LoopHeaders: A ForEach FNC performs a loop through the
HTTPContext.Headerslist:-
IfElse_CheckForHeaderAuthorizationKey : An IfElse FNC performs a check on the current loop header
Keyvalue. -
Header_Key_ContainsAuthorization : If the current loop header
Keyvalue contains the stringAuthorization.-
ForEach_LoopValueSubList : A ForEach FNC performs a loop through the
ForEach_LoopHeaders.Loop.Valuelist. This means that the innerValuelist of that particular header item is being looped through. -
IfElse_CheckForBasicValue: An IfElse FNC performs a check on the current loop
Valueitem value.-
Header_Value_ListItemContainsBasic: If the current loop
Valueitem starts with the string 'Basic ': -
BasicCredentials_base64encoded: A STRTYP is set to the value of the current loop
Valueitem with the text 'Basic ' replaced.
-
-
-
-
The above logic will result in the base64 encoded credentials being extracted from the Authorization header.
In order to validate the credentials, you will need to decode them and validate the according to custom rules which is described further below.
Complex
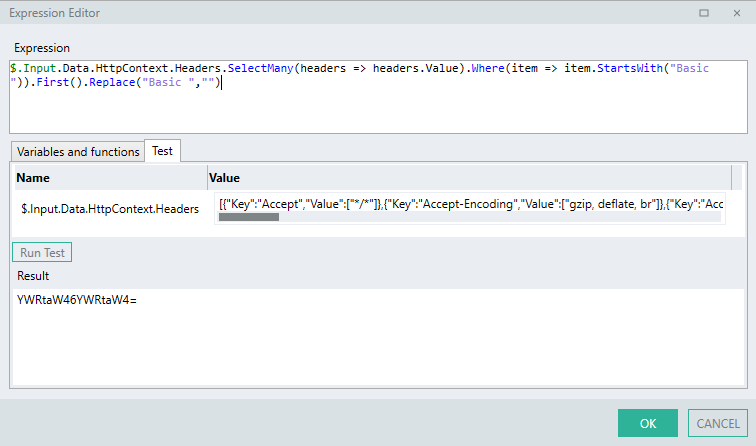
You can achieve the exact same result as the above process Function using a single Linx expression involving linq operators.
$.Input.Data.HttpContext.Headers.SelectMany(headers => headers.Value).Where(item => item.StartsWith("Basic ")).First().Replace("Basic ","")
Expression breakdown:
-
The LST TYP of all headers are returned.
$.Input.Data.HttpContext.Headers
- All the items contained in the
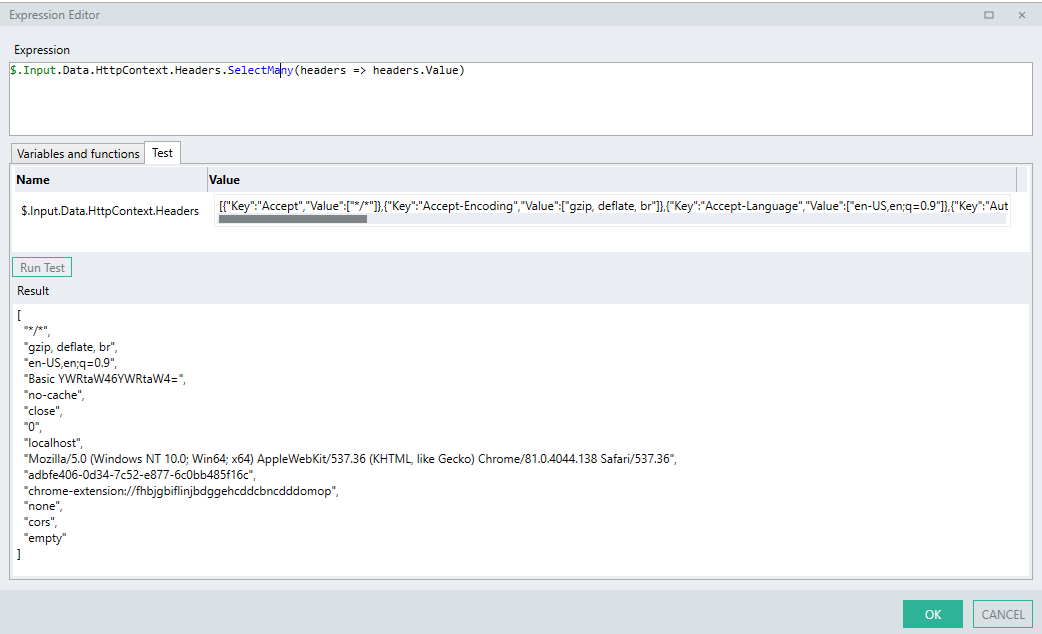
ValueLST TYPof all theHeaders..SelectMany(headers => headers.Value)
- The LST TYP of values for each
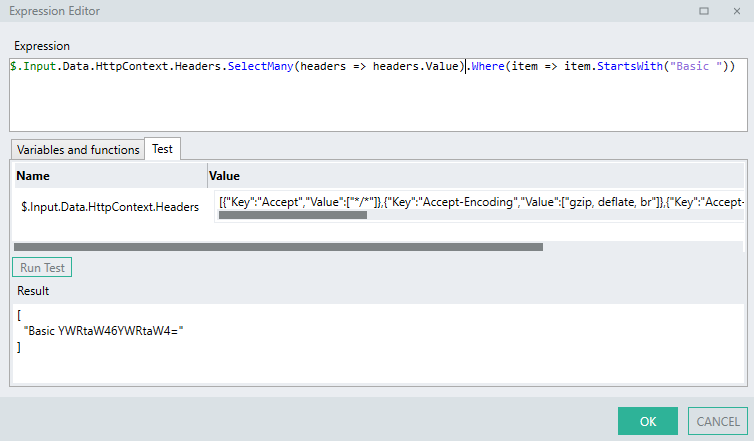
headeris then filtered for items that start with the text"Basic "..Where(item => item.StartsWith("Basic"))
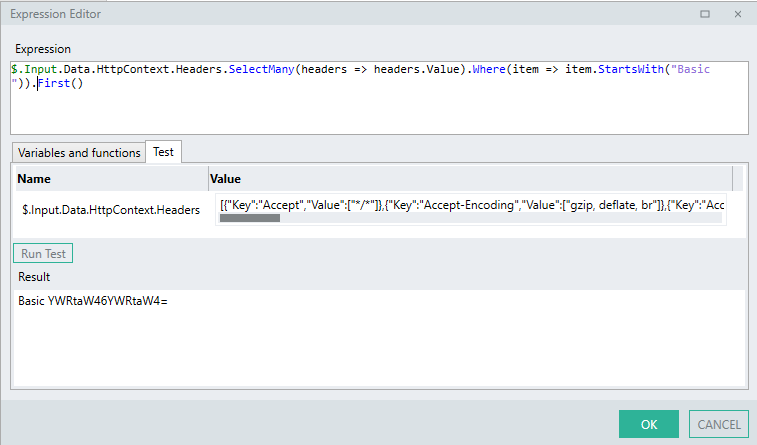
- The first item in the resulting LST TYP is then extracted.
.First()
- Finally, the text
"Basic "is removed..Replace("Basic ","")
The above expression logic will result in the encoded credentials being extracted from the Authorization header into a STR TYP.
In order to validate the credentials, you will need to decode and validate them according to custom rules which are described further in this section.
Decode credentials
Basic authentication credentials in the Authorization header are received the form of:
base64encoded(username:password)
This base64 string then needs to be decoded into a UTF-8 STR TYP so that you are able to extract the username and password fields respectively.
Once you have parsed the headers for the Basic Authorization credentials you now have to decode them from base64 so that you are able to interact with the specific credentials.
The resulting STR TYP will be in the format username:password
Decoding a base64 STR TYP in Linx involves converting the base64 STR TYP into a LST<BYT> TYP format and then converting it into UTF-8 format.
The above can be achieved with the following expression:
BasicCredentials_base64encoded.ToBytesFromBase64().ToString("UTF8")
-
First, the extracted
base64encoded STR TYP is set as the base of the expression.BasicCredentials_base64encoded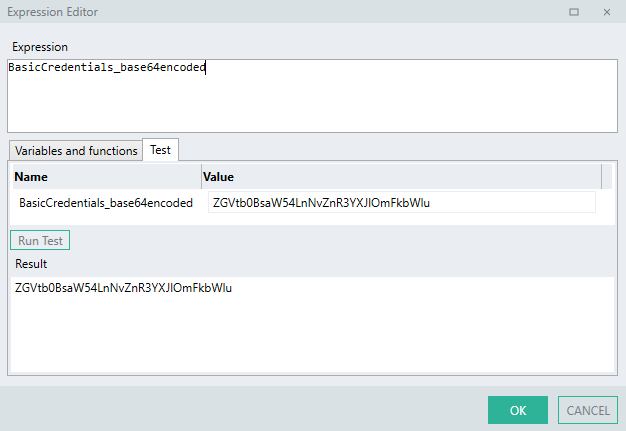
*The :
BasicCredentials_base64encodedabove is a STR TYP that holds the value of the extracted credentials from the step above.
- The
base64encoded STR TYP is then converted into a list of bytes ( LST<BYT> TYP ) using the built in expression:.ToBytesFromBase64()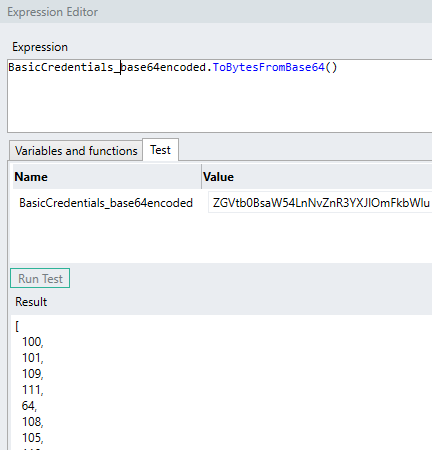
-
The LST<BYT> TYP is then converted into a STR TYP in the
UTF-8format:.ToString("UTF-8")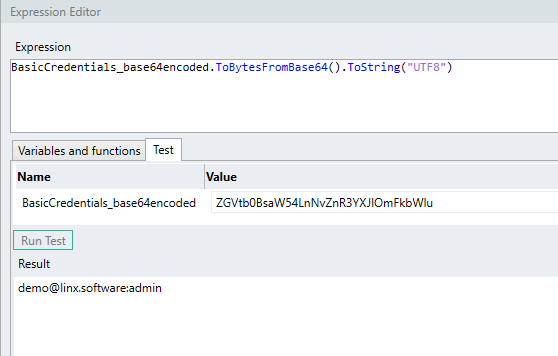
The result of the above example is:
demo@linx.software:admin
Now what would typically happen is that you would then extract the username and password by using expressions to to split the string according to the ':' character, which can be done with the following expressions:
-
To extract the
usernameor first credential:BasicCredentials_base64decoded.Substring(0,BasicCredentials_base64decoded.IndexOf(":"))A
.Substring()method is used which extracts the characters from the start of thebase64decoded STR TYP up until the position of the ':' character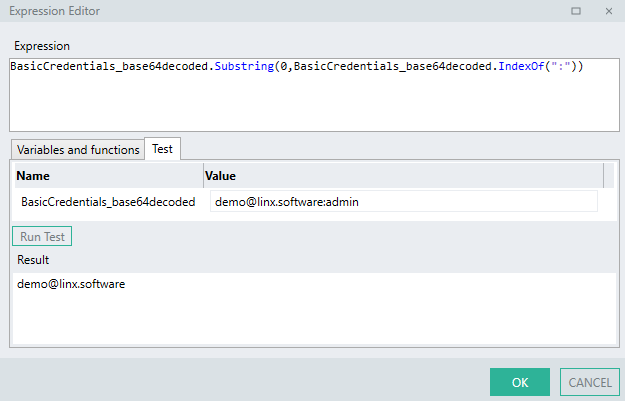
-
To extract the
passwordor second credential:BasicCredentials_base64decoded.Substring(BasicCredentials_base64decoded.IndexOf(":") + 1)A
.Substring()method is used which extracts the characters from the position of the ':' character until the end of the STR TYP.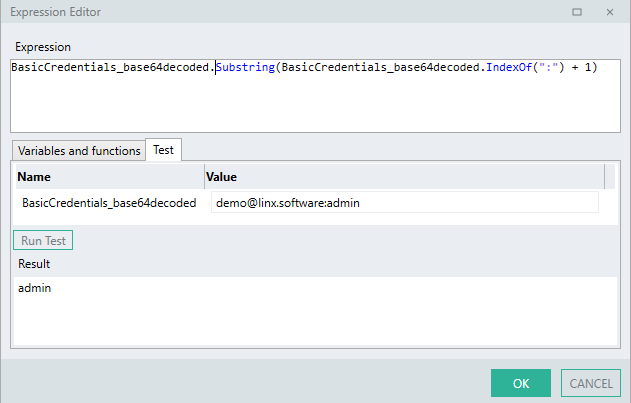
Validate credentials
Now that the credentials have been extracted into their username and password fields, what would typically happen now is that custom logic would need to be added to OperationEvents_AuthenticateEVT in order to validate the credentials in some way.
A typical example would be validating the hashed password against the username from a data source such as a database using an ExecuteSQL FNC .
In the below example, the extracted password is first hashed using a GenerateHash FNC and then compared with the stored hashed password of the user matching the username in the database using an ExecuteSQL FNC.
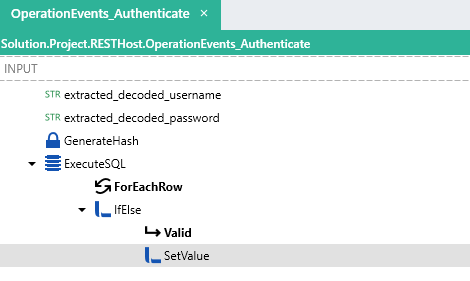
- The
usernamefield is extracted and decoded into a STR TYP. - The
passwordfield is extracted and decoded into a STR TYP. - The ExecuteSQL FNC performs a search on the database and returns an
idwhich matches the credentials, if noidis found then a0is returned. - A check is then done using IfElse FNC to see if the
idis greater than0which results in a Y/NTYP. - If the condition is met, the
IsAuthenticatedresult as well as additional user information of the OperationEvents_AuthenticateEVT is set using a SetValue FNC
Learn more abouting setting the output of this event.
API Key
Applying security
In order to apply an authentication scheme to an operation, you must first add the security scheme globally to the API definition, and then apply it to specific operations.
In your API definition include the following “ApiKeyAuth” security scheme definition (*this is the arbitrary name you give the scheme):
    components:                 # Security schemes available to apply to operations.
      securitySchemes:
          ApiKeyAuth:           # Arbitary name for security scheme.
              type: apiKey      # Can be one of 'http' or 'apiKey'.
              in: header        # Location - can be header,query,cookie
              name: X-API-Key   # Name of Header
Then, apply the security scheme to your chosen operation by adding “ApiKeyAuth” (*this is the arbitrary name you gave the scheme) as a security scheme to the path:
paths:
  /helloworld:
    get:
      summary: Return the text 'Hello World!'
      description: Return the text 'Hello World!'
      operationId: HelloWorld
      security:
        - ApiKeyAuth: []
      responses:
        '200':
          description: OK (200)
          content:
            application/json:
              schema:
                type: string
Implementing custom authentication
In the above example, the operation HelloWorld, will now have an API Key security scheme attached to it.
This will mean that when a request is made to the /helloworld endpoint:
- The built-in security protocols validate the format of the API Key Authentication credentials in the form of the header matching the API Key from the definition.
- The OperationEvents_AuthenticateEVT is then executed which contains custom logic to validate the API Key (described below).
Although the API Key security scheme is applied to an operation, custom logic still needs to be added in the OperationEvents_AuthenticateEVT in order to validate the API Key according to custom rules.
In the OperationEvents_AuthenticateEVT, the incoming request structure will include an AuthenticationData object as an input.
Contained in the AuthenticationData is the API Key object.
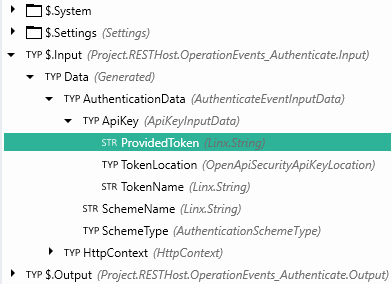
The Input.Data.AuthenticationData.ApiKey will contain the following:
ProvidedToken: API Key value submittedTokenLocation: Location of API Key in request (header,query string,cookie)TokenName: Name of API Key authentication scheme from theAPI definition.
In order to validate the ProvidedToken, you will need to build custom logic.
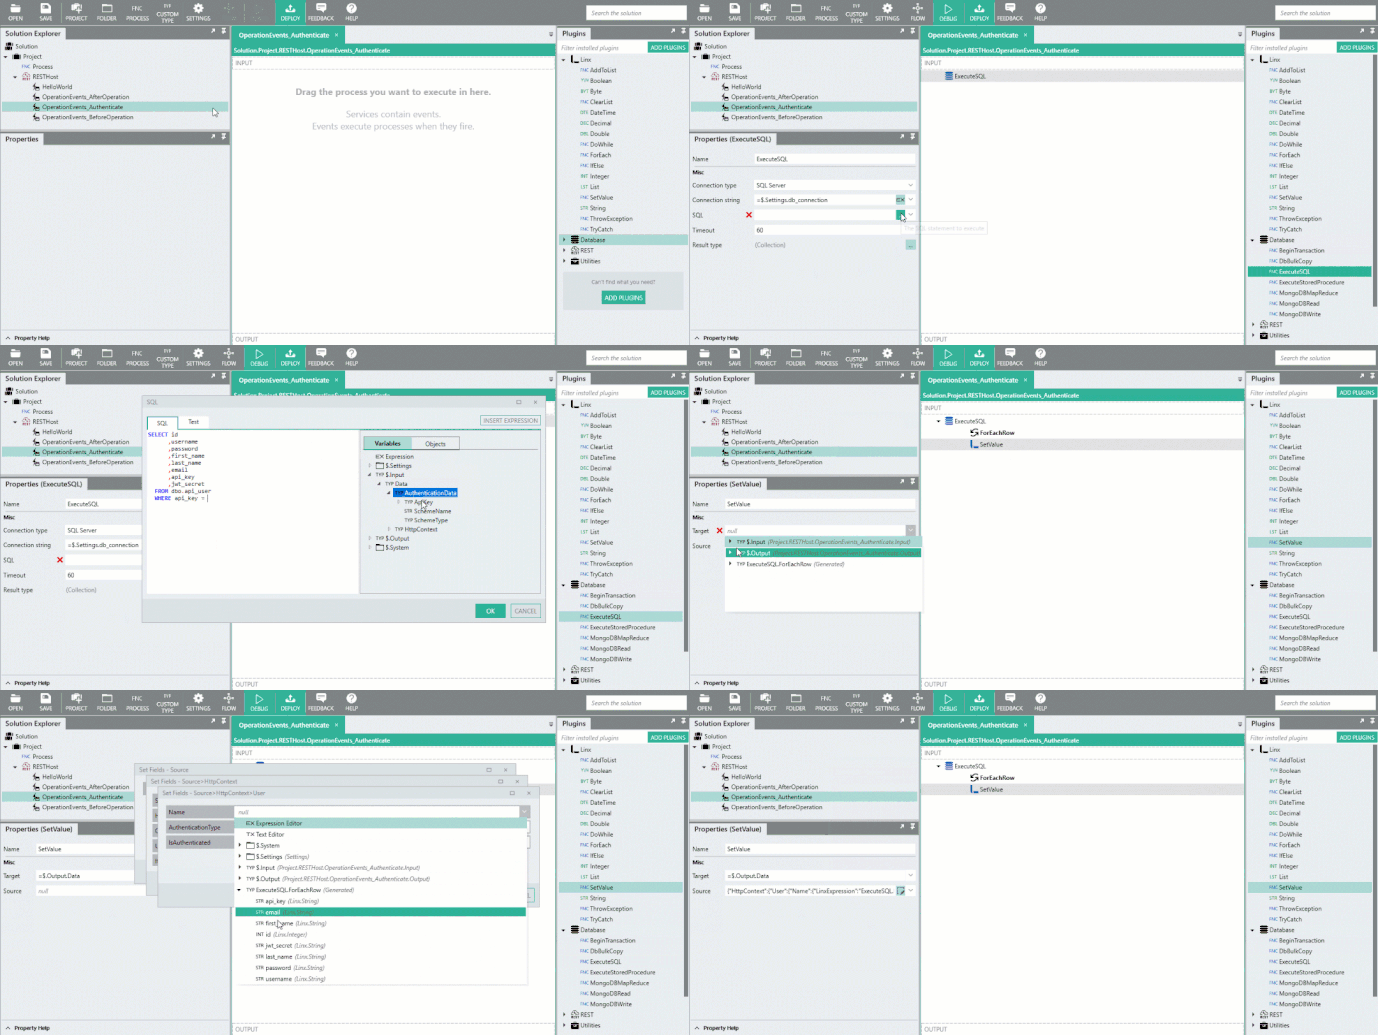
In the example below a database is queried using ExecuteSQL FNC for a record matching the API Key submitted in the request. The ExecuteSQL FNC returns the id and some other fields of the user that matches the ProvidedToken.
The result of the event ($.Output.Data.HttpContext.User.IsAuthenticated) is set along with additional user information.
Linx Designer View
Setting the Authenticated result
For HTTP Basic and API Key security schemes, the OperationEvents_AuthenticateEVT will execute before any events or operations. The $.Output.Data.HttpContext.User.IsAuthenticated of this event will affect the request flow. If this is False then a (401) Unauthorized response is returned, if True then the request flow will continue.
To set the result of the OperationEvents_AuthenticateEVT , you would add a SetValue FNC to OperationEvents_AuthenticateEVT and set Target as the whole $.Output.Data object, then use the ![]() to set the
to set the $.Output.Data.HttpContext.User.IsAuthenticated field to the result of the validation (Y/NTYP), along with any other HTTPContext values that you want to assign.
If the value of the $.Output.Data.HtttpContext.User.IsAuthenticated is not explicitly set, the it will be defaulted to False, in the case the request will fail with a (401) Unauthorized response and the request flow will cease.
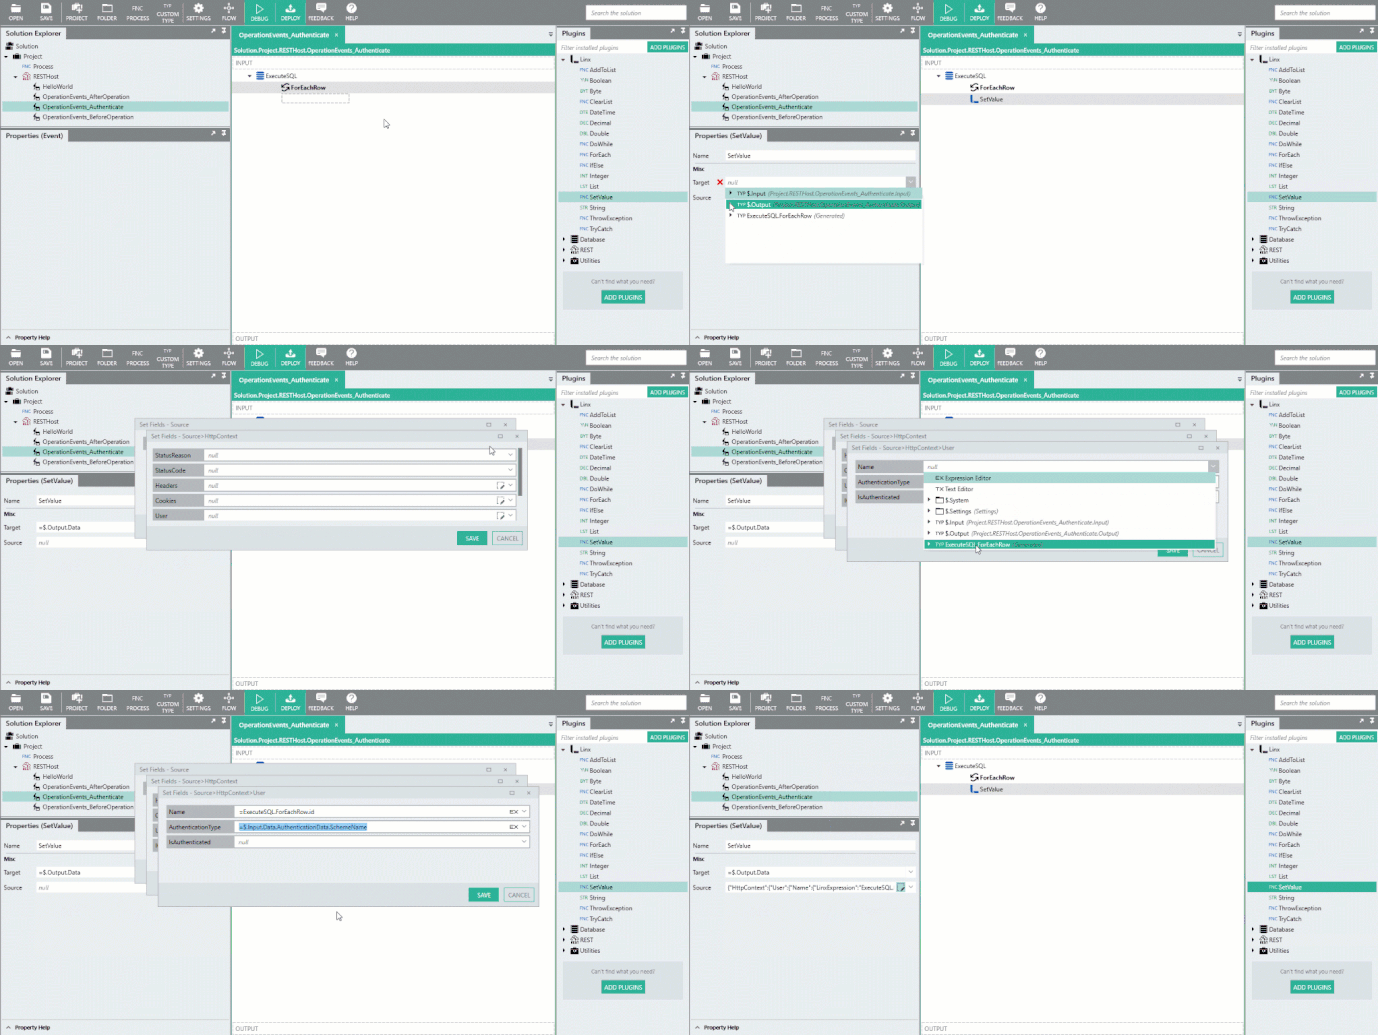
In the below example the $.Output.Data is set as the Target of a SetValue FNC . Then, using the ![]() editor, the
editor, the HttpContext object is expanded and then the HttpContext.User fields are then set as the source.
This allows additional information to be passed in with the request. In this case the id of the authenticated user returned from ExecuteSQL FNC will be passed in the $.Output.Data.HttpContext.User.Name field which can be used in the subsequent operation without having to re-extract this information.
Linx Designer View
Bearer
The HTTP Bearer authentication scheme involves the issuing and receiving of cryptographic 'tokens' which contain authentication information. The advantage of this scheme is that all the verification details are contained in the token itself.
For this demonstration, a RESTHost svc operation will be secured by JWT Tokens. These are digitately signed self-contained verification objects with are used to authenticate requests. Linx has functionality which allows in the generation and verification of these tokens.
Applying security
In order to apply an authentication scheme to an operation, you must first add the security scheme globally to the API definition, and then apply it to specific operations.
In your API definition include the following “Token” (this is the arbitrary name you give the scheme) security scheme definition:
    components:                   # Security schemes available to apply to operations.
      securitySchemes:
          Token:                  # Arbitary name for security scheme.
              type: http          # Can be one of 'http' or 'apiKey'.
              scheme: bearer      # Can be 'basic' or 'bearer'
              bearerFormat: JWT   # Documentation purposes
Then, apply the security scheme to your chosen operation by adding “Token” (this is the arbitrary name you gave the scheme) as a security scheme to the path:
  /helloworld:
    get:
      summary: Return the text 'Hello World!'
      description: Return the text 'Hello World!'
      operationId: HelloWorld
      security:
      - Token: []
      responses:
        '200':
          description: OK (200)
          content:
            application/json:
              schema:
                type: string
Authentication Configuration
JWT Tokens require a secret in order to cryptographically sign them.
In order for Linx to automatically handle the verification of the token, you need to configure the Linx RESTHost svc Auth config to reference this secret (this value must be the same as the one used to generate the token initially).
Once you've imported your API definition, Linx will automatically import the authentication configurations needed.
![]()
However, you still need to reference the secret signing key.
Configure signing key:
-
Add a new
$.Settingvalue to your Solution, this will contain thekeyused to sign the JWT Token. -
Expand the
Auth configproperty of the RESTHost svc using the field editor. -
Reference the new
$.Settingvalue you just created as theValuefield of theSecretkey and save.
Linx Designer View
In the above example, the HelloWorld operation , will now have the Token security scheme attached to it.
This will mean that when a request is made to the /helloworld endpoint:
- The built-in security protocols will automatically verify the JWT Token using the
signing key. If successful the request will proceed, if the token is invalid then a(401) Unauthorizederror response will be returned.
There is no need to create custom authentication logic to verify the token as it is handled by Linx internally based on the configured secret.
However, if you would like to verify the token explicitly and extract the payload, you can do so by following the below sections:
Learn more about generating JWT Tokens.
Learn more about implementing custom logic to verify JWT tokens.
